San Sebastian Cheesecake Recipe
Cheesecake is a dessert that has transcended cultures, evolving through centuries to take on a myriad of forms—from the dense, graham-cracker-based New York-style to the airy, ricotta-filled Italian varieties. Yet, in recent years, a seemingly rustic, burnt-topped version from the Basque Country of Spain has taken the culinary world by storm. This is the San Sebastian Cheesecake—also widely referred to as Basque Burnt Cheesecake—a creation that defies the traditional rules of baking and presentation, while offering an indulgent experience that is rich, creamy, and unexpectedly refined.
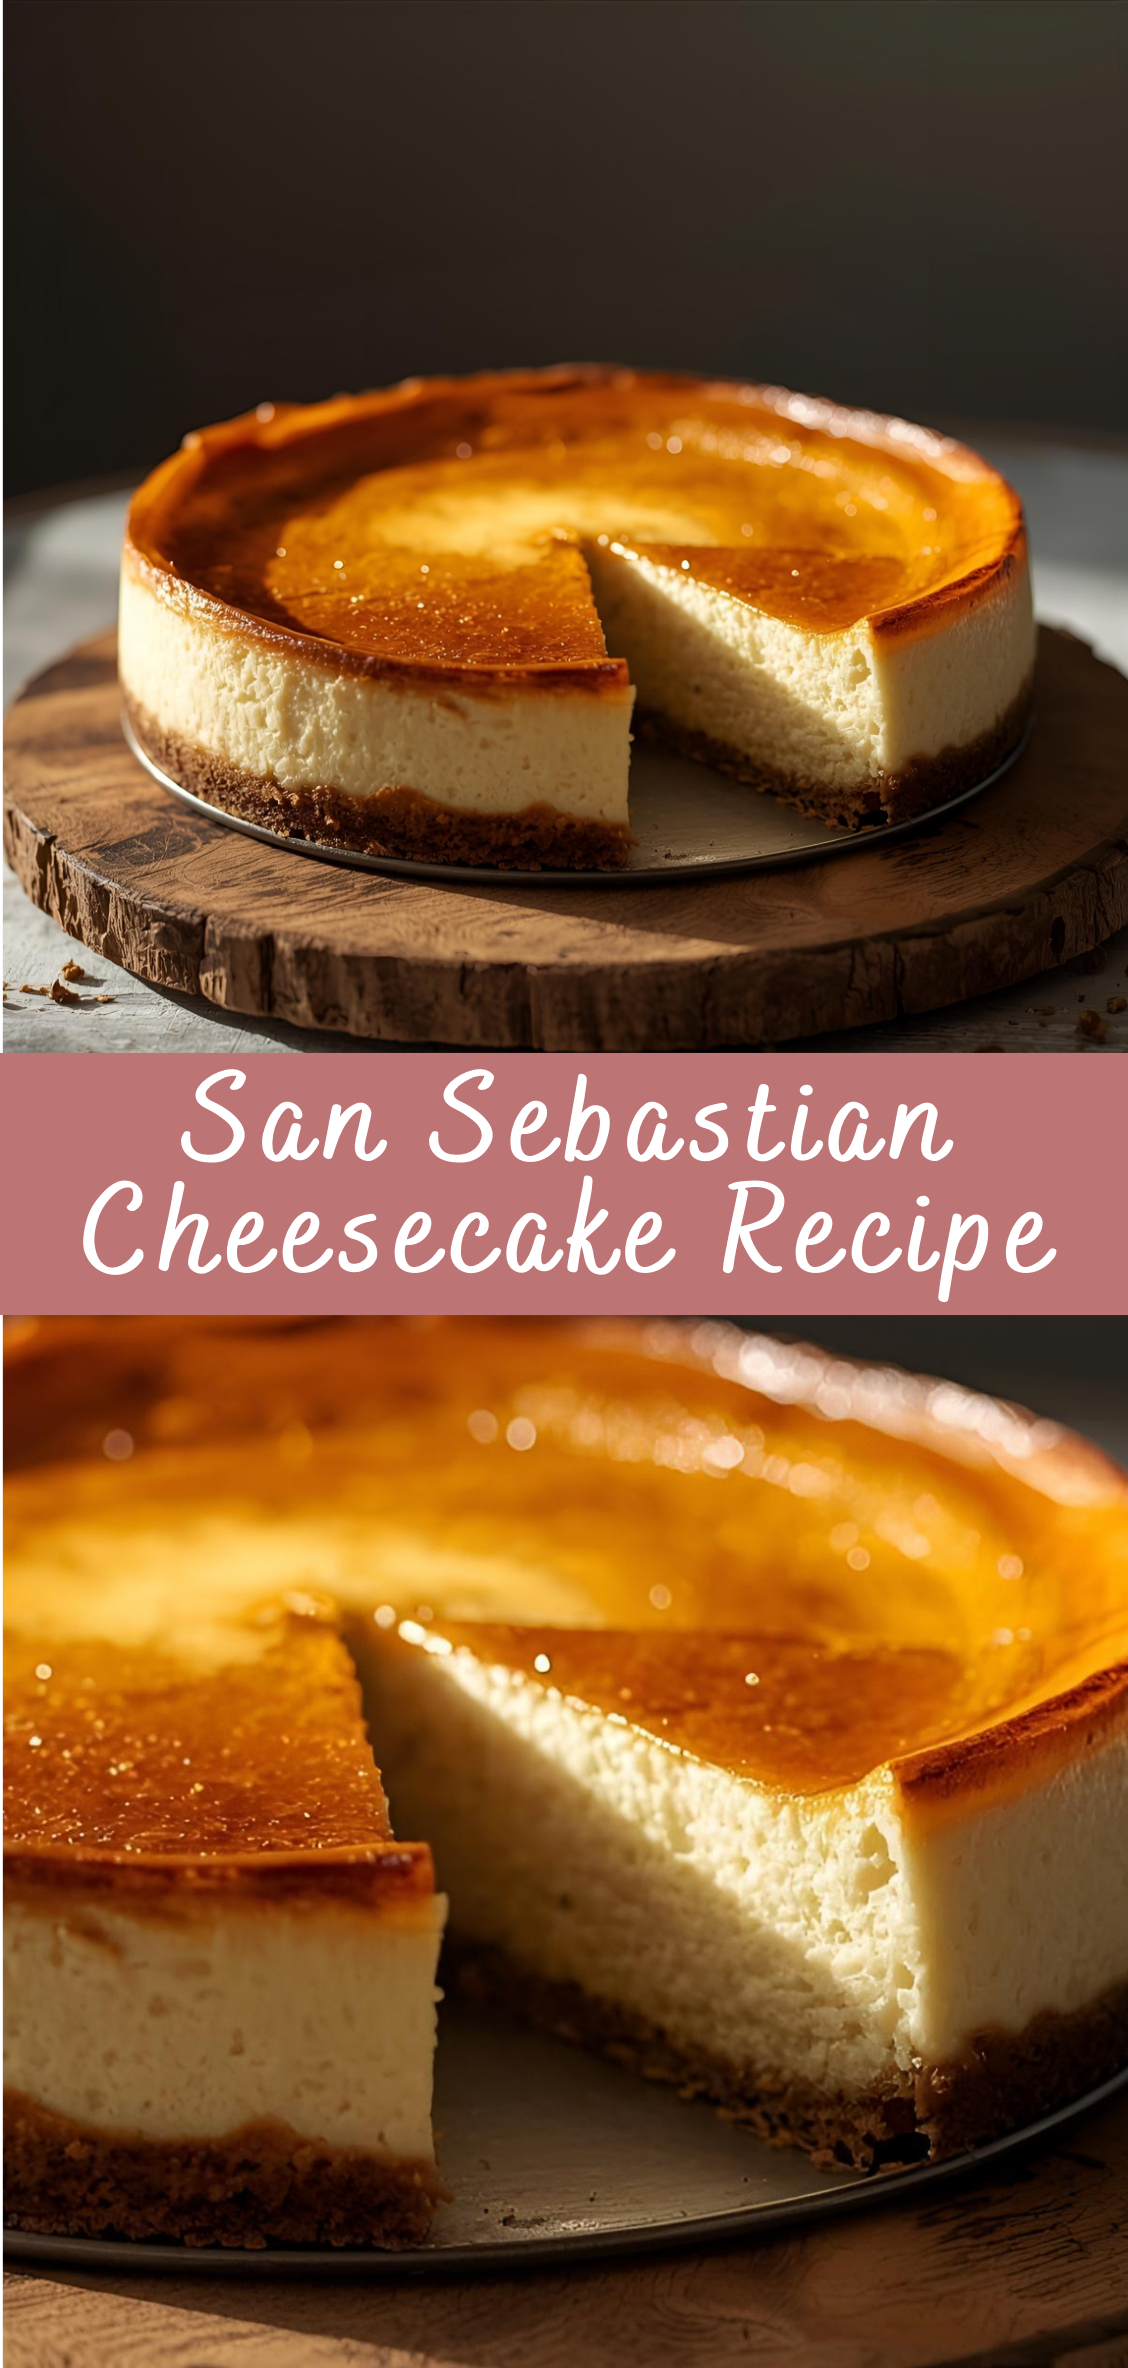
The San Sebastian Cheesecake originated in San Sebastián, a small but gastronomically significant city nestled along the northern coast of Spain in the Basque region. Known globally for its concentration of Michelin-starred restaurants and its deep-rooted culinary traditions, San Sebastián is no stranger to innovation and excellence in food. This cheesecake was first baked in the early 1990s at La Viña, a humble yet renowned tavern tucked away in the old quarter of the city. The chef, Santiago Rivera, sought to create a dessert that was simple, satisfying, and uniquely his own. What resulted was a baked good so unorthodox it seemed, at first glance, like a mistake—a cheesecake with a deeply caramelized, almost charred exterior and a soft, custard-like center.
Despite its cracked top and scorched look, the San Sebastian Cheesecake quickly became a local favorite. Its unconventional appearance was not just accepted but celebrated, offering a striking contrast to the picture-perfect pastries often found in high-end patisseries. Word of mouth carried its reputation beyond the boundaries of the Basque Country, and in the past decade, it has captured the attention of bakers, chefs, and food enthusiasts across the globe.
One of the most remarkable qualities of this cheesecake is its simplicity. Unlike its counterparts that require water baths, careful temperature controls, or intricate crusts, the San Sebastian Cheesecake invites a more relaxed approach. It has no crust—just a velvety filling that is poured directly into a parchment-lined pan. It’s baked at a high temperature, allowing the exterior to brown deeply while the interior remains luxuriously soft. This intense baking method creates an almost soufflé-like rise that falls gently as it cools, forming its signature rustic surface.
But don’t let its simplicity deceive you. Mastering the San Sebastian Cheesecake requires a keen understanding of ingredient ratios, baking times, and temperature variations. Its deceptively minimalistic recipe can result in wildly different textures and flavors depending on subtle tweaks. The balance of cream cheese, eggs, sugar, and cream must be precise, and even the type of oven or pan used can influence the outcome. In many ways, it is both beginner-friendly and technically sophisticated—a rare combination that appeals to novice bakers and seasoned pastry chefs alike.
Beyond the technique, what truly sets this cheesecake apart is its flavor profile. The caramelized top offers deep, almost nutty notes that contrast beautifully with the creamy, tangy richness of the filling. It’s a dessert that seduces with its texture—firm at the edges, melting at the center—and delights with its taste: bold, smooth, slightly sweet, and subtly savory. Some describe it as custard-like, others as almost mousse-like. It is, above all, indulgent without being overly heavy.
The San Sebastian Cheesecake also lends itself to customization and experimentation. Variations abound—infusions with vanilla, citrus zest, or even liqueurs; combinations with chocolate or fruit; dairy alternatives for lighter versions; and creative presentations for modern reinterpretations. Despite its humble beginnings, this cheesecake has become a blank canvas for bakers worldwide to express their creativity.
In this guide, we’ll take you through every aspect of crafting the perfect San Sebastian Cheesecake—from choosing the right ingredients to mastering the baking technique, understanding its history, learning about common mistakes, and exploring optional variations. Whether you’re preparing it for a special occasion, a dinner party, or simply for the joy of baking something extraordinary, this cheesecake is more than a dessert—it’s an experience.
Ingredients and Equipment
Essential Ingredients
While the San Sebastian Cheesecake is known for its minimalism, the quality and balance of the ingredients are what make it exceptional. Below is a breakdown of each component, including their roles and suggestions for substitutions where appropriate.
1. Cream Cheese – 900g (about 2 lbs)
-
Role: This is the heart of the cheesecake. It gives the cake its creamy, dense, and slightly tangy base.
-
Type: Use full-fat cream cheese, preferably Philadelphia brand or an equivalent block-style cream cheese (avoid whipped or spreadable versions).
-
Tip: Let it come to room temperature before using. This ensures a smooth, lump-free batter.
2. Granulated Sugar – 300g (about 1½ cups)
-
Role: Provides sweetness and structure. It also helps the batter whip up smoothly with the cream cheese.
-
Optional Adjustment: You can reduce it slightly if you prefer a less sweet version.
3. Eggs – 5 large
-
Role: Eggs add structure, richness, and a custard-like texture.
-
Tip: Use room-temperature eggs for easier incorporation and a smoother batter.
4. Heavy Cream – 475ml (2 cups)
-
Role: Contributes to the creamy, almost mousse-like texture of the cheesecake.
-
Substitution: You can use double cream or whipping cream, but ensure it has a fat content of at least 35%.
5. All-Purpose Flour – 1 tablespoon
-
Role: Stabilizes the batter just enough to hold shape without making it dense.
-
Substitution: You can use cake flour or cornstarch for a slightly softer texture, or omit it entirely for a gluten-free version (note: omitting may slightly affect structure).
6. Salt – ¼ teaspoon (optional but recommended)
-
Role: Enhances the flavor and balances sweetness.
Optional Flavor Additions (Use Sparingly)
These are not part of the traditional recipe but can be added for variation:
-
Vanilla extract (½ tsp) – Adds warmth and depth.
-
Lemon zest (½ tsp) – For a bright, citrusy note.
-
Espresso or coffee (1 tbsp) – Enhances complexity, especially in chocolate variations.
-
Liquors like Grand Marnier, Frangelico, or Amaretto (1 tbsp) – Adds richness and a signature twist.
Essential Equipment
Using the right tools is critical to achieving the perfect San Sebastian Cheesecake texture and appearance.
1. Springform Pan – 8 or 9-inch (20-23 cm)
-
Why it matters: The high sides and removable base allow for even rise and easy removal.
-
Tip: Lightly grease the bottom to help the parchment paper stick and avoid bubbling.
2. Parchment Paper
-
Why it matters: The cake is crustless and sticks easily. Lining with parchment not only prevents sticking but also gives the cake its rustic, wrinkled edges.
-
Technique: Use two overlapping large sheets to fully line the pan, allowing overhang on all sides.
3. Electric Mixer (Hand or Stand)
-
Why it matters: Helps whip the cream cheese and eggs to a smooth consistency. You can do it by hand, but it’s more effort.
4. Mixing Bowls
-
Use large bowls to accommodate all ingredients without spilling.
5. Fine Mesh Sieve (Optional)
-
For sifting flour or straining batter to remove lumps.
6. Rubber Spatula
-
To scrape down the bowl and fold the batter evenly.
7. Oven Thermometer
-
Ensures accurate baking temperature, which is crucial due to the high heat involved.
Step-by-Step Instructions
Here is a detailed walkthrough, not just of what to do, but why each step is important.
Step 1: Prepare the Ingredients (Timing: 30 minutes)
Bring all cold ingredients to room temperature.
-
Remove cream cheese, eggs, and cream from the refrigerator at least 30–45 minutes before starting.
-
This step ensures even mixing and prevents lumps or curdling.
-
Tip: If you’re short on time, cut the cream cheese into chunks and warm gently in a microwave at low power for 15–20 seconds.
Step 2: Preheat Your Oven (Timing: 10–15 minutes)
-
Temperature: Set oven to 210°C (410°F) conventional (not fan-forced).
-
High heat is critical to achieve the characteristic burnt top and custardy center.
-
Place a rack in the center of the oven.
Tip: Ovens can vary. Use an oven thermometer to confirm the temperature for best results.
Step 3: Line the Pan with Parchment (Timing: 5 minutes)
-
Tear two large sheets of parchment paper.
-
Criss-cross them inside the springform pan, pressing them into the base and up the sides.
-
Allow 2–3 inches of overhang above the rim—this will catch the rise and fall of the cheesecake as it bakes.
Why: The parchment gives the cheesecake its signature wrinkled, rustic edge. Don’t try to smooth it out too much.
Step 4: Cream the Cream Cheese and Sugar (Timing: 5–7 minutes)
-
Place cream cheese in a large mixing bowl.
-
Beat on medium speed until smooth and fluffy—about 2–3 minutes.
-
Gradually add sugar and continue beating for another 2–3 minutes until completely incorporated.
Texture cue: The mixture should be creamy, light, and free of lumps.
Important: Scrape down the sides and bottom of the bowl frequently.
Step 5: Add Eggs One at a Time (Timing: 3–4 minutes)
-
Add each egg individually, beating on low-medium speed.
-
Wait until each egg is fully incorporated before adding the next.
Why: This prevents the batter from splitting and ensures a stable emulsion.
Visual cue: The batter should look smooth and glossy.
Step 6: Add Heavy Cream (Timing: 1–2 minutes)
-
Slowly pour in the heavy cream while mixing at low speed.
-
Beat until the mixture is uniform.
Tip: Do not overmix here—over-aeration can lead to cracking.
Step 7: Sift in the Flour and Salt (Timing: 1–2 minutes)
-
Sift flour and salt over the batter using a fine mesh sieve.
-
Gently fold in with a spatula until no streaks remain.
Why: This prevents clumps and ensures even distribution.
Step 8: Final Mix and Strain (Optional but recommended)
-
For an ultra-smooth texture, you can strain the batter through a fine sieve into a clean bowl.
-
This step is optional but especially helpful if your cream cheese was slightly lumpy.
Step 9: Pour Batter into the Pan
-
Pour the finished batter into your parchment-lined pan.
-
Gently tap the pan on the counter 2–3 times to release air bubbles.
Optional: Use a toothpick or skewer to pop large bubbles on the surface.
Step 10: Bake the Cheesecake (Timing: 45–60 minutes)
-
Place the cheesecake in the preheated oven.
-
Bake for 50–60 minutes, depending on your oven and the size of your pan.
What to look for:
-
The top should be deeply browned, even burnt-looking.
-
The center should still jiggle slightly when shaken.
-
The edges will be set, and the cake may rise significantly—it will fall as it cools.
Note: If using a 10-inch pan, reduce baking time slightly; for a 7-inch pan, increase it slightly.
Step 11: Cool the Cheesecake (Timing: 2–3 hours)
-
Remove the cheesecake from the oven and place it on a wire rack.
-
Allow it to cool completely in the pan at room temperature.
Important: Do not attempt to remove the parchment or slice it while warm—it will be too soft and may collapse.
Step 12: Chill (Optional, for firmer texture)
-
Once cooled, you can refrigerate the cheesecake for 4–6 hours or overnight.
-
Chilling firms up the center, making it easier to slice and serve.
Serving Options:
-
Serve chilled for a firmer, denser bite.
-
Serve at room temperature for a more creamy, custard-like experience.
Step 13: Slice and Serve
-
Use a sharp knife dipped in hot water and wiped dry between cuts for clean slices.
-
The cheesecake is rich—small slices go a long way.
-
Enjoy as is, or with minimal garnishes like whipped cream, berries, or espresso drizzle.
San Sebastian Cheesecake Recipe
Cheesecake is a dessert that has transcended cultures, evolving through centuries to take on a myriad of forms—from the dense, graham-cracker-based New York-style to the airy, ricotta-filled Italian varieties. Yet, in recent years, a seemingly rustic, burnt-topped version from the Basque Country of Spain has taken the culinary world by storm. This is the San Sebastian Cheesecake—also widely referred to as Basque Burnt Cheesecake—a creation that defies the traditional rules of baking and presentation, while offering an indulgent experience that is rich, creamy, and unexpectedly refined.
Ingredients
- 2 lbs (900g) cream cheese, at room temperature
- 1½ cups (300g) granulated sugar
- 6 large eggs
- 2 cups (480ml) heavy cream
- 1 tsp vanilla extract (optional)
- ¼ cup (30g) all-purpose flour
- ½ tsp salt
Instructions
- Preheat the oven:
Preheat to 400°F (205°C). Line a 9-inch (23 cm) springform pan with parchment paper, leaving about 2 inches of overhang on all sides. Crumple the paper first to make it easier to shape. - Cream the cheese and sugar:
In a large mixing bowl, beat the cream cheese and sugar on medium speed until smooth and creamy—about 2–3 minutes. - Add the eggs:
Add the eggs one at a time, beating well after each addition. Scrape down the bowl as needed. - Add cream and vanilla:
Pour in the heavy cream and vanilla extract (if using). Mix until fully incorporated. - Add flour and salt:
Sift in the flour and add the salt. Mix until smooth. The batter will be quite liquid—this is normal. - Pour and bake:
Pour the batter into the prepared pan. Tap the pan gently on the counter to remove any large air bubbles. Bake for 50–60 minutes, or until the top is deep golden brown and the center still jiggles when shaken. - Cool:
Let the cheesecake cool in the pan at room temperature. It will deflate slightly—this is expected. - Chill (optional):
You can serve it slightly warm, room temperature, or chilled after refrigerating for 4+ hours. Each gives a slightly different texture.
Notes
- No crust: Traditional San Sebastian cheesecake does not have a crust.
- High temperature baking gives it that signature burnt top and caramelized flavor.
- Flour: You can substitute with cornstarch (2 tbsp) for a gluten-free version.
- Flavor variations: Try adding lemon zest, espresso powder, or a swirl of dulce de leche.
- Pan size matters: A smaller pan will yield a taller cheesecake but may require extra baking time.
- Don't overbake: The jiggle in the center is key to a creamy texture. It will set as it cools.

