Baked Honey Sesame Chicken: A Golden Fusion of Sweet, Savory, and Crispy Perfection
There are few dishes that embody the satisfying contrast of sweet and savory quite as beautifully as Honey Sesame Chicken. It’s one of those rare recipes that feels simultaneously familiar and exciting — an irresistible blend of golden, crisp-coated chicken bathed in a glossy, amber sauce that glistens with honey and toasted sesame. Every bite offers a harmonious balance: the crunch of oven-baked coating giving way to tender, juicy meat, all enveloped in a silky glaze that tastes both comforting and indulgent.
While most versions of Honey Sesame Chicken are traditionally deep-fried and served in restaurants or takeout boxes, this baked rendition captures the same golden-crisp magic with a lighter, cleaner touch. The oven replaces the fryer, but not the flavor — and in doing so, it transforms a takeout favorite into a dish that’s not only easier to make at home but also more wholesome and versatile. The key lies in mastering the textures: creating a coating that crisps beautifully in the oven, and a sauce that clings luxuriously without turning soggy or overly sweet.
The roots of this dish can be traced to the broader family of Chinese-American cuisine, a culinary style that evolved through adaptation — blending Chinese cooking techniques and flavors with Western ingredients and sensibilities. Honey Sesame Chicken, much like its close cousin General Tso’s or Orange Chicken, represents that balance of cultures: crispy meat bathed in a glaze that’s equal parts savory soy and sweet honey, finished with a sprinkle of sesame seeds for aroma and texture. It’s a dish built on contrast — crisp yet tender, sweet yet salty, homey yet sophisticated.
What makes this particular version stand out is the baking technique. Where frying gives instant crispness, baking demands patience and precision. The chicken is first coated in a light, seasoned batter that locks in moisture and develops texture in the dry heat of the oven. A careful balance of cornstarch and breadcrumbs ensures that each piece achieves that golden, slightly crackling crust we crave. The sauce — a fragrant combination of honey, soy sauce, garlic, ginger, and sesame oil — is prepared separately, then poured over the baked chicken just before serving, ensuring every bite glistens but remains delightfully crisp.
The dish is as much about technique as it is about flavor. The success of Baked Honey Sesame Chicken lies in small, thoughtful details: preheating the baking sheet to mimic the sear of a wok, tossing the cooked chicken with sauce at just the right temperature, and finishing with toasted sesame seeds for that signature nutty perfume. It’s in these subtleties that home cooking transcends the ordinary, producing a meal that looks and tastes like it came from a professional kitchen.
But beyond the technical artistry, there’s a comforting warmth to this recipe. The aroma of honey caramelizing in the oven, the gentle sizzle as sauce meets hot chicken, and the glossy finish of sesame-studded glaze all evoke a sense of care and celebration. This is the kind of dish that gathers people — family, friends, or even just yourself at the end of a long day — around a meal that’s deeply satisfying without being heavy.
In this guide, we’ll explore every aspect of creating perfect Baked Honey Sesame Chicken from scratch. You’ll learn how to select the ideal chicken cuts for tenderness, how to prepare the batter for maximum crispness, and how to balance the sauce to achieve that ideal sweet-salty ratio. We’ll discuss variations — from spicy versions infused with chili flakes to lighter, citrus-tinted interpretations — and explore side pairings that complement the dish beautifully. We’ll also delve into the science behind caramelization and crisping, helping you understand not just what to do, but why it works.
Whether you’re an experienced cook refining your home repertoire or a beginner eager to master a restaurant classic, this comprehensive recipe will guide you every step of the way. The result? A dish that feels both indulgent and balanced — a symphony of textures and flavors that pays homage to a beloved classic while celebrating the joy of modern, mindful cooking.
Baked Honey Sesame Chicken isn’t just another recipe. It’s a lesson in culinary harmony — where sweetness meets savor, texture meets tenderness, and simple ingredients come together to create something truly extraordinary.
Instructions
Cooking Baked Honey Sesame Chicken is an exercise in balance — not just in flavor, but in texture, timing, and temperature. The goal is to achieve crisp, golden chicken pieces coated in a sticky, aromatic sauce that shines with sweetness, depth, and sesame warmth. The process is straightforward, but the attention to detail at each stage is what transforms the result from good to exceptional.
Step 1: Preparing the Chicken
1. Selecting the right cut
Use boneless, skinless chicken breast or thighs. Breasts deliver a clean, lean bite, while thighs provide slightly more fat and moisture, resulting in a richer texture. For most home cooks, a combination of both works beautifully, offering contrast in tenderness.
2. Cutting for even cooking
Cut the chicken into bite-sized cubes, roughly 1 to 1½ inches each. This size ensures they cook quickly and evenly in the oven, with plenty of surface area to crisp and absorb the glaze. Avoid pieces that are too large (they won’t cook through evenly) or too small (they risk drying out).
3. Patting dry
Moisture is the enemy of crispness. After cutting, pat the chicken pieces dry with paper towels. This step ensures the coating will adhere properly and brown evenly during baking.
4. Light seasoning
Place the chicken in a large bowl and season lightly with:
-
½ teaspoon salt
-
¼ teaspoon black pepper
-
½ teaspoon garlic powder (optional, for subtle depth)
Toss gently to coat, then set aside while preparing the batter.
Step 2: Creating the Crisp Coating
Traditional fried versions rely on oil for crunch, but in this baked adaptation, we achieve crispness through a clever combination of starch, egg, and heat.
1. Ingredients for the coating
In two separate bowls, prepare the following:
Bowl 1 (wet batter):
-
2 large eggs, beaten
-
1 tablespoon cornstarch (helps create a light film that adheres to the chicken)
-
1 tablespoon soy sauce
Whisk until smooth and slightly frothy.
Bowl 2 (dry coating):
-
½ cup cornstarch
-
½ cup panko breadcrumbs (for added texture)
-
¼ teaspoon baking powder (optional, promotes lightness)
2. Dipping and coating
Dip each chicken piece first into the egg mixture, letting excess drip off, then roll it gently in the dry mixture. Shake off any loose coating.
Pro tip: For maximum crispness, press the coating gently into the chicken rather than over-coating it. A thin, even layer will bake up crunchier than a thick, floury one.
3. Resting before baking
Place coated chicken pieces on a wire rack for 5–10 minutes. This resting time allows the coating to hydrate slightly, helping it adhere firmly so it doesn’t flake off during baking.
Step 3: Preparing to Bake
1. Preheat the oven
Set your oven to 400°F (200°C). Place a large rimmed baking sheet inside as it preheats — this is a crucial step. A hot baking sheet instantly sears the underside of the chicken, mimicking the effect of shallow frying and ensuring the coating becomes crisp rather than soggy.
2. Greasing the surface
Once the oven reaches temperature, carefully remove the baking sheet (use oven mitts!) and lightly brush or spray it with a thin layer of oil. This prevents sticking and encourages even browning.
3. Arranging the chicken
Lay the coated chicken pieces in a single layer on the preheated tray, ensuring they do not touch. Overcrowding leads to steam buildup, which prevents crisping. If necessary, bake in two batches.
Step 4: Baking the Chicken
1. The first bake
Bake for 10 minutes, then remove the tray and use tongs to flip each piece. This ensures even browning on both sides.
2. The second bake
Return to the oven for another 8–10 minutes, or until the coating is golden and the internal temperature of the chicken reaches 165°F (74°C).
3. Optional crisp finish
For extra crunch, switch the oven to broil for the last 1–2 minutes. Keep a close eye — the honey glaze you’ll add later contains sugar, so pre-browning too deeply can make the final result overly dark.
At this point, the chicken should be firm yet tender, with a golden crust that feels light and crisp to the touch.
Step 5: Making the Honey Sesame Sauce
While the chicken bakes, prepare the sauce — the defining element of this dish. The goal is a glossy, balanced glaze that coats the chicken evenly without becoming sticky or cloying.
1. Ingredients
In a small saucepan or skillet, combine:
-
⅓ cup honey (preferably raw or pure for best flavor)
-
¼ cup soy sauce
-
2 tablespoons rice vinegar (adds tang and balances sweetness)
-
1 tablespoon sesame oil
-
2 teaspoons minced garlic
-
1 teaspoon grated fresh ginger
-
2 tablespoons brown sugar (for caramel depth)
-
1 tablespoon cornstarch mixed with 2 tablespoons cold water (slurry for thickening)
2. Cooking process
Place the saucepan over medium heat. Stir occasionally as the mixture begins to simmer. The honey will dissolve, the garlic and ginger will bloom, and the aroma will turn nutty and slightly smoky as the sugars caramelize.
After 2–3 minutes of gentle simmering, add the cornstarch slurry while stirring continuously. The sauce will begin to thicken almost immediately, turning glossy and smooth.
3. Adjusting consistency and flavor
If the sauce is too thick, whisk in a tablespoon or two of water. Taste and balance:
-
Add a touch more soy sauce for saltiness.
-
Add a drizzle of honey for sweetness.
-
Add a splash of vinegar for acidity.
You’re aiming for a sauce that coats the back of a spoon — rich but fluid enough to pour over the chicken without clumping.
Step 6: Glazing the Chicken
1. Tossing and coating
When the baked chicken is ready, transfer it to a large heatproof bowl. Pour the hot honey sesame sauce over it immediately. Toss gently with a spatula or wooden spoon until every piece is evenly coated in a shimmering glaze.
The heat from both the sauce and the chicken will allow the glaze to set into a beautiful sheen without softening the crisp coating too quickly.
2. Optional wok finish
For an extra touch of authenticity, you can quickly toss the coated chicken in a hot wok or skillet over medium heat for 30 seconds. This reactivates the sugars in the sauce, deepening the caramelization and infusing the chicken with wok-charred aroma — often referred to as wok hei, or “breath of the wok.”
Step 7: Adding the Sesame Finish
1. Toasting sesame seeds
In a small dry skillet, toast 1–2 tablespoons of white sesame seeds over medium-low heat for 2–3 minutes, shaking the pan frequently. They’re ready when fragrant and lightly golden.
2. Final garnish
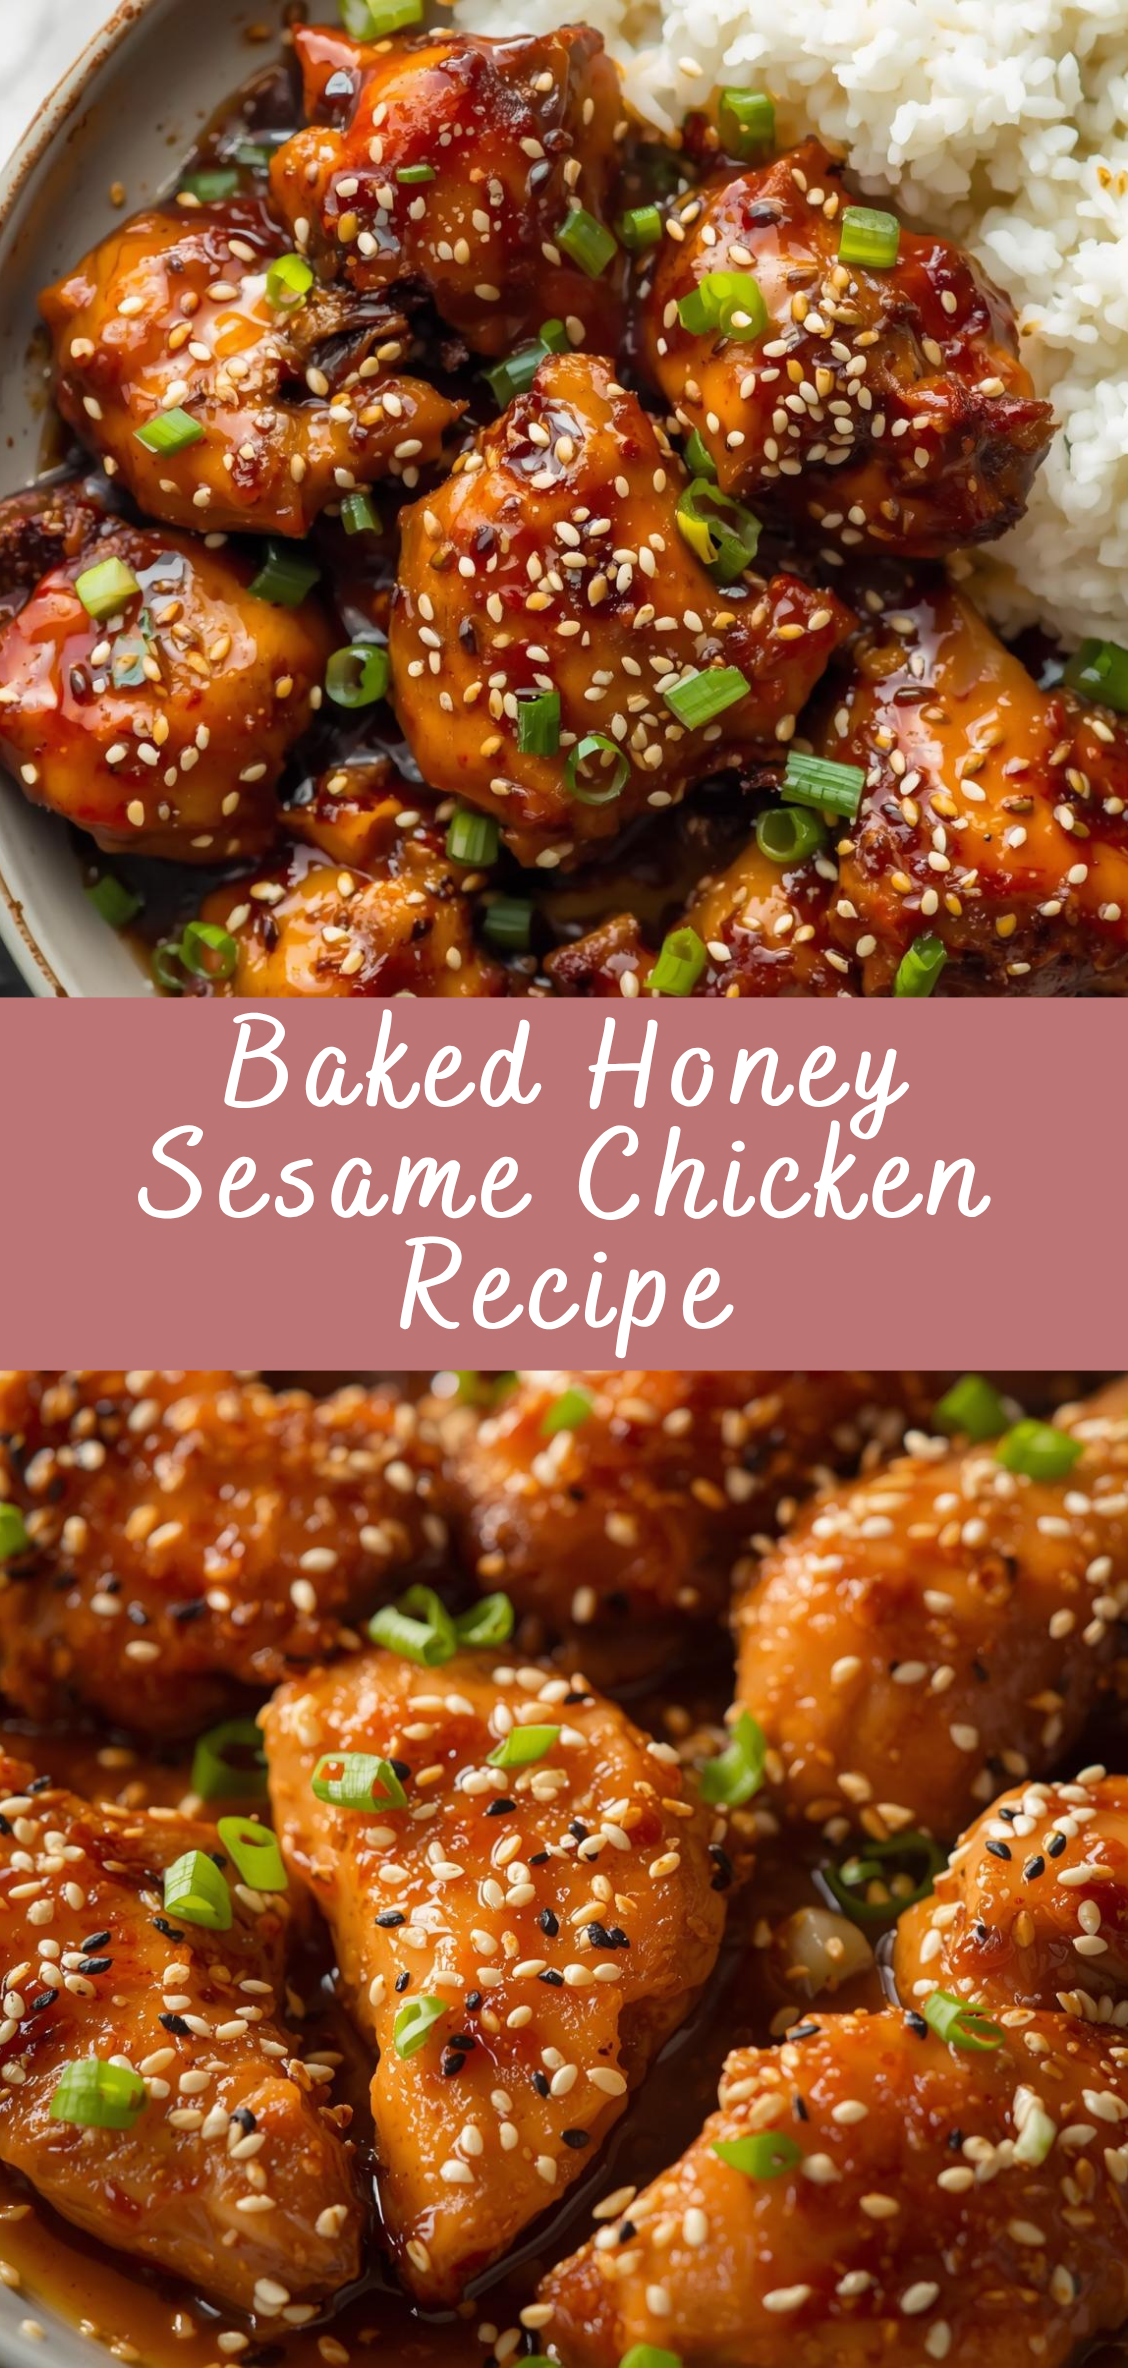
Sprinkle the toasted sesame seeds generously over the glazed chicken. For color and freshness, add finely chopped green onions or scallions on top.
The sesame seeds not only provide crunch but also a nutty undertone that beautifully complements the honey and soy elements.
Step 8: Serving and Presentation
Presentation transforms this from a simple homemade meal into a restaurant-caliber dish.
1. Serving suggestions
Serve the Baked Honey Sesame Chicken over a bed of steamed jasmine rice or fluffy white rice. The neutral grains absorb the excess sauce while allowing the flavor of the glaze to shine.
For a lighter option, serve atop brown rice, cauliflower rice, or quinoa. The slight earthiness of these grains pairs surprisingly well with the sweet-savory sauce.
2. Visual appeal
For maximum contrast, present the dish on a white or dark ceramic plate. The golden glaze and sesame garnish gleam beautifully against a neutral background. A few scattered sesame seeds and a drizzle of extra sauce around the plate make the dish look refined and intentional.
3. Complementary sides
-
Steamed broccoli or snow peas: add freshness and a vibrant green color.
-
Asian slaw with sesame dressing: adds crunch and acidity to balance the richness.
-
Pickled cucumbers or daikon: introduce a cool, tangy counterpoint.
Step 9: Variations and Enhancements
Once you master the base recipe, you can easily adapt it to suit your preferences.
1. Spicy Honey Sesame Chicken
Add ½ teaspoon red pepper flakes or a teaspoon of sriracha to the sauce for a gentle heat that balances the sweetness.
2. Citrus-Infused Version
Replace part of the vinegar with orange or lemon juice for a brighter, fruit-forward glaze. Garnish with zest for aromatic flair.
3. Vegetable-Loaded Version
Stir-fry bell peppers, snap peas, or broccoli separately and toss them with the glazed chicken before serving. This adds texture, nutrition, and vibrant color.
4. Gluten-Free Variation
Substitute tamari or coconut aminos for soy sauce, and use gluten-free breadcrumbs or rice flour for coating.
5. Sesame-Crusted Version
Before baking, roll the coated chicken pieces lightly in a mix of panko and sesame seeds to intensify the nuttiness and add extra crunch.
Baked Honey Sesame Chicken is a lesson in precision and restraint — proof that you don’t need deep frying to achieve indulgent texture and flavor. When baked properly and glazed with balance, it becomes a dish that’s both nourishing and luxurious — golden, fragrant, and irresistibly sticky in the best possible way.
Baked Honey Sesame Chicken Recipe
There are few dishes that embody the satisfying contrast of sweet and savory quite as beautifully as Honey Sesame Chicken. It’s one of those rare recipes that feels simultaneously familiar and exciting — an irresistible blend of golden, crisp-coated chicken bathed in a glossy, amber sauce that glistens with honey and toasted sesame. Every bite offers a harmonious balance: the crunch of oven-baked coating giving way to tender, juicy meat, all enveloped in a silky glaze that tastes both comforting and indulgent.
Ingredients
- For the Chicken:
- 1 ½ lbs boneless, skinless chicken breasts (cut into 1-inch cubes)
- Salt and pepper, to taste
- 2 large eggs, beaten
- ¾ cup cornstarch (or use half cornstarch, half flour for extra crispiness)
- 2 tablespoons vegetable oil (for greasing the baking pan or spraying the chicken)
- For the Sauce:
- ⅓ cup honey
- 3 tablespoons soy sauce (low sodium if preferred)
- 2 tablespoons ketchup
- 1 tablespoon rice vinegar (or apple cider vinegar)
- 1 tablespoon sesame oil
- 2 teaspoons cornstarch + 2 teaspoons water (for thickening slurry)
- 2 cloves garlic, minced
- 1 tablespoon toasted sesame seeds
- 2 green onions, sliced (for garnish)
Instructions
- Preheat Oven:
Preheat your oven to 400°F (200°C). Line a large baking sheet with parchment paper or lightly grease it. - Prepare the Chicken:
Season chicken pieces with salt and pepper.
Dip each piece into the beaten eggs, then coat in cornstarch.
Arrange coated chicken pieces on the baking sheet in a single layer.
Lightly spray or drizzle with oil to help them crisp up. - Bake the Chicken:
Bake for 20–25 minutes, flipping halfway through, until chicken is golden and cooked through. - Make the Sauce:
While the chicken bakes, whisk together honey, soy sauce, ketchup, rice vinegar, sesame oil, and minced garlic in a saucepan over medium heat.
Bring to a simmer, then stir in the cornstarch slurry.
Cook for 2–3 minutes until the sauce thickens and becomes glossy. - Combine:
Remove baked chicken from the oven and place in a large mixing bowl.
Pour the honey sesame sauce over the chicken and toss to coat evenly. - Garnish and Serve:
Sprinkle with toasted sesame seeds and sliced green onions.
Serve immediately with steamed rice or noodles.
Serving Ideas
- Serve over jasmine rice, fried rice, or stir-fried vegetables.
- Add a side of steamed broccoli or snap peas for color and crunch.
Notes
- Extra Crispy Tip: For crispier chicken, bake on a wire rack set over the pan or briefly broil for 2 minutes after coating in sauce.
- Gluten-Free Option: Use gluten-free soy sauce (tamari) and cornstarch.

