Few dishes strike the perfect balance between convenience, nutrition, and flavor quite like a well-crafted grilled chicken wrap. Whether prepared as a light lunch, a satisfying dinner, or a make-ahead meal for busy weekdays, grilled chicken wraps offer the kind of versatility that appeals to virtually every type of cook and eater. They are equally at home in the hands of someone who is learning their way around a kitchen as they are in the repertoire of an experienced home chef who appreciates simple, wholesome meals displayed through thoughtful execution. At their core, grilled chicken wraps are a celebration of smart cooking: they rely on fresh ingredients, straightforward preparation techniques, and customizable components that can be adapted to suit a wide range of tastes and dietary needs.
The appeal of grilled chicken wraps begins with their star ingredient: chicken that has been marinated, seasoned, and cooked over open heat. Grilling not only infuses the meat with deep, smoky undertones but also creates a textural contrast between the slightly crisp exterior and the tender interior. This method of cooking transforms ordinary chicken into a flavorful, protein-rich centerpiece that anchors the entire wrap. Surrounding it is an ensemble of vibrant vegetables, creamy or tangy sauces, and a tortilla or flatbread that brings everything together in a portable, satisfying format. Whether you prefer a classic combination of lettuce and tomatoes or enjoy layering bold flavors such as roasted peppers, pickled onions, or herb-forward dressings, a grilled chicken wrap leaves plenty of room for personalization.
Another reason these wraps have remained a staple in homes, cafés, and meal prep routines is their practicality. They require minimal cleanup, can be assembled quickly, and are easy to transport. For those looking to incorporate more balanced meals into their diets, grilled chicken wraps offer an ideal ratio of lean protein, fiber, and fresh produce. They can be crafted to be lower in calories or more indulgent depending on the choice of sauces, toppings, and tortillas. Whole-grain wraps add heartiness and nutritional value, while lighter options such as lettuce wraps provide a refreshing, low-carbohydrate alternative. Even within the realm of flavors, the possibilities are nearly endless: Mediterranean-style wraps with hummus and cucumbers, Southwestern wraps with peppers and chipotle sauce, Asian-inspired variations with sesame dressing, or classic American flavor profiles featuring ranch, cheddar, and crisp veggies.
Perhaps what makes grilled chicken wraps particularly compelling is their ability to satisfy. They manage to deliver bold, layered flavors without requiring hours in the kitchen. They are filling without being heavy, flavorful without relying on overly complex ingredients, and impressive enough to serve guests while still being practical for everyday meals. As you explore this recipe, you will find that each component—marinade, chicken, vegetables, sauces, and assembly—can be tailored to match your preferences or dietary goals. The following guide breaks down each step with clarity and precision, ensuring that whether you are preparing a single wrap for yourself or making a large batch for family or friends, the results will be consistently delicious.
Detailed Instructions
Preparing the Chicken Marinade
A great grilled chicken wrap begins long before the chicken reaches the grill. The marinade you prepare will determine the depth of flavor, tenderness, and aroma that ultimately infuse the meat. A well-balanced marinade incorporates acidity to tenderize, oil to promote moisture retention, and seasonings to shape the overall profile. For this recipe, a combination of olive oil, lemon juice, garlic, paprika, cumin, salt, and freshly cracked black pepper provides a robust yet versatile foundation.
-
Prepare the workspace
Start by clearing a section of your kitchen counter and gathering all the ingredients needed for the marinade. This might seem like a small step, but ensuring that everything is within reach allows you to focus on technique rather than searching for items mid-preparation. -
Measure and combine wet ingredients
In a medium-sized bowl, pour in the olive oil and fresh lemon juice. The olive oil ensures the chicken remains juicy during grilling, while the lemon juice works gently to break down the meat’s fibers, resulting in a more tender texture. -
Add aromatics and spices
Mince the garlic finely or use a garlic press for a smoother texture in the marinade. Add it to the bowl along with paprika, cumin, salt, and pepper. Each spice plays a distinct role: paprika adds warmth and subtle sweetness; cumin brings earthiness and depth; salt enhances all the flavors; and pepper contributes a mild heat. -
Whisk thoroughly
Using a whisk, mix all the ingredients until they form a cohesive mixture. Look for an emulsified texture, meaning the lemon juice and oil look unified rather than separated. If the mixture separates slightly, continue whisking or add a small additional splash of lemon juice to bind it. -
Taste and adjust
Before introducing the chicken, dip a spoon into the marinade and taste it. It should be bold, slightly tangy, and aromatic. Adjust the seasoning to your preference. Remember that chicken has a milder flavor, so the marinade should be slightly more intense than what you want in the final product.
Marinating the Chicken
With the marinade prepared, the next step is to introduce the chicken and allow it sufficient time to absorb flavors. Patience during this stage pays off greatly during cooking.
-
Trim the chicken
Place boneless, skinless chicken breasts on a cutting board. Use a sharp knife to remove excess fat or connective tissue. If the breasts are particularly thick, consider cutting them horizontally to create thinner, more manageable pieces that cook more evenly. -
Pound for uniform thickness (optional)
For consistent cooking, cover the chicken with plastic wrap and gently pound it with a meat mallet or rolling pin until each piece reaches an even thickness. This prevents overcooking thinner ends while waiting for thicker centers to finish. -
Coat the chicken
Transfer the trimmed chicken pieces into a large zip-top bag or shallow glass dish. Pour the marinade over the chicken, ensuring each piece is fully coated. -
Remove air and seal
If using a bag, press out excess air before sealing to maximize contact between chicken and marinade. Massage the bag lightly to distribute the mixture evenly. -
Refrigerate
Place the bag or dish in the refrigerator. For the best results, allow the chicken to marinate for at least 1 hour. For deeper flavor, marinating for 4 to 6 hours is ideal. Avoid exceeding 12 hours, as prolonged exposure to acidic ingredients can begin to alter the texture of the meat.
Preparing the Grill
A properly heated and cleaned grill is essential for developing the signature sear and smoky flavor of grilled chicken. Taking the time to prepare the grill ensures consistent cooking and prevents sticking.
-
Choose the heat source
Both gas and charcoal grills work well for this recipe. Charcoal provides a deeper smoky flavor, while gas offers greater control and convenience. Choose whichever aligns with your preference and available equipment. -
Preheat thoroughly
Set your grill to medium-high heat and allow it to preheat for 10 to 15 minutes. The grates should be hot enough that a few drops of water sizzle and evaporate instantly. Proper heat ensures quick searing, which helps lock in moisture. -
Clean the grates
Once heated, use a grill brush to remove any residue from previous cooks. Clean grates prevent sticking and contribute to cleaner grill marks on the chicken. -
Oil the grates
To further prevent sticking, dip a folded paper towel in a small amount of oil and, using tongs, rub it across the hot grates. This creates a thin, even layer of lubrication.
Grilling the Chicken
Cooking the chicken correctly is the heart of the recipe. The goal is to achieve a flavorful char on the outside while keeping the interior moist and fully cooked.
-
Place the chicken on the grill
Remove the chicken from the marinade, letting excess liquid drip off. Lay the pieces on the grill diagonally to the grates for attractive markings. -
Sear and cook
Grill the chicken for 5 to 6 minutes on one side without moving it. Avoid frequent flipping, as this can disrupt the searing process. When the bottom side develops rich grill marks, flip the chicken using tongs. -
Cook the second side
Continue grilling for another 5 to 6 minutes. The total cooking time may vary depending on thickness, but most pieces will finish within 10 to 15 minutes. -
Check for doneness
Use a meat thermometer to check the internal temperature. The chicken is fully cooked at 165°F (74°C). If you do not have a thermometer, cut into the thickest part; the juices should run clear and the interior should be opaque. -
Rest the chicken
Transfer cooked chicken to a plate and cover loosely with foil. Allow it to rest for 5 to 10 minutes. Resting helps redistribute juices inside the meat, making it more tender when sliced.
Preparing the Wrap Components
While the chicken rests, prepare the vegetables, sauces, and wraps. Freshness and variety are key to building a satisfying wrap.
-
Wash and dry vegetables
Rinse lettuce, tomatoes, cucumber, bell peppers, red onion, or any other selected produce. Dry them well to prevent soggy wraps. -
Slice thinly
Cut vegetables into thin, uniform slices or strips. Thin cuts ensure easier folding and even distribution of textures within the wrap. -
Warm the tortillas or flatbreads
Place the tortillas briefly on the grill or in a dry skillet. Warming them makes them pliable and less prone to tearing. -
Prepare sauces or spreads
Depending on your chosen flavor profile, assemble ingredients such as garlic mayo, hummus, tzatziki, chipotle sauce, or ranch. Place sauces in bowls for easy access during assembly.
Assembling the Grilled Chicken Wraps
Assembly is where all the components come together. The sequence and balance of ingredients determine whether the wrap holds together neatly and delivers the intended flavor in each bite.
-
Lay out the tortilla
Place a warm tortilla on a flat surface. If using large burrito-style wraps, ensure the top edge is positioned slightly higher to allow easy folding. -
Spread the sauce
Using a spoon or spatula, spread your chosen sauce evenly over the center of the tortilla. Avoid spreading too close to the edges to prevent leakage. -
Add sliced chicken
Slice the rested grilled chicken into thin strips. Lay them horizontally across the center of the tortilla. This placement supports better rolling and even distribution. -
Layer the vegetables
Add fresh vegetables on top of the chicken. Avoid overstuffing; balance is key to achieving a wrap that is both flavorful and structurally sound. -
Optional toppings
Add grated cheese, fresh herbs, a squeeze of lemon, or a drizzle of secondary sauce if desired. -
Fold the sides inward
Fold the left and right sides of the tortilla toward the center, partially covering the filling. -
Roll tightly
Starting from the bottom edge, roll upward while keeping the sides tucked in. Apply gentle pressure as you roll to create a compact wrap that stays together. -
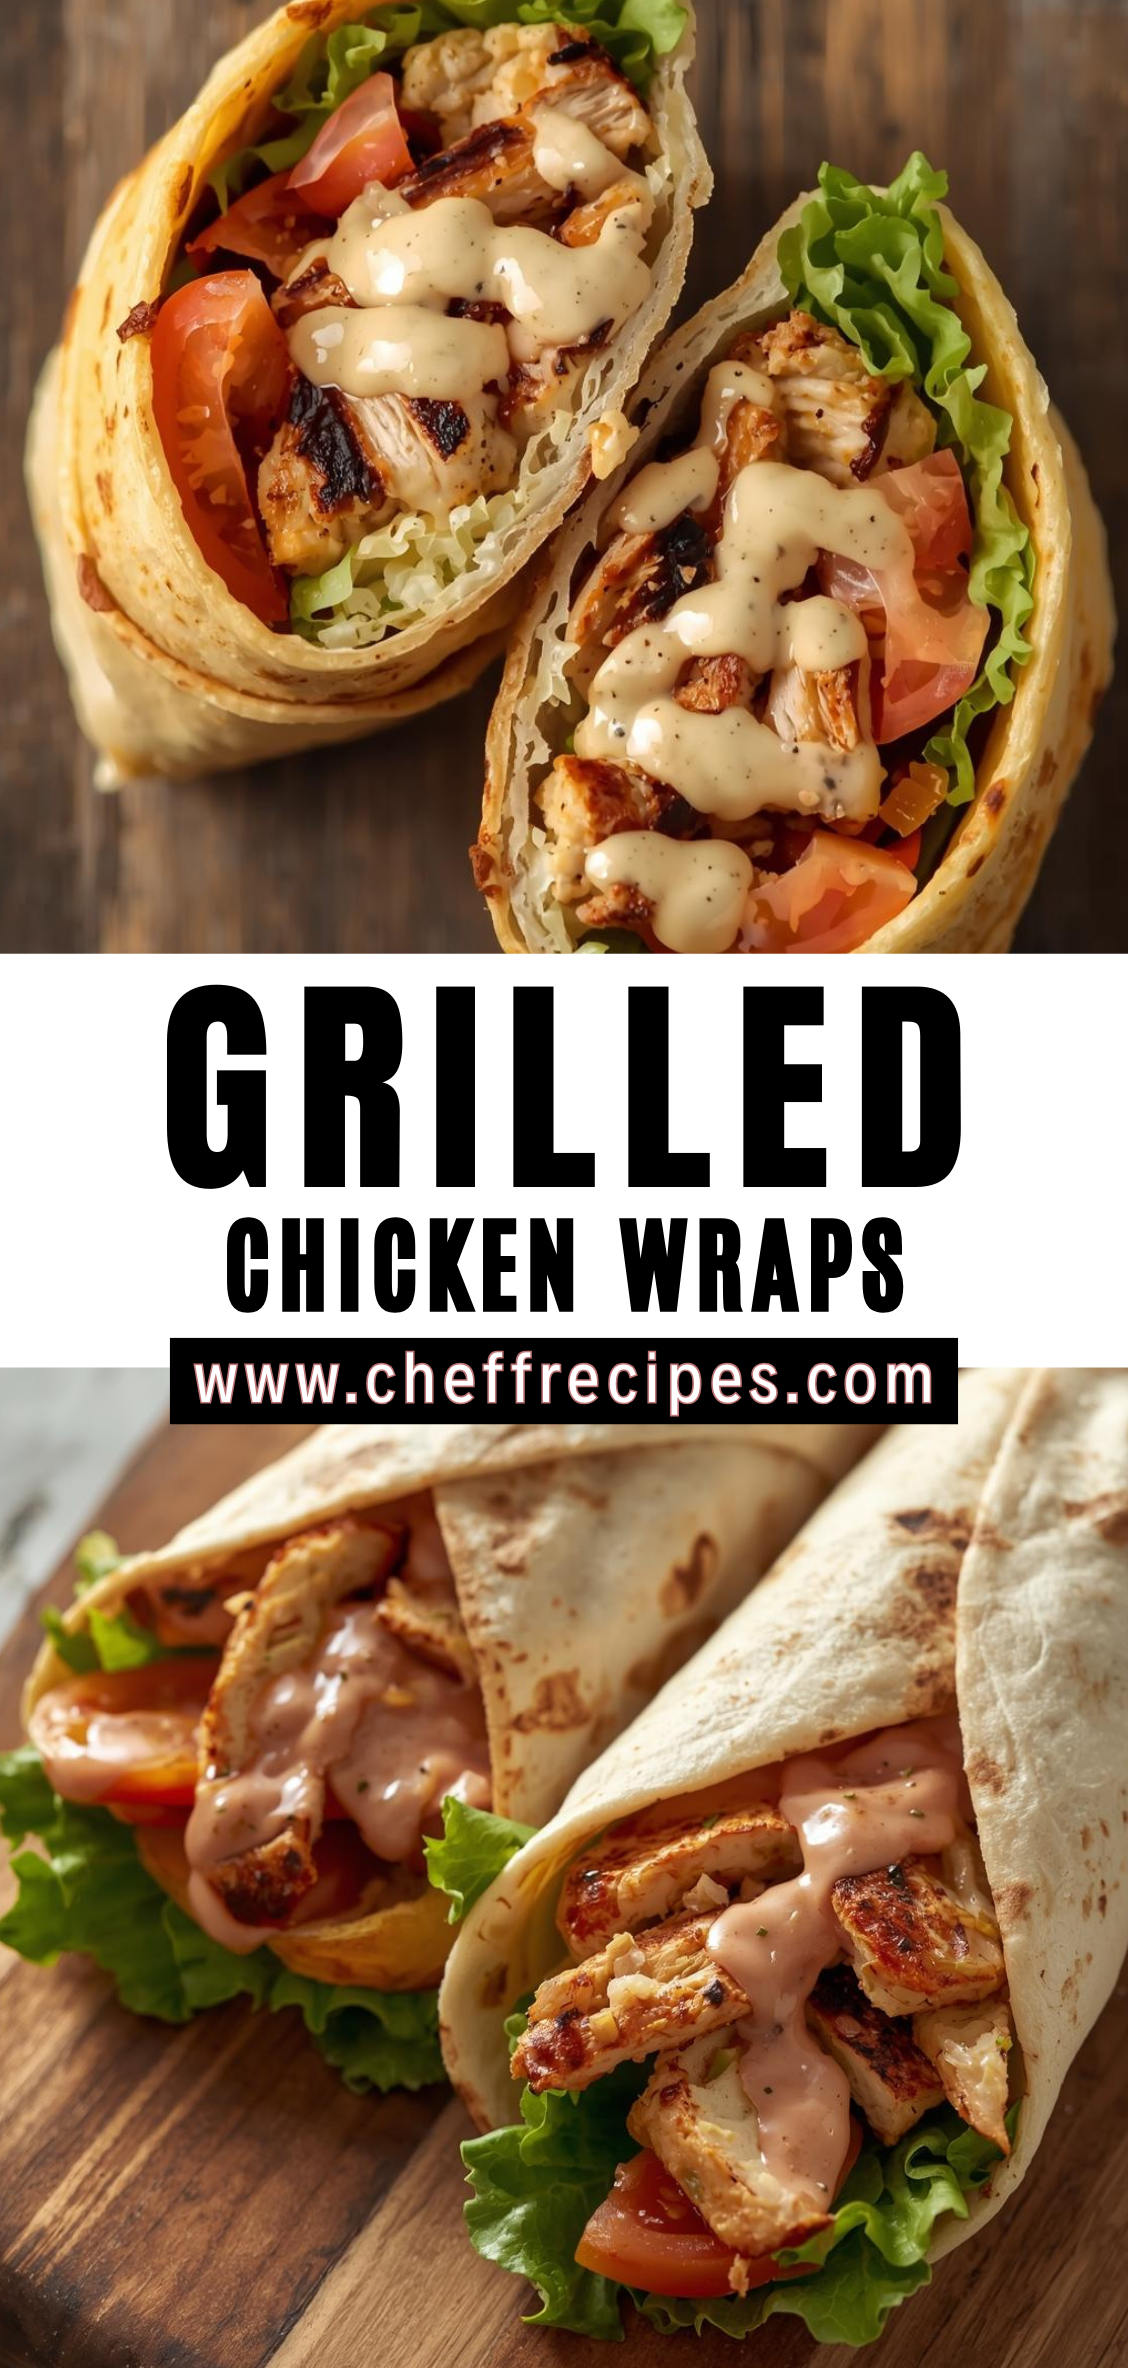
Slice and serve
For presentation, cut the wrap in half diagonally. Serve immediately or wrap tightly in parchment paper if preparing for later consumption.
Grilled Chicken Wraps
Few dishes strike the perfect balance between convenience, nutrition, and flavor quite like a well-crafted grilled chicken wrap. Whether prepared as a light lunch, a satisfying dinner, or a make-ahead meal for busy weekdays, grilled chicken wraps offer the kind of versatility that appeals to virtually every type of cook and eater. They are equally at home in the hands of someone who is learning their way around a kitchen as they are in the repertoire of an experienced home chef who appreciates simple, wholesome meals displayed through thoughtful execution. At their core, grilled chicken wraps are a celebration of smart cooking: they rely on fresh ingredients, straightforward preparation techniques, and customizable components that can be adapted to suit a wide range of tastes and dietary needs.
Ingredients
- For the Chicken:
- 2 boneless, skinless chicken breasts
- 1 tbsp olive oil
- 1 tsp paprika
- 1 tsp garlic powder
- ½ tsp onion powder
- ½ tsp cumin (optional for a Tex-Mex twist)
- ½ tsp salt
- ¼ tsp black pepper
- Juice of ½ lemon (or lime)
- For the Wraps:
- 4 large flour tortillas (10-inch)
- 1 cup shredded lettuce
- 1 cup diced tomatoes (or salsa)
- ½ cup shredded cheddar or Mexican-blend cheese
- ½ small red onion, thinly sliced
- 1 avocado, sliced (optional)
- ¼ cup ranch dressing or chipotle mayo (your choice)
Instructions
- Prepare the chicken: In a bowl, mix the olive oil, paprika, garlic powder, onion powder, cumin, salt, pepper, and lemon juice. Coat the chicken breasts evenly.
- Grill the chicken: Heat a grill pan or outdoor grill over medium-high. Grill chicken 6–7 minutes per side, or until fully cooked (internal temp 165°F/74°C). Let rest for 5 minutes, then slice thinly.
- Warm the tortillas: Heat each tortilla in a dry skillet for 10–15 seconds per side, or microwave wrapped in a damp paper towel for 20 seconds.
- Assemble the wraps: Lay tortillas flat and spread ranch or chipotle mayo on each. Add lettuce, tomatoes, onions, cheese, and avocado slices. Top with the grilled chicken.
- Wrap it up: Fold in the sides, roll tightly from the bottom up, and slice diagonally if desired.
Notes
- Variations: Add black beans or corn for extra texture. Swap ranch for tzatziki for a Mediterranean twist. Use whole-wheat or spinach tortillas for a lighter option.
- Spice level: Add chipotle peppers, jalapeños, or hot sauce for more heat.
- Healthier option: Skip cheese and use Greek yogurt as dressing.

