The Ultimate Breakfast Granola Cups Recipe: A Delicious, Healthy Start to Your Day
Breakfast is often referred to as the most important meal of the day — and for good reason. It sets the tone for your energy levels, mood, and productivity, offering your body the first nutrients it receives after hours of fasting overnight. While there are countless breakfast options out there, one that stands out for its versatility, nutrition, and visual appeal is the breakfast granola cup.
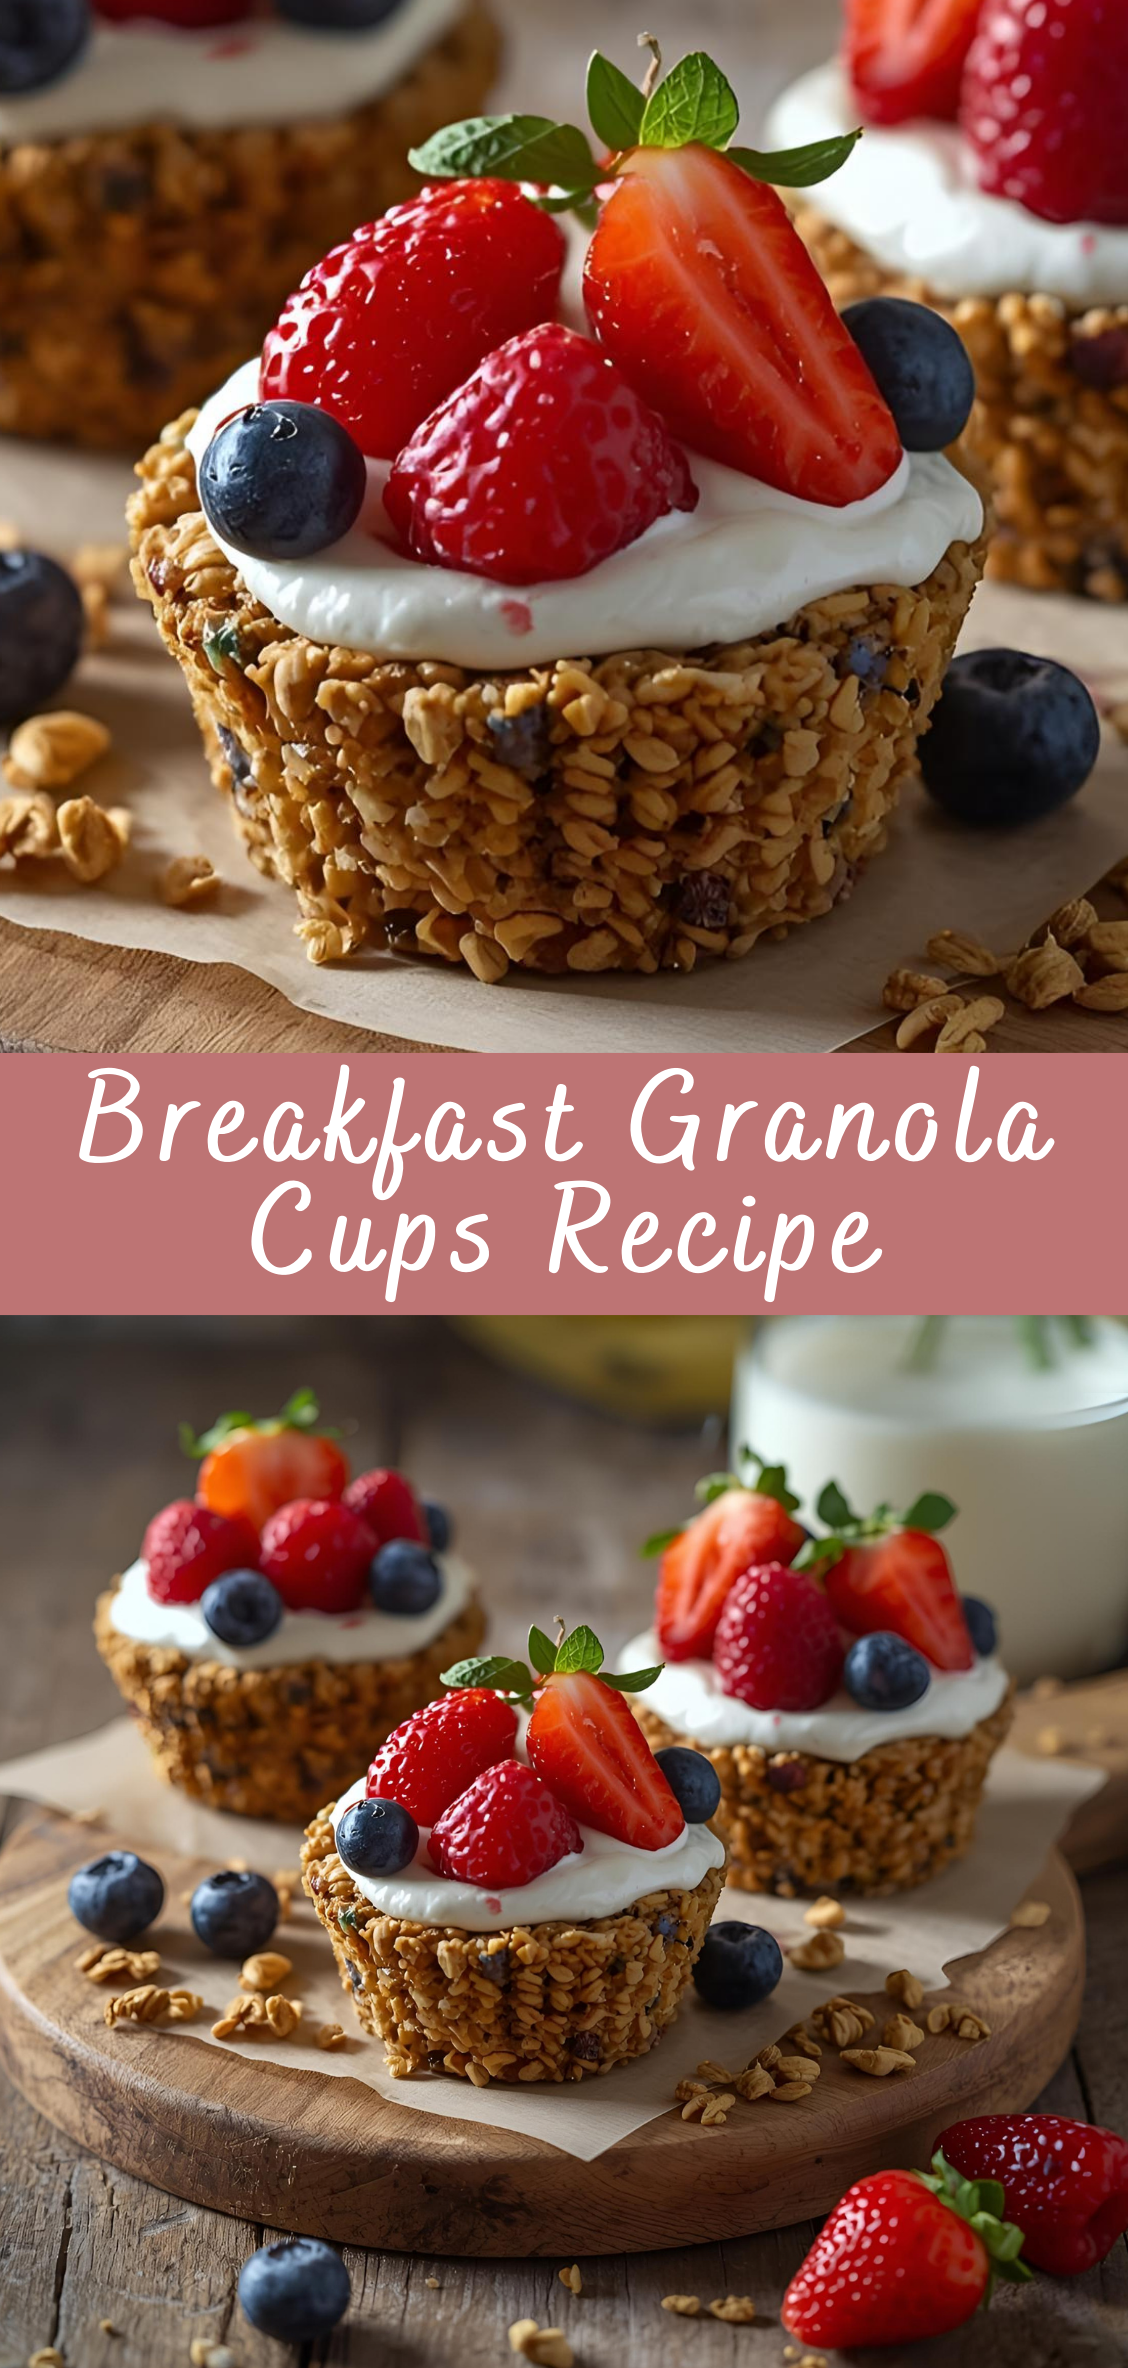
Breakfast granola cups are an inventive and wholesome twist on traditional morning meals. These charming, edible cups are made from a mixture of oats, nuts, seeds, and natural sweeteners, baked to golden perfection and shaped like small tart shells. Once cooled, they become the perfect vessel for all kinds of delicious and nourishing fillings — from creamy Greek yogurt to fresh fruits, nut butters, and even chia seed pudding.
What makes granola cups truly special is their adaptability. Whether you’re someone who prefers a protein-packed breakfast to fuel your morning workout, a busy professional in need of a quick grab-and-go option, or a parent looking for a fun way to get your kids excited about healthy eating, granola cups offer something for everyone.
In this comprehensive recipe guide, we’re going beyond a simple ingredient list. We’ll explore the history and benefits of granola, the nutritional science behind key ingredients, and multiple variations to suit different dietary needs. Whether you’re vegan, gluten-free, dairy-free, or simply aiming to reduce your sugar intake, you’ll find tips and modifications throughout this guide to help you customize your breakfast to your lifestyle.
This article is designed to be both a detailed recipe and a resource. We’ll walk you through every step of making breakfast granola cups — from selecting the best oats and binders, to choosing the ideal fillings, to storing and serving them for optimal taste and texture. We’ll also share expert tips, answer common questions, and provide troubleshooting advice to ensure your granola cups turn out perfectly every time.
By the end of this guide, you won’t just have a new recipe to add to your breakfast rotation — you’ll have a deeper appreciation for whole foods, the joy of homemade meals, and the power of starting your day with something both healthy and indulgent.
Let’s get started.
Step-by-Step Instructions: How to Make Breakfast Granola Cups
Creating the perfect breakfast granola cup involves several important steps — from selecting high-quality ingredients to carefully shaping and baking the cups for maximum crunch and durability. Follow these detailed instructions to get consistent, delicious results every time.
Ingredients You’ll Need (Base Granola Cups)
Before diving into the process, gather all the necessary ingredients. These form the foundation of your granola cups:
-
2 cups old-fashioned rolled oats
Use certified gluten-free oats if needed. Rolled oats provide the right texture and hold their shape well during baking. -
1/2 cup chopped nuts (e.g., almonds, walnuts, pecans)
Adds healthy fats, crunch, and flavor. -
1/4 cup seeds (optional: chia seeds, flaxseeds, sunflower seeds)
Boosts nutritional value and fiber content. -
1/2 teaspoon cinnamon
Adds warmth and depth to the flavor profile. -
1/4 teaspoon salt
Enhances and balances the sweetness. -
1/3 cup honey or maple syrup
Acts as a natural sweetener and binder. Maple syrup is a vegan-friendly alternative. -
1/4 cup coconut oil or unsalted butter, melted
Provides richness and helps bind the oats together. -
1 teaspoon vanilla extract
Enhances the flavor with a sweet, aromatic note. -
1 egg white (optional, for extra binding strength)
Helps hold the cups together more firmly, especially if using chunkier add-ins.
Instructions
Step 1: Preheat the Oven
Set your oven to 350°F (175°C).
Allow it to fully preheat before placing your granola cups inside — a stable oven temperature ensures even baking and helps the cups hold their shape.
Step 2: Prepare Your Muffin Tin
Use a standard 12-cup muffin tin (or mini muffin tin for bite-sized cups).
-
Lightly grease each cup with non-stick cooking spray, melted coconut oil, or butter.
-
Alternatively, you can use silicone muffin liners, which make removal easier and help maintain the cup shape without sticking.
Tip: Do not use paper liners, as granola tends to stick to them unless they are well-greased or non-stick parchment.
Step 3: Mix Dry Ingredients
In a large mixing bowl, combine:
-
2 cups rolled oats
-
1/2 cup chopped nuts
-
1/4 cup seeds (if using)
-
1/2 tsp cinnamon
-
1/4 tsp salt
Stir well to ensure even distribution of spices and dry components.
Optional Add-In Tip:
For added texture or flavor, you can mix in 2–3 tablespoons of shredded coconut or a small handful of dried fruit. Just be aware that sugary add-ins may brown more quickly during baking.
Step 4: Mix Wet Ingredients Separately
In a smaller bowl, whisk together:
-
1/3 cup honey or maple syrup
-
1/4 cup melted coconut oil or butter
-
1 tsp vanilla extract
-
1 egg white (if using)
Whisk until the mixture is smooth and slightly emulsified.
Why separate mixing?
Combining wet ingredients separately helps create a uniform mixture that coats the dry ingredients more evenly, which is essential for consistent binding and baking.
Step 5: Combine Wet and Dry Ingredients
Pour the wet mixture over the dry oat mixture.
Using a rubber spatula or your hands, mix thoroughly until every bit of oat and nut is coated.
Consistency Check:
The mixture should feel sticky but not soggy. If it’s too dry and crumbly, add 1–2 teaspoons more honey or oil. If too wet, stir in a bit more oats.
Step 6: Press Mixture into Muffin Cups
This step is critical to forming granola cups that hold their shape after baking.
-
Scoop about 2–3 tablespoons of the mixture into each muffin cavity.
-
Use the back of a spoon or your fingers to firmly press the mixture down and then push it up the sides to create a cup shape.
Pro Tip:
Use a small glass, shot glass, or a tart press wrapped in plastic wrap to help press the center and sides evenly. You want the walls of the cup to be about 1/4 inch thick.
Step 7: Bake
Place the muffin tin in the center rack of the preheated oven.
-
Bake for 15 to 20 minutes, or until the edges are golden brown.
-
Rotate the tray halfway through baking if your oven has hot spots.
Note: Watch closely during the last few minutes. Granola can burn quickly once it starts to brown.
Step 8: Cool in Tin
Once baked, remove the tray from the oven, but do not remove the cups immediately.
Let the granola cups cool in the muffin tin for at least 15–20 minutes. This resting time allows them to firm up and crisp as they cool.
Why this matters:
Removing too early can cause them to crumble or fall apart. The cooling phase is when the granola sets into its final shape.
Step 9: Gently Remove from Tin
After cooling, carefully run a thin knife or offset spatula around the edge of each cup to loosen them.
Gently lift out and transfer to a wire rack to finish cooling completely.
Optional (but recommended):
Store in the refrigerator for 10–15 minutes before filling. This adds extra crispness and prevents sogginess when adding moist ingredients like yogurt or fruit.
Step 10: Fill and Serve
Now comes the fun part — filling your granola cups.
Here are some classic and creative filling ideas:
Yogurt & Fruit Combo
-
Greek yogurt or plant-based yogurt
-
Fresh berries (blueberries, raspberries, strawberries)
-
Drizzle of honey or maple syrup
Nut Butter Delight
-
Peanut butter or almond butter
-
Sliced banana
-
Sprinkle of granola or cacao nibs
Tropical Escape
-
Coconut yogurt
-
Pineapple chunks, mango slices
-
Toasted coconut flakes
Protein Power
-
High-protein yogurt or cottage cheese
-
Chopped nuts or seeds
-
A touch of cinnamon or cocoa powder
Breakfast Granola Cups Recipe
Breakfast is often referred to as the most important meal of the day — and for good reason. It sets the tone for your energy levels, mood, and productivity, offering your body the first nutrients it receives after hours of fasting overnight. While there are countless breakfast options out there, one that stands out for its versatility, nutrition, and visual appeal is the breakfast granola cup.
Ingredients
- For the Granola Cups:
- 2 cups old-fashioned rolled oats
- 1/2 cup chopped nuts (e.g., almonds, walnuts, or pecans)
- 1/4 cup honey or maple syrup
- 1/4 cup melted coconut oil or butter
- 1/4 cup brown sugar (optional, for extra sweetness)
- 1/2 tsp cinnamon
- 1/4 tsp salt
- 1 tsp vanilla extract
- 1 egg white (helps bind the mixture – optional but recommended)
- For the Filling (Optional):
- 1 cup Greek yogurt (or dairy-free yogurt)
- Fresh berries or sliced fruit (strawberries, blueberries, kiwi, etc.)
- Drizzle of honey or nut butter (optional)
Instructions
- Preheat oven to 350°F (175°C).
Lightly grease a muffin tin or use silicone liners for easy removal. - Mix the dry ingredients.
In a large bowl, combine oats, chopped nuts, cinnamon, and salt. - Add the wet ingredients.
Stir in melted coconut oil, honey (or maple syrup), brown sugar (if using), vanilla, and egg white. Mix until the oats are well-coated. - Press into muffin tin.
Scoop the granola mixture into each muffin cup. Press firmly into the bottom and up the sides to create a cup shape. Use the back of a spoon or your fingers to press it well – this helps it hold shape after baking. - Bake.
Bake for 12–15 minutes or until the edges are golden brown. - Cool completely.
Let the granola cups cool in the tin for at least 30 minutes before removing. They will firm up as they cool. - Fill and serve.
Once cooled, fill each cup with yogurt and top with fresh fruit. Serve immediately.
Notes
- Make it vegan: Use maple syrup and omit the egg white or use a flax egg (1 tbsp flaxseed + 2.5 tbsp water, let sit for 5 minutes).
- Nut-free: Use sunflower seeds or pumpkin seeds instead of nuts.
- Crunchier texture: Bake for an extra 2–3 minutes, but watch carefully to prevent burning.
- Make ahead: These cups are great for meal prepping – just prep the cups and store them without the filling.

