Soda bread occupies a distinctive place in the world of baking, belonging to that small but invaluable category of breads that offer both simplicity and substance. Unlike yeasted loaves, which require patient rising, kneading, and careful timing, soda bread relies on a chemical reaction for its lift. This reaction, between an acidic component and baking soda, produces carbon dioxide quickly, allowing the bread to go from bowl to oven in a remarkably short time. For this reason, soda bread has long been a staple in households where economy, speed, and practicality are as important as flavor. Yet within its humble origins lies immense versatility, and one of the most satisfying interpretations of this traditional loaf is the Cheddar and Herb Soda Bread.
Combining robust aged cheese with aromatic herbs elevates the familiar structure of soda bread into something deeply savory and comforting. The sharp saltiness of cheddar complements the rustic crumb of the bread, while fresh or dried herbs contribute brightness, complexity, and aroma. The resulting loaf feels substantial yet accessible: a bread that fits equally well on a weeknight table or as the centerpiece of a weekend brunch. This kind of soda bread stands at the intersection of simplicity and indulgence, providing a fast, reliable method for creating a richly flavored bread without advanced techniques or special equipment.
The essence of soda bread is rooted in resourcefulness. Historically, in regions where soft wheat flour and cool climates limited the ability to produce strong gluten networks, traditional yeast-leavened breads were not always practical. Baking soda, however, offered a means of producing a satisfying loaf with minimal time and technique. This accessible approach allowed families to create fresh bread on short notice, often using ingredients they already had on hand. Over generations, the basic recipe evolved, accommodating local preferences, regional ingredients, and the individual creativity of home cooks. Today, Cheddar and Herb Soda Bread continues that tradition of flexibility, inviting the baker to adapt flavors, experiment with herbs, and tailor textures to suit any meal.
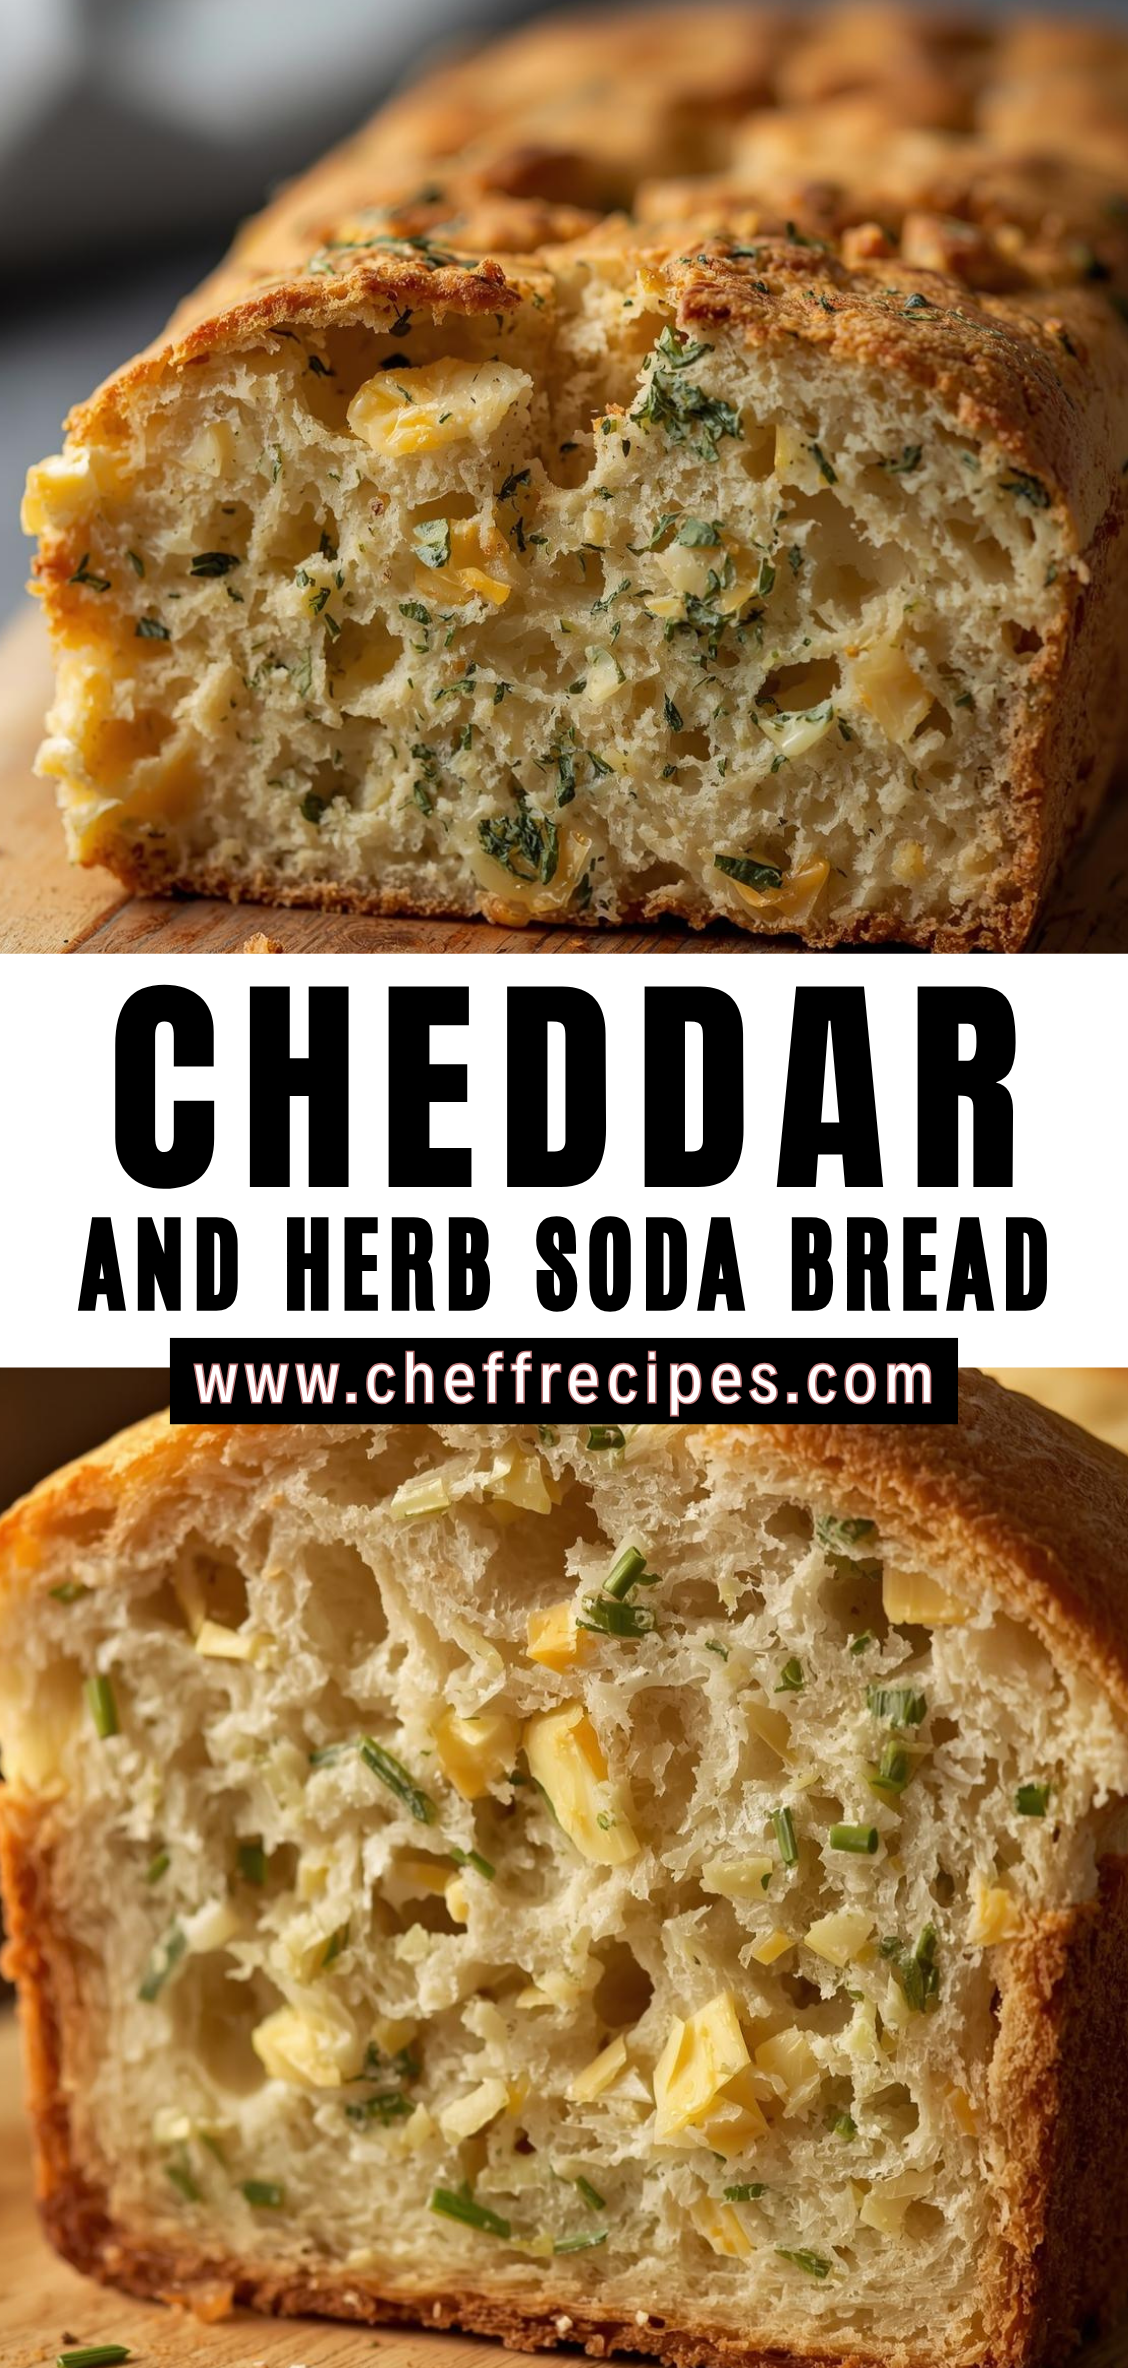
Part of this bread’s appeal lies in the way it embodies contrast. The interior crumb remains tender and moist, while the outer crust develops a hearty, golden firmness. The cheese melts into pockets of richness throughout the loaf, creating occasional bursts of savory depth. Herbs weave their way through the dough, contributing not only flavor but fragrance. The experience of slicing into a freshly baked soda bread is always rewarding: steam rises in soft, aromatic waves, and the crumb reveals its rustic character—less uniform than commercial breads but all the more charming for its natural variation.
Just as cherries elevate the sweetness of cookies in other recipes, cheese elevates the savory qualities of soda bread. Aged cheddar in particular carries a sharpness that interacts beautifully with the buttermilk or sour milk traditionally used in soda bread dough. The acidity in the dairy activates the baking soda, ensuring a reliable rise, while also providing tang that complements the cheese’s richness. This interaction of flavor and chemistry creates a loaf that feels intentionally crafted even though it requires only minutes of active work.
Herbs add an additional dimension, and the choice of herbs significantly affects the personality of the bread. Classic options such as thyme, rosemary, parsley, and chives create an approachable, familiar flavor profile that pairs comfortably with cheese. More assertive herbs—such as sage or oregano—add boldness, while milder herbs—like dill—lend delicacy. The versatility of herb combinations allows this soda bread to shift effortlessly between meals. With subtle herbs, it becomes a breakfast bread. With assertive herbs and robust cheddar, it transforms into a dinner side that stands up to stews, soups, and roasted dishes.
Introduction
Before entering the full, step-by-step instructions of the Cheddar and Herb Soda Bread recipe, it is valuable to understand why each major step matters. Soda bread is simple, but its success depends on a handful of precise decisions. These decisions affect texture, flavor, crust formation, crumb structure, and even how the cheese melts within the loaf. Preparing for detailed instructions begins with understanding the principles that underlie them.
1. Ingredient Preparation and Temperature
The first—and often most underestimated—aspect of soda bread technique is ingredient readiness. Because soda bread relies on a rapid chemical reaction, every ingredient must be prepared before mixing begins. Once baking soda meets acidity, the dough must be shaped and baked promptly or the reaction will lose its force, resulting in a dense loaf.
To support this process, the cheese should be freshly grated rather than pre-shredded. Packaged shredded cheese contains anti-caking agents that interfere with melting and distribution, creating uneven pockets and sometimes greasy patches in the final bread. Freshly grated cheddar melts more evenly, integrates more naturally throughout the dough, and preserves the bread’s moisture balance.
Herbs also deserve attention. Fresh herbs must be washed, thoroughly dried, and chopped finely to distribute evenly. Excess water from improperly dried herbs can disrupt the dough’s texture. Dried herbs require careful measurement because their concentrated flavor can overwhelm the bread if used too heavily. The detailed instructions later will specify how to adjust herb amounts when scaling the recipe or substituting fresh for dried.
The temperature of ingredients plays a role as well. While butter is not always used in soda bread, when it is included—as is typical with cheddar-based variations—it should be cold, not softened. Cold butter creates small pockets that melt during baking, contributing to flakiness and helping the bread maintain structure. Soft butter blends too completely into the dough and eliminates these pockets, leading to a denser texture.
2. Mixing Method and Gluten Control
Soda bread is not kneaded in the traditional sense. The upcoming instructions emphasize minimal mixing, because gluten development creates toughness, not strength, in this style of bread. Yeasted loaves rely heavily on gluten for springiness and structure; soda breads do not.
The detailed instructions will guide you through a mixing method that:
-
Combines dry ingredients thoroughly without overworking them.
-
Introduces cheese and herbs gently, ensuring even distribution.
-
Incorporates buttermilk quickly and lightly using a folding motion.
-
Avoids using a mixer, which overworks the dough within seconds.
Understanding why this matters is key: mixing flour with liquid activates gluten strands. In soda bread, too much gluten causes the bread to lose its hallmark tender crumb. The dough should be shaggy, slightly sticky, and intentionally imperfect. It should never be smooth or elastic like a yeast dough.
3. Chemistry of Leavening and Acid Balance
The reaction between baking soda and an acidic ingredient—traditionally buttermilk—is responsible for the bread’s rise. Buttermilk varies in acidity depending on brand and fat content. A thicker, richer buttermilk may require slightly less flour; a thinner one may call for more.
The presence of cheddar also affects acidity. Strong, aged cheddar adds saltiness and depth but can influence pH balance. Herbs do the same. These subtle shifts matter because baking soda must be precisely balanced. Too much baking soda causes bitterness and a yellowish crumb; too little results in a flat, overly dense loaf.
Later instructions will guide you through:
-
How to judge if your dough needs a tablespoon more or less buttermilk.
-
How to read the dough’s behavior as an indicator of correct acidity.
-
How to compensate if using alternative acidic liquids like yogurt or sour cream.
Understanding this preliminary chemistry helps you interpret the detailed instructions with confidence rather than following them blindly.
4. Dough Handling: Shaping, Hydration, and Texture
Unlike yeasted breads, soda bread dough should be handled minimally and shaped quickly. The instructions later will teach you how to bring the dough together using a light-touch technique. The goal is not smoothness but cohesiveness.
Key points the introduction must establish before the recipe steps:
-
A slightly sticky dough yields a more tender crumb.
-
Excess flour leads to dryness and weak cheese integration.
-
The dough should be shaped by hand, not rolled or heavily pressed.
-
The loaf’s final height depends more on dough handling than on baking time.
Hydration is particularly important. Buttermilk interacts differently with whole wheat flour, all-purpose flour, or blends of the two. Herbs can absorb small amounts of moisture. Cheese melts and redistributes moisture during baking. Because soda bread comes together quickly, the baker must learn to rely on feel as much as on measurement. This is why the upcoming recipe includes sensory cues—description of texture, firmness, and stickiness—to supplement numerical measurements.
5. Scoring the Loaf: Function and Tradition
The cross cut into a soda bread loaf is not optional, and the detailed instructions will explain how deep it should be and why it matters. Scientifically, scoring allows:
-
Heat to penetrate the loaf’s center.
-
Even expansion during baking.
-
Prevention of uncontrolled cracking.
Culturally, the score carries traditional symbolism. Depending on the region and era, bakers believed it allowed evil spirits to escape, blessed the loaf, or made it easier to divide among family members. While these meanings are not required knowledge for baking, they enrich the experience and place the recipe within the lineage of home baking traditions.
In a Cheddar and Herb Soda Bread, scoring also creates areas where cheese may bubble toward the surface, adding textural and visual appeal.
6. Oven Management and Temperature Understanding
Soda bread requires a hot oven, typically between 400°F and 425°F (204°C–218°C), to ensure rapid rise before the chemical reaction dissipates. Because cheese is involved, balancing high heat with adequate baking time becomes crucial. Too hot, and the crust will overbrown before the center is set. Too cool, and the loaf will rise insufficiently.
The upcoming detailed instructions will explain:
-
How to position the loaf in the oven.
-
When and why to rotate the loaf.
-
How to recognize visual signs of doneness.
-
What internal temperature indicates a fully baked soda bread.
-
How to adjust for high-altitude or moisture-heavy environments.
Understanding these principles in advance provides context for the decisions you will make during baking.
7. Cooling, Resting, and Flavor Development
Soda bread continues to cook after it leaves the oven. Cutting into it too early releases steam that should remain inside to finish setting the crumb. Cheese-filled loaves especially benefit from a proper rest time so the cheese can firm slightly instead of spilling out in molten pockets.
The detailed instructions later will specify:
-
How long to cool the loaf.
-
Whether it should cool on a rack or in the pan.
-
How cooling affects texture and sliceability.
-
How flavor compounds develop as the loaf rests.
Cooling is not merely a passive phase; it is the final stage of the baking process.
8. Storage and Freshness Considerations
Because of the cheese, herb oils, and moisture content, this soda bread ages differently from a plain loaf. The introduction must clarify ahead of time that:
-
The loaf is best eaten the day it is baked.
-
Proper wrapping maintains freshness for 48 hours.
-
Refrigeration can alter texture unless done correctly.
-
Freezing is possible and will be explained later.
-
Reheating techniques can restore much of the original crumb quality.
This foundation prepares you to understand and follow the detailed storage instructions later in the recipe.
Cheddar and Herb Soda Bread
Soda bread occupies a distinctive place in the world of baking, belonging to that small but invaluable category of breads that offer both simplicity and substance. Unlike yeasted loaves, which require patient rising, kneading, and careful timing, soda bread relies on a chemical reaction for its lift. This reaction, between an acidic component and baking soda, produces carbon dioxide quickly, allowing the bread to go from bowl to oven in a remarkably short time. For this reason, soda bread has long been a staple in households where economy, speed, and practicality are as important as flavor. Yet within its humble origins lies immense versatility, and one of the most satisfying interpretations of this traditional loaf is the Cheddar and Herb Soda Bread.
Ingredients
- Dry Ingredients:
- 3 cups all-purpose flour
- 1 teaspoon baking soda
- 1 teaspoon baking powder
- 1 teaspoon salt
- 1 teaspoon sugar (optional, but helps browning)
- Wet Ingredients:
- 1 ½ cups buttermilk (shake well before using)
- 1 large egg, lightly beaten (optional but adds richness)
- Add-ins:
- 1 ½ cups shredded sharp cheddar cheese
- 2 tablespoons chopped fresh herbs
- Suggestions: chives, parsley, thyme, rosemary, dill (use 1–2 herbs you like)
- 2 tablespoons melted butter (brushed on top, optional)
Instructions
- Preheat Oven Heat oven to 400°F (200°C). Line a baking sheet with parchment paper or lightly grease a cast-iron skillet.
- Mix Dry Ingredients In a large bowl, stir together the flour, baking soda, baking powder, salt, and sugar.
- Add Cheddar & Herbs Fold the shredded cheddar and chopped herbs into the dry ingredients so they’re evenly distributed.
- Combine Wet Ingredients In a separate bowl, whisk together the buttermilk and egg (if using).
- Bring Dough Together Pour the wet mixture into the dry ingredients. Use a wooden spoon or your hands to gently mix until a shaggy dough forms. Do not overmix—it should look rough and rustic.
- Shape the Loaf Turn the dough onto a lightly floured surface. Form it into a round loaf about 7 inches wide. Place it on the baking sheet or skillet.
- Score the Top Cut a deep “X” across the top of the loaf (about ¾ inch deep). This helps it bake evenly.
- Optional Butter Brush the top with melted butter for extra color and flavor.
- Bake Bake for 40–45 minutes, until golden brown and the loaf sounds hollow when tapped on the bottom. You can also check that the internal temp reaches 190°F (88°C).
- Cool Let the bread cool at least 15 minutes before slicing.
Notes
- Herb Variations: For stronger flavor: use rosemary + thyme. For mild flavor: use chives + parsley. Dried herbs may be used—use 1 teaspoon dried for every 1 tablespoon fresh.
- Cheese Options: Substitute part of the cheddar with Gruyère, smoked cheddar, or pepper jack.
- No Buttermilk? Make a substitute: 1 ½ cups milk + 1 ½ tablespoons lemon juice or vinegar. Let sit 5–10 minutes until thickened.
- Serving Ideas: Amazing with soups, stews, chili, or simply warmed with butter.

