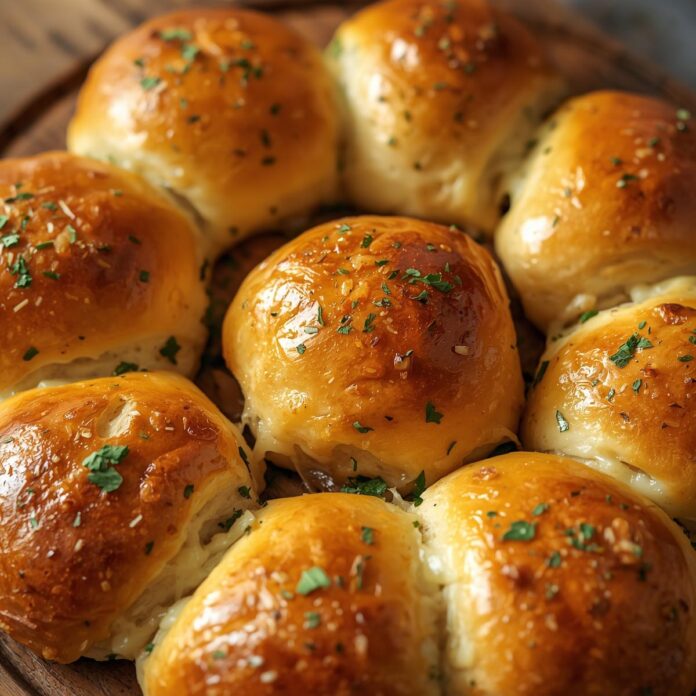
Cheesy garlic pizza balls are the perfect combination of indulgence, comfort, and finger-food fun. They take the familiar flavors of pizza—garlic, melted cheese, and a soft, pillowy crust—and transform them into bite-sized, hand-held parcels that are as satisfying to eat as they are to share. Unlike traditional pizza, which requires slicing and careful portioning, pizza balls offer convenience without sacrificing flavor or texture. Each ball is a self-contained package of gooey cheese, aromatic garlic, and savory sauce, making them ideal for parties, game nights, family dinners, or casual snacking.

What makes these pizza balls particularly special is the way they balance simplicity and decadence. The dough serves as a soft, slightly chewy vessel that holds a rich, flavorful filling, while the garlic butter topping creates an irresistible aroma and golden finish. Unlike some bread-based snacks that can be heavy or dry, these pizza balls are designed to remain soft and pillowy, with a perfectly balanced chewiness that complements the melted cheese inside. When baked correctly, the crust develops a subtle crispness on the outside while remaining tender on the inside, creating a textural contrast that makes each bite memorable.
Cheese is central to the appeal of these pizza balls. A combination of mozzarella, provolone, or even cheddar ensures that each bite is delightfully gooey and stringy, reminiscent of classic pizza but concentrated into a compact, flavorful bundle. Garlic, whether roasted, sautéed, or infused into butter, elevates the filling and topping with a robust aroma and savory depth. Optional additions such as pepperoni, sausage, mushrooms, or fresh herbs provide layers of complexity that allow you to customize the pizza balls to your taste or dietary preferences. This versatility makes the recipe accessible to both beginner cooks and more experienced home chefs looking to experiment with flavors.
Beyond flavor, pizza balls are a practical recipe. They are easy to portion, simple to bake, and highly adaptable. You can prepare them in advance and bake them when needed, or even freeze them for later use without losing quality. Their portable nature makes them ideal for packed lunches, school or office snacks, or quick appetizers during gatherings. Unlike some homemade pizzas that require careful attention to sauce distribution and baking time, pizza balls simplify the process while still delivering a professional-tasting result.
The creation of pizza balls is also a hands-on, enjoyable experience. Rolling out dough, layering cheese and fillings, and forming individual balls can be a fun activity for children or a communal cooking project for family and friends. The assembly process encourages creativity, as each pizza ball can be slightly different, tailored with various fillings, seasonings, and finishes. Watching them bake to golden perfection and filling the kitchen with the aroma of garlic and cheese is a rewarding experience in itself.
Step-by-Step Instructions
1. Preparing Your Workspace
Before starting, organize your kitchen. Cheesy garlic pizza balls require multiple steps, including dough preparation, filling assembly, and baking. Clear a large work surface for rolling and shaping dough, and gather tools such as mixing bowls, measuring cups and spoons, a whisk, a baking sheet, parchment paper, and a pastry brush.
Keep your fillings and toppings ready and within reach. Grate or shred cheese in advance, mince garlic if using fresh, and prepare optional ingredients like pepperoni, cooked sausage, or herbs. Preheating the oven should also be considered, but wait until assembly is nearly complete to ensure it is at the correct temperature when the pizza balls go in.
2. Preparing the Dough
If using store-bought pizza dough, remove it from the packaging and let it sit at room temperature for 20–30 minutes. Room-temperature dough is easier to stretch and shape, and it produces a softer, more tender crust.
If making dough from scratch, combine flour, yeast, salt, sugar, and warm water in a mixing bowl. Knead until the dough is smooth and elastic, approximately 8–10 minutes by hand or 5–7 minutes using a stand mixer with a dough hook. Cover with a damp towel or plastic wrap and let it rise in a warm area for 1–2 hours, or until doubled in size. Proper rising ensures a soft, airy interior in your pizza balls.
Once risen, punch down the dough to release trapped air and divide it into equal portions. Each portion will become an individual pizza ball.
3. Preparing the Garlic Butter
While the dough is rising or resting, prepare a garlic butter mixture. Melt butter in a small saucepan or microwave-safe bowl. Mince fresh garlic and stir it into the melted butter. Add salt, optional Italian seasoning, and a small pinch of red pepper flakes for added flavor. This garlic butter will be used both in the filling and as a finishing glaze, so making it in advance ensures it is ready for assembly.
4. Preparing the Cheese and Fillings
Grate or shred your cheese of choice, commonly mozzarella for its meltiness, along with provolone or cheddar for extra flavor. If using additional fillings such as pepperoni slices, cooked sausage, sautéed mushrooms, or spinach, prepare these in advance.
Cut larger ingredients into small, uniform pieces so that each pizza ball contains a balanced amount of filling. This prevents uneven cooking and ensures that every bite contains both cheese and flavor.
5. Assembling the Pizza Balls
Roll each portion of dough into a small disc about 3–4 inches in diameter. Spoon a small amount of grated cheese and optional fillings into the center of the disc. Brush the edges lightly with garlic butter to help seal the dough.
Fold the dough over the filling and pinch the edges together tightly to form a smooth ball. Ensure there are no gaps or openings, as these could allow the cheese to leak during baking. Place the filled pizza balls on a parchment-lined baking sheet, spacing them about 1 inch apart to allow for expansion during baking.
Brush the tops lightly with additional garlic butter for flavor and a golden finish. Optional: sprinkle with extra grated Parmesan or Italian seasoning for enhanced taste and presentation.
6. Baking
Preheat the oven to 375°F (190°C) if not already done. Bake the pizza balls for 15–20 minutes, or until golden brown and cooked through. Smaller balls may bake faster, while larger balls may need an additional 2–3 minutes.
Watch carefully during the last few minutes to avoid overbrowning. The cheese inside should be melted and gooey, while the exterior should be lightly crisp but still soft and tender to the touch.
7. Cooling and Finishing
Remove the pizza balls from the oven and allow them to cool for 5–10 minutes. This brief cooling period lets the cheese set slightly, making them easier to handle and eat without spilling the filling.
Brush once more with garlic butter if desired for extra flavor and shine. Garnish with fresh chopped parsley, basil, or a sprinkle of Parmesan for presentation.
8. Serving
Serve pizza balls warm, either individually on a platter or in a bowl for communal snacking. They are ideal as appetizers, game-day snacks, or party finger foods. Provide marinara or pizza sauce on the side for dipping, enhancing the classic pizza flavor experience.
For larger gatherings, keep the pizza balls warm in a low oven (about 200°F/95°C) covered loosely with foil until ready to serve. This preserves both texture and gooeyness of the cheese.
Cheesy Garlic Pizza Balls
Cheesy garlic pizza balls are the perfect combination of indulgence, comfort, and finger-food fun. They take the familiar flavors of pizza—garlic, melted cheese, and a soft, pillowy crust—and transform them into bite-sized, hand-held parcels that are as satisfying to eat as they are to share. Unlike traditional pizza, which requires slicing and careful portioning, pizza balls offer convenience without sacrificing flavor or texture. Each ball is a self-contained package of gooey cheese, aromatic garlic, and savory sauce, making them ideal for parties, game nights, family dinners, or casual snacking.
Ingredients
- For the Dough:
- 1 ½ cups all-purpose flour
- 1 tsp sugar
- ½ tsp salt
- 1 tsp instant yeast
- ⅔ cup warm water
- 1 tbsp olive oil
- For the Filling:
- 1 cup shredded mozzarella cheese
- ¼ cup grated Parmesan cheese
- 2–3 slices pepperoni, chopped (optional)
- ½ tsp dried oregano
- ½ tsp garlic powder
- For the Garlic Butter Topping:
- 3 tbsp unsalted butter, melted
- 2 cloves garlic, minced
- 1 tsp dried parsley
Instructions
1. Prepare the Dough
- In a bowl, mix warm water, sugar, and yeast. Let sit 5 minutes until foamy.
- Add flour, salt, and olive oil. Knead for 5–7 minutes until smooth and elastic.
- Cover and let rise for 15–20 minutes, or until slightly puffed.
2. Preheat Oven
- Preheat oven to 375°F (190°C). Line a baking sheet with parchment paper.
3. Assemble Pizza Balls
- Divide dough into 12–16 pieces.
- Flatten each piece into a small disc.
- Place a teaspoon of mozzarella (and optional pepperoni) in the center.
- Sprinkle with Parmesan, oregano, and garlic powder.
- Fold edges over filling and pinch to seal, forming a ball.
- Place seam-side down on the prepared baking sheet.
4. Add Garlic Butter
- Mix melted butter, minced garlic, and parsley.
- Brush half over pizza balls before baking.
5. Bake
- Bake for 15–20 minutes, until golden brown.
- Brush remaining garlic butter over hot pizza balls when they come out of the oven.
6. Serve
- Serve warm with marinara or pizza sauce for dipping.
Notes
- Cheese variations: Mix mozzarella with cheddar, provolone, or fontina.
- Make-ahead: Assemble and freeze uncooked balls; bake from frozen, adding a few extra minutes.
- Spicy option: Add red pepper flakes to the filling or brush topping.
- Kid-friendly tip: Mini pizza balls are perfect for lunchboxes or party snacks.

