Christmas Tree Rice Krispie Treats Recipe
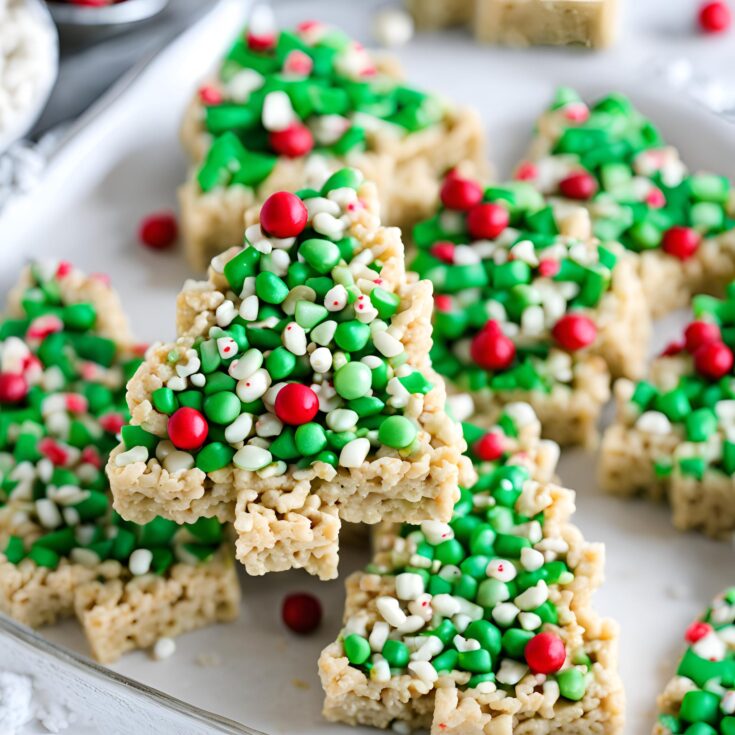
Christmas is the perfect time for festive treats, and these Christmas Tree Rice Krispie Treats are as adorable as they are delicious. They’re a fun twist on the classic Rice Krispie Treats, shaped like Christmas trees, and decorated to look like they came straight from Santa’s workshop. These treats are simple to make, requiring just a few ingredients and a little creativity. Whether you’re hosting a holiday party or looking for a kid-friendly activity, these treats will spread joy and holiday cheer!

Why You’ll Love This Recipe
- Kid-Friendly Fun: Perfect for little helpers who want to decorate their own edible Christmas trees.
- No-Bake Simplicity: A quick and easy treat that doesn’t require an oven.
- Customizable: You can decorate these treats with any holiday candies, sprinkles, or frosting.
- Festive and Eye-Catching: These bright, cheerful treats are perfect for any holiday dessert table.
- Delicious Classic Flavor: The buttery, marshmallow-y base makes this treat irresistible.
Step-by-Step Instructions
Step 1: Make the Rice Krispie Mixture
- Melt the Butter and Marshmallows:
- In a large saucepan, melt butter over low heat. Once melted, add the marshmallows and stir continuously until smooth.
- Add Vanilla and Food Coloring:
- Remove the saucepan from heat and stir in vanilla extract. Add green food coloring a few drops at a time, mixing until you achieve your desired shade of green.
- Mix in the Cereal:
- Gradually fold in the Rice Krispies cereal until fully coated in the marshmallow mixture.
Step 2: Shape the Trees
- Transfer to Baking Sheet:
- Spray a baking sheet with non-stick cooking spray or line it with parchment paper. Spread the Rice Krispie mixture evenly on the sheet.
- Cut into Tree Shapes:
- Let the mixture cool slightly, then use a Christmas tree cookie cutter to cut out shapes. If you don’t have a cookie cutter, use a knife to cut triangle shapes.
- Insert Pretzel Sticks:
- Gently press a pretzel stick into the base of each tree to act as the tree trunk.
Step 3: Decorate the Trees
- Add Ornaments:
- Press mini M&M’s or other small candies onto the trees as ornaments.
- Top with Stars:
- Place a candy star or sprinkle on the top of each tree.
- Create Garland (Optional):
- Use white frosting to pipe garlands or add more decorations.
- Add Snow (Optional):
- Dust the trees lightly with powdered sugar for a snowy effect.
Tips for Success
- Work Quickly:
- The Rice Krispie mixture sets fast, so shape and decorate while it’s still warm.
- Grease Your Hands or Tools:
- Use a bit of butter or non-stick spray on your hands or utensils to prevent sticking.
- Use Gel Food Coloring:
- Gel-based food coloring gives a more vibrant color without watering down the mixture.
- Experiment with Shapes:
- Aside from trees, you can make wreaths, stars, or snowmen for variety.
- Store Properly:
- Keep the treats in an airtight container to maintain freshness.
Variations
- Chocolate Dipped Trees:
- Dip the base or edges of the trees in melted chocolate for extra flavor.
- Gluten-Free Version:
- Use certified gluten-free Rice Krispies and marshmallows.
- Minty Trees:
- Add a drop of peppermint extract for a festive minty twist.
- Red and Green Combo:
- Divide the mixture and color half red and half green for dual-colored trees.
Serving Suggestions
- Holiday Dessert Table:
- Arrange the trees on a festive platter surrounded by candy canes or other holiday sweets.
- Party Favors:
- Wrap individual trees in clear cellophane and tie with a ribbon for adorable take-home treats.
- Paired with Hot Chocolate:
- Serve alongside a warm cup of cocoa for a cozy holiday pairing.
Frequently Asked Questions
Q: Can I use regular marshmallows instead of mini ones?
A: Absolutely! Just ensure they melt evenly by stirring continuously.
Q: How can I make these dairy-free?
A: Use vegan butter and dairy-free marshmallows to make this recipe suitable for those with dietary restrictions.
Q: What if I don’t have a tree-shaped cookie cutter?
A: A knife works perfectly to cut simple triangle shapes, which resemble trees.
Q: Can I use food-safe glitter for decoration?
A: Yes! Edible glitter adds a magical sparkle to your trees.
Q: Can I substitute the Rice Krispies cereal?
A: Sure, you can use any puffed rice cereal or a mix of cereals for added texture.
Conclusion
Christmas Tree Rice Krispie Treats are an easy and fun way to celebrate the holiday season. With their delightful appearance and classic flavor, they’re sure to be a hit with kids and adults alike. The combination of gooey marshmallow, crispy cereal, and festive decorations makes these treats the perfect addition to your holiday traditions.
Gather your family, get creative, and make these charming little trees the centerpiece of your holiday festivities!
Christmas Tree Rice Krispie Treats Recipe

Christmas is the perfect time for festive treats, and these Christmas Tree Rice Krispie Treats are as adorable as they are delicious. They’re a fun twist on the classic Rice Krispie Treats, shaped like Christmas trees, and decorated to look like they came straight from Santa’s workshop. These treats are simple to make, requiring just a few ingredients and a little creativity. Whether you're hosting a holiday party or looking for a kid-friendly activity, these treats will spread joy and holiday cheer!
Ingredients
- 3 tablespoons unsalted butter
- 10 ounces marshmallows (mini or regular)
- 6 cups crispy rice cereal
- Green food coloring
- 12 pretzel sticks (for tree trunks)
- Assorted sprinkles and candies (for decorations)
- 1/4 cup powdered sugar mixed with 1-2 teaspoons water (optional icing "glue")
Instructions
1. Prepare Your Workspace:
- Line a baking sheet with parchment paper or a silicone mat.
- Lightly grease your hands or a spatula with butter to prevent sticking.
2. Melt the Marshmallows:
- In a large pot, melt the butter over low heat.
- Add the marshmallows and stir continuously until completely melted and smooth.
- Stir in green food coloring a few drops at a time until the desired shade of green is achieved.
3. Add the Cereal:
- Remove the pot from the heat and quickly fold in the crispy rice cereal, ensuring it’s evenly coated with the marshmallow mixture.
4. Shape the Trees:
- Allow the mixture to cool slightly (enough to handle safely, but still pliable).
- Using greased hands, scoop portions of the mixture and shape them into cones to resemble Christmas trees.
- Place the shaped trees on the prepared baking sheet.
5. Add the Trunks:
- Insert a pretzel stick into the base of each tree to act as the trunk.
6. Decorate:
- Use sprinkles, candies, or small edible stars to decorate the trees while the mixture is still slightly sticky.
- For additional decoration, use the powdered sugar icing as glue to attach candies or to drizzle over the trees for a snowy effect.
7. Cool and Set:
- Allow the trees to cool completely at room temperature until firm, about 30 minutes.
Notes
- Custom Shapes: Use cookie cutters for different holiday shapes if you prefer not to hand-shape the trees.
- Flavor Variations: Add a teaspoon of vanilla or almond extract to the melted marshmallows for extra flavor.

