Honey Butter Chicken Recipe
There are dishes that soothe the soul, and then there are dishes that surprise and soothe in equal measure. Honey Butter Chicken is the latter—a delightful combination of crispy, tender chicken enveloped in a glossy glaze of rich butter and golden honey. It’s sweet but balanced, comforting yet bold, and undeniably satisfying in every bite.
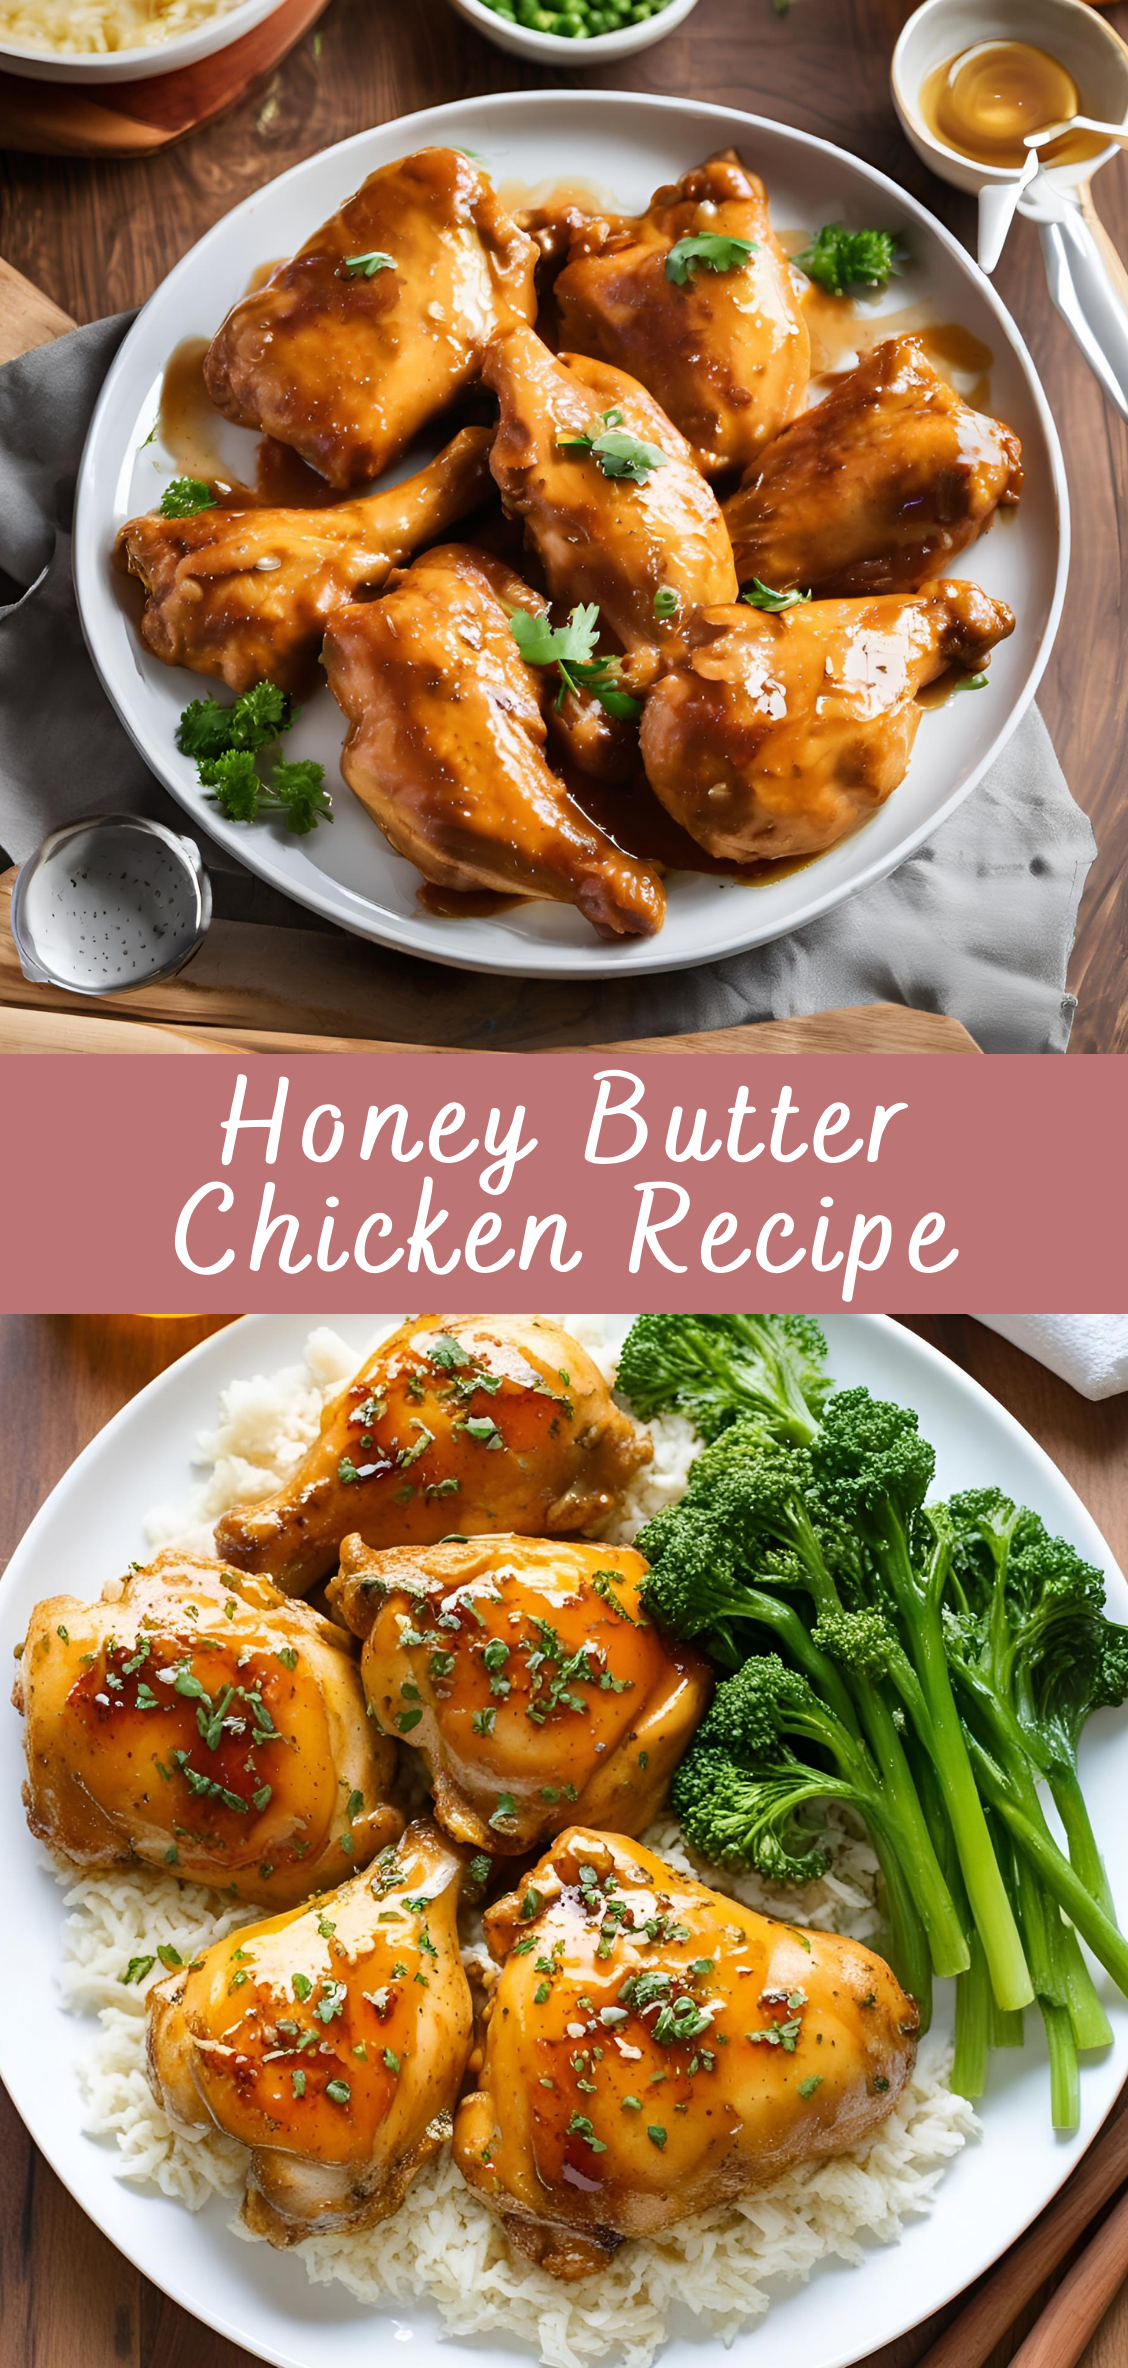
This recipe is a love letter to the irresistible contrast of textures and flavors. The crunch of perfectly fried or baked chicken gives way to succulent meat, all bathed in a buttery sauce that clings to every crevice. The honey adds natural sweetness and shine, while the butter brings richness and depth. Together, they create a flavor profile that’s decadent without being overwhelming.
What makes Honey Butter Chicken so appealing is its versatility. It’s a dish that can be dressed up for a dinner party or served casually with waffles or biscuits for a weekend brunch. It works as well in a sandwich as it does on its own. And depending on how you like your heat, a touch of cayenne or hot sauce can take it in a spicy-sweet direction that’s downright addictive.
The origins of honey butter chicken are hard to pin down to one region or cuisine—it’s more of a flavor trend that’s evolved through food culture. In the Southern United States, honey and butter are traditional pairings for fried chicken, often served with cornbread or waffles. In Korean cuisine, Korean honey butter fried chicken has become a wildly popular street food, known for its ultra-crispy texture and sticky, savory glaze. And across the globe, chefs and home cooks alike have embraced the idea of combining sugar and spice with the savory crunch of chicken.
This recipe guide will walk you through the full process of making Honey Butter Chicken from scratch—no shortcuts, no skimping on flavor. We’ll explore ingredient selection, kitchen tools, preparation techniques, cooking methods (fried and baked options), sauce variations, serving ideas, and tips for storing leftovers. We’ll even break down the science of why honey and butter work so well together and how to achieve that perfect glaze without ending up with a greasy or overly sweet result.
Whether you’re here to master the basics or take your home-cooked comfort food to the next level, this recipe is for you. It’s a celebration of indulgence in the best possible way.
History and Flavor Inspiration: The Origins of Honey Butter Chicken
The Sweet and Savory Tradition
Honey Butter Chicken, though widely adored today, draws inspiration from several culinary traditions that highlight the harmony between sweet and savory flavors. This combination of sweetness with the richness of butter and the savoriness of chicken is as old as cooking itself, especially in cuisines that emphasize balance in taste.
The Southern Influence
In the Southern United States, honey and butter have long been used in combination to complement hearty, savory dishes. Fried chicken, cornbread, and biscuits are staples of Southern comfort food, and many of these dishes are paired with honey or butter to enhance their flavor. Honey’s natural sweetness and buttery richness balance the savory and often salty components of the food, creating a deeply satisfying experience for the palate.
Fried chicken is a Southern classic in itself, and when paired with a touch of honey and butter, the result is a flavor-packed dish that’s both crispy and tender, with a balanced sweetness that contrasts with the savory seasoning. This pairing has become a beloved element of Southern cuisine, often served with waffles or biscuits for an unforgettable meal.
Korean Influence: Honey Butter Fried Chicken
In the last decade, Korean fried chicken has become a global phenomenon. The dish is renowned for its ultra-crisp texture and unique flavor combinations, often featuring sweet, sticky sauces that coat the chicken in a glistening layer. Korean honey butter chicken is a variation that incorporates a rich honey-butter glaze, inspired by the Korean love of sweet and savory flavor profiles.
In Korea, the combination of honey and butter has become a widely popular way to prepare fried chicken, particularly in street food culture. This trend grew rapidly in the 2010s, and it wasn’t long before honey butter fried chicken became a signature item on menus worldwide. The chicken is typically coated in a honey and butter mixture, often enhanced with a touch of soy sauce and garlic to add umami depth.
While this specific preparation has roots in Korean cuisine, the concept of using honey and butter together transcends cultural boundaries, showing just how universal and timeless the combination of sweet and savory can be.
The Global Appeal of Sweet and Savory Combinations
The beauty of Honey Butter Chicken is that it taps into a universally understood flavor profile—sweet and savory. Whether it’s the sticky sweetness of honey against the rich saltiness of fried chicken or the creamy butter bringing depth to a honey glaze, the contrast is irresistible. This combination appears in many different global cuisines, from honey-glazed duck in French cuisine to barbecue chicken with a honey-based glaze in various American regions. The balance of flavors appeals to the human palate’s natural desire for contrast—sweetness, richness, and saltiness all working together in harmony.
As food culture has become more globalized, Honey Butter Chicken has found its place in kitchens across the world, evolving with each chef’s touch. Some may lean more into the sweetness, while others might bring in a touch of spice or acidity to cut through the richness. The flexibility of this dish allows it to fit into a variety of culinary contexts, whether you’re serving it as a Southern-inspired comfort food meal, a fusion dish, or a trendy appetizer.
Step 1: Preparing the Chicken and Setting Up the Breading Station
The first step to a crispy, golden-brown exterior and juicy, tender interior is properly prepping the chicken. Whether you’re frying or baking, the key is to coat the chicken evenly so that the breading sticks and creates that perfect crust.
1.1. Preparing the Chicken
Start by taking your chicken breasts (or thighs) and patting them dry with paper towels. This helps remove any excess moisture, which can interfere with the breading process. The drier the chicken, the better the breading will adhere, giving you a crispier finish.
Optional Step for Thicker Breasts:
If you’re using chicken breasts, consider butterflying them or cutting them in half horizontally to create thinner pieces. Thinner pieces cook more evenly and quickly, which is ideal if you want a crisp crust and juicy interior.
Once prepped, season both sides of the chicken with salt and black pepper to taste. You can also add a bit of garlic powder or onion powder to boost the flavor of the chicken itself. Remember, the breading and honey butter sauce will add plenty of flavor, so don’t overdo it on the seasonings here.
1.2. Setting Up the Breading Station
Now that the chicken is prepped, it’s time to create your breading station. This is a key step to getting that perfectly crispy coating, so make sure to set everything up in an organized way.
You’ll need three shallow dishes (or plates):
-
Dish 1 – Flour Mixture:
In the first dish, combine 1 cup of all-purpose flour with 1 teaspoon of garlic powder, 1 teaspoon of onion powder, and 1 teaspoon of paprika. Season this mixture with a pinch of salt and black pepper. -
Dish 2 – Egg Wash:
In the second dish, whisk 2 large eggs with 1 tablespoon of water or milk to create a smooth egg wash. The water or milk makes it easier for the egg to coat the chicken evenly. -
Dish 3 – Breadcrumbs:
In the third dish, add 1 cup of breadcrumbs (Panko breadcrumbs are ideal for extra crispiness). You can also add a touch of garlic powder, onion powder, or paprika here for extra flavor if desired.
1.3. Dredging the Chicken
Take each piece of chicken and coat it in the following order:
-
First, dredge the chicken in the flour mixture, ensuring it’s fully covered and tap off any excess.
-
Then dip it into the egg wash, making sure the chicken is evenly coated with the egg mixture.
-
Finally, press the chicken into the breadcrumbs, ensuring it’s completely covered in a thick layer of crumbs.
For an extra crispy coating, you can repeat the process—dipping back into the egg wash and then the breadcrumbs again. This double-coating method will create an even thicker crust.
Once all the chicken pieces are breaded, set them aside on a clean plate or baking rack while you prepare for cooking.
Step 2: Frying the Chicken
If you’ve chosen to fry your chicken, the process is simple but requires careful attention to ensure the chicken is crispy and cooked through.
2.1. Heat the Oil
In a large skillet or deep frying pan, pour enough vegetable or canola oil to reach about 2 inches up the side of the pan. Heat the oil over medium-high heat until it reaches 350°F (175°C). If you don’t have a thermometer, test the oil by dropping a small piece of breading into the pan. If it bubbles vigorously and starts to brown within a few seconds, the oil is ready.
Tip: It’s important to maintain the oil temperature while frying. Too high, and the chicken will burn before cooking through; too low, and the breading will soak up too much oil and become greasy.
2.2. Fry the Chicken
Carefully place the breaded chicken pieces into the hot oil, one at a time. Don’t overcrowd the pan—work in batches if necessary. Fry the chicken for 5 to 7 minutes per side until it’s golden brown and crispy. The internal temperature of the chicken should reach 165°F (75°C) to ensure it’s fully cooked.
Tip: For extra crispy chicken, don’t flip it too often. Let it cook undisturbed on each side for a few minutes to develop a solid crust.
Once cooked, transfer the chicken to a plate lined with paper towels or a wire rack to drain any excess oil.
Step 3: Making the Honey Butter Sauce
Now that your chicken is crispy and perfectly fried, it’s time to make the delicious honey butter sauce that will coat the chicken and bring it all together.
3.1. Melt the Butter
In a small saucepan, melt ½ cup of unsalted butter over medium heat. Stir occasionally to ensure the butter doesn’t burn, but let it melt gently until it becomes smooth and golden.
3.2. Add the Honey
Once the butter is melted, add ⅓ cup of honey to the saucepan. Stir the mixture together, allowing the honey to blend smoothly with the butter. The combination of honey and butter will naturally create a glossy sauce with a rich, slightly thick texture.
Tip: You can use different types of honey depending on your preference. Clover honey offers a mild sweetness, while stronger varieties like buckwheat honey add a more robust, earthy flavor.
3.3. Add Flavor Enhancers
To elevate the sauce, add 1 tablespoon of Dijon mustard (optional), which gives the sauce a slight tanginess and complexity. You can also incorporate 1 teaspoon of garlic powder for additional savory notes and a pinch of cayenne pepper if you like a little heat.
If you want a touch of acidity to balance the richness, add 1 tablespoon of apple cider vinegar or fresh lemon juice. Stir the sauce until all the ingredients are well-combined and smooth.
3.4. Simmer and Thicken
Allow the honey butter sauce to simmer over low heat for 2–3 minutes. This will thicken the sauce slightly and help the flavors meld together. Stir occasionally to ensure it doesn’t burn or separate.
Step 4: Coating the Chicken
Now that both the chicken and honey butter sauce are ready, it’s time to combine the two for maximum flavor.
4.1. Coat the Chicken
Place the fried chicken pieces into a large bowl or serving dish. Spoon the warm honey butter sauce over the chicken, ensuring each piece is generously coated. For an extra touch, use a basting brush to apply the sauce evenly across the chicken.
4.2. Garnish and Serve
For a finishing touch, garnish the chicken with freshly chopped parsley or chives, adding a pop of color and freshness that cuts through the richness of the honey butter. Serve with lemon wedges on the side, allowing guests to add a touch of acidity if desired.
Honey Butter Chicken Recipe
There are dishes that soothe the soul, and then there are dishes that surprise and soothe in equal measure. Honey Butter Chicken is the latter—a delightful combination of crispy, tender chicken enveloped in a glossy glaze of rich butter and golden honey. It’s sweet but balanced, comforting yet bold, and undeniably satisfying in every bite.
Ingredients
- For the Chicken:
- 1.5 lbs boneless, skinless chicken thighs or breasts (cut into bite-sized pieces)
- Salt and pepper to taste
- 2 tablespoons cornstarch (for light coating)
- 2 tablespoons vegetable oil (for frying)
- For the Honey Butter Sauce:
- ¼ cup honey
- 3 tablespoons unsalted butter
- 1 tablespoon soy sauce
- 2 cloves garlic, minced
- ½ teaspoon chili flakes (optional, for heat)
Instructions
- Prep the Chicken:
Season chicken pieces with salt and pepper. Lightly toss in cornstarch until evenly coated. - Cook the Chicken:
Heat oil in a large skillet over medium-high heat. Add chicken and cook until golden brown and cooked through (about 4-5 minutes per side). Remove from pan and set aside. - Make the Sauce:
In the same pan, reduce heat to medium. Add butter, honey, soy sauce, garlic, and chili flakes (if using). Stir until melted and bubbling, about 1-2 minutes. - Combine & Glaze:
Return chicken to the pan. Toss to coat in the honey butter sauce. Cook for another 2-3 minutes until sticky and caramelized. - Serve:
Serve hot over steamed rice, mashed potatoes, or with roasted veggies. Garnish with green onions or sesame seeds if desired.
Notes
- Crispier chicken? Double fry or use an air fryer for extra crunch before adding to the sauce.
- Sweetness level: Adjust honey to taste — start with less and add more if needed.
- Add-ons: Try adding broccoli, snow peas, or cashews to turn it into a stir-fry.

