The Ultimate Guide to Red Velvet Truffles: A Decadent Dessert Experience
Few desserts evoke the same sense of indulgent luxury as red velvet. With its vibrant crimson hue, subtle cocoa flavor, and creamy richness, red velvet has long been a favorite among dessert lovers. Traditionally known in the form of cake or cupcakes, red velvet has now found a new and equally delightful expression—red velvet truffles.
These bite-sized confections combine everything we love about red velvet with the smooth, melt-in-your-mouth experience of a chocolate truffle. Coated in chocolate or white chocolate and filled with a soft, cake-like center, red velvet truffles offer a perfect balance of texture and flavor. They are visually stunning, easy to personalize, and ideal for everything from holiday gifts to wedding favors, party treats, or even a simple weekend indulgence.
In this comprehensive guide, we’ll explore every aspect of making red velvet truffles at home. Whether you’re a baking novice or a seasoned home chef, this step-by-step journey will give you the tools, techniques, and inspiration to create your own batch of these luxurious sweets.
Part 1: Ingredients Preparation
Before starting the process, it’s essential to gather all your ingredients and tools. Preparation is key to a smooth experience in the kitchen.
Essential Ingredients
For the Red Velvet Cake Base:
-
1 ¼ cups (160g) all-purpose flour
-
1 tbsp unsweetened cocoa powder (not Dutch-processed)
-
½ tsp baking soda
-
½ tsp salt
-
½ cup (115g) unsalted butter, softened
-
¾ cup (150g) granulated sugar
-
1 large egg, room temperature
-
½ cup (120ml) buttermilk, room temperature
-
1 tsp vanilla extract
-
1 tsp white vinegar
-
1 tbsp red food coloring (liquid or gel)
For the Cream Cheese Frosting (Truffle Binder):
-
4 oz (115g) cream cheese, softened
-
2 tbsp unsalted butter, softened
-
1 tsp vanilla extract
-
1 ½ cups (180g) powdered sugar, sifted
For Coating:
-
12 oz (340g) white chocolate or candy melts (for coating)
-
Optional: 6 oz (170g) dark or milk chocolate (for variety or drizzling)
Optional Decoration Ingredients:
-
Red velvet cake crumbs (reserved)
-
Sprinkles, edible glitter, crushed nuts, or freeze-dried berries
Part 2: Baking the Red Velvet Cake
The truffles begin with a rich and moist red velvet cake. Baking it from scratch gives you complete control over flavor and texture, ensuring your truffles are exceptional.
Step-by-Step Cake Preparation
-
Preheat the Oven
Set your oven to 350°F (175°C). Line an 8×8-inch baking pan with parchment paper or lightly grease it with butter or non-stick spray. -
Sift the Dry Ingredients
In a medium mixing bowl, sift together:-
Flour
-
Cocoa powder
-
Baking soda
-
Salt
This helps prevent lumps and ensures even mixing.
-
-
Cream the Butter and Sugar
In a large mixing bowl, use an electric mixer or stand mixer to cream together:-
Softened butter
-
Granulated sugar
Mix on medium speed for 2–3 minutes, until the mixture is pale and fluffy. This incorporates air, resulting in a lighter cake.
-
-
Add the Egg
Add the egg and beat until fully combined. Scrape down the sides of the bowl with a spatula to ensure even mixing. -
Mix Wet Ingredients Separately
In a small bowl or measuring cup, combine:-
Buttermilk
-
Vanilla extract
-
White vinegar
-
Red food coloring
Stir until the color is evenly distributed.
-
-
Alternate Adding Dry and Wet Mixtures
With the mixer on low speed, add the flour mixture and buttermilk mixture in parts:-
Start with ⅓ of the dry ingredients
-
Add ½ of the wet ingredients
-
Repeat, ending with the dry mixture
This prevents overmixing and results in a tender crumb.
-
-
Bake the Cake
Pour the batter into your prepared pan. Smooth the top with a spatula.
Bake for 25–30 minutes, or until a toothpick inserted in the center comes out clean.
Let the cake cool completely on a wire rack before proceeding.
Part 3: Making the Truffle Mixture
Once your cake is baked and cooled, it’s time to transform it into a rich, fudgy truffle filling.
Step-by-Step Truffle Mixture Preparation
-
Break Down the Cake
Using clean hands or a fork, crumble the cooled cake into fine crumbs.
Reserve about 2 tablespoons of crumbs for decoration if desired. -
Prepare the Cream Cheese Frosting
In a clean mixing bowl, beat together:-
Softened cream cheese
-
Softened butter
Beat until smooth and creamy.
Add:
-
Vanilla extract
Mix again, then gradually add sifted powdered sugar.
Beat until the frosting is soft, spreadable, and lump-free.
-
-
Combine Cake and Frosting
Add the crumbled cake to the frosting, mixing with a spatula or your hands until the mixture forms a dough-like consistency.
It should be moist enough to hold its shape when rolled but not sticky.Tip: If it’s too dry, add a little more frosting (1 tablespoon at a time). If it’s too wet, add more cake crumbs.
Part 4: Shaping and Chilling the Truffles
This stage sets the base for coating and decorating.
Step-by-Step Shaping
-
Portion the Mixture
Use a small cookie scoop or tablespoon to scoop even portions of the mixture. Aim for balls about 1 inch in diameter (roughly 20–25g each). -
Roll into Smooth Balls
Roll each portion between your palms until smooth. Place them on a parchment-lined baking sheet. -
Chill the Truffles
Refrigerate the truffle balls for at least 1 hour, or freeze for 20–30 minutes.
This helps them firm up, making them easier to dip without falling apart.
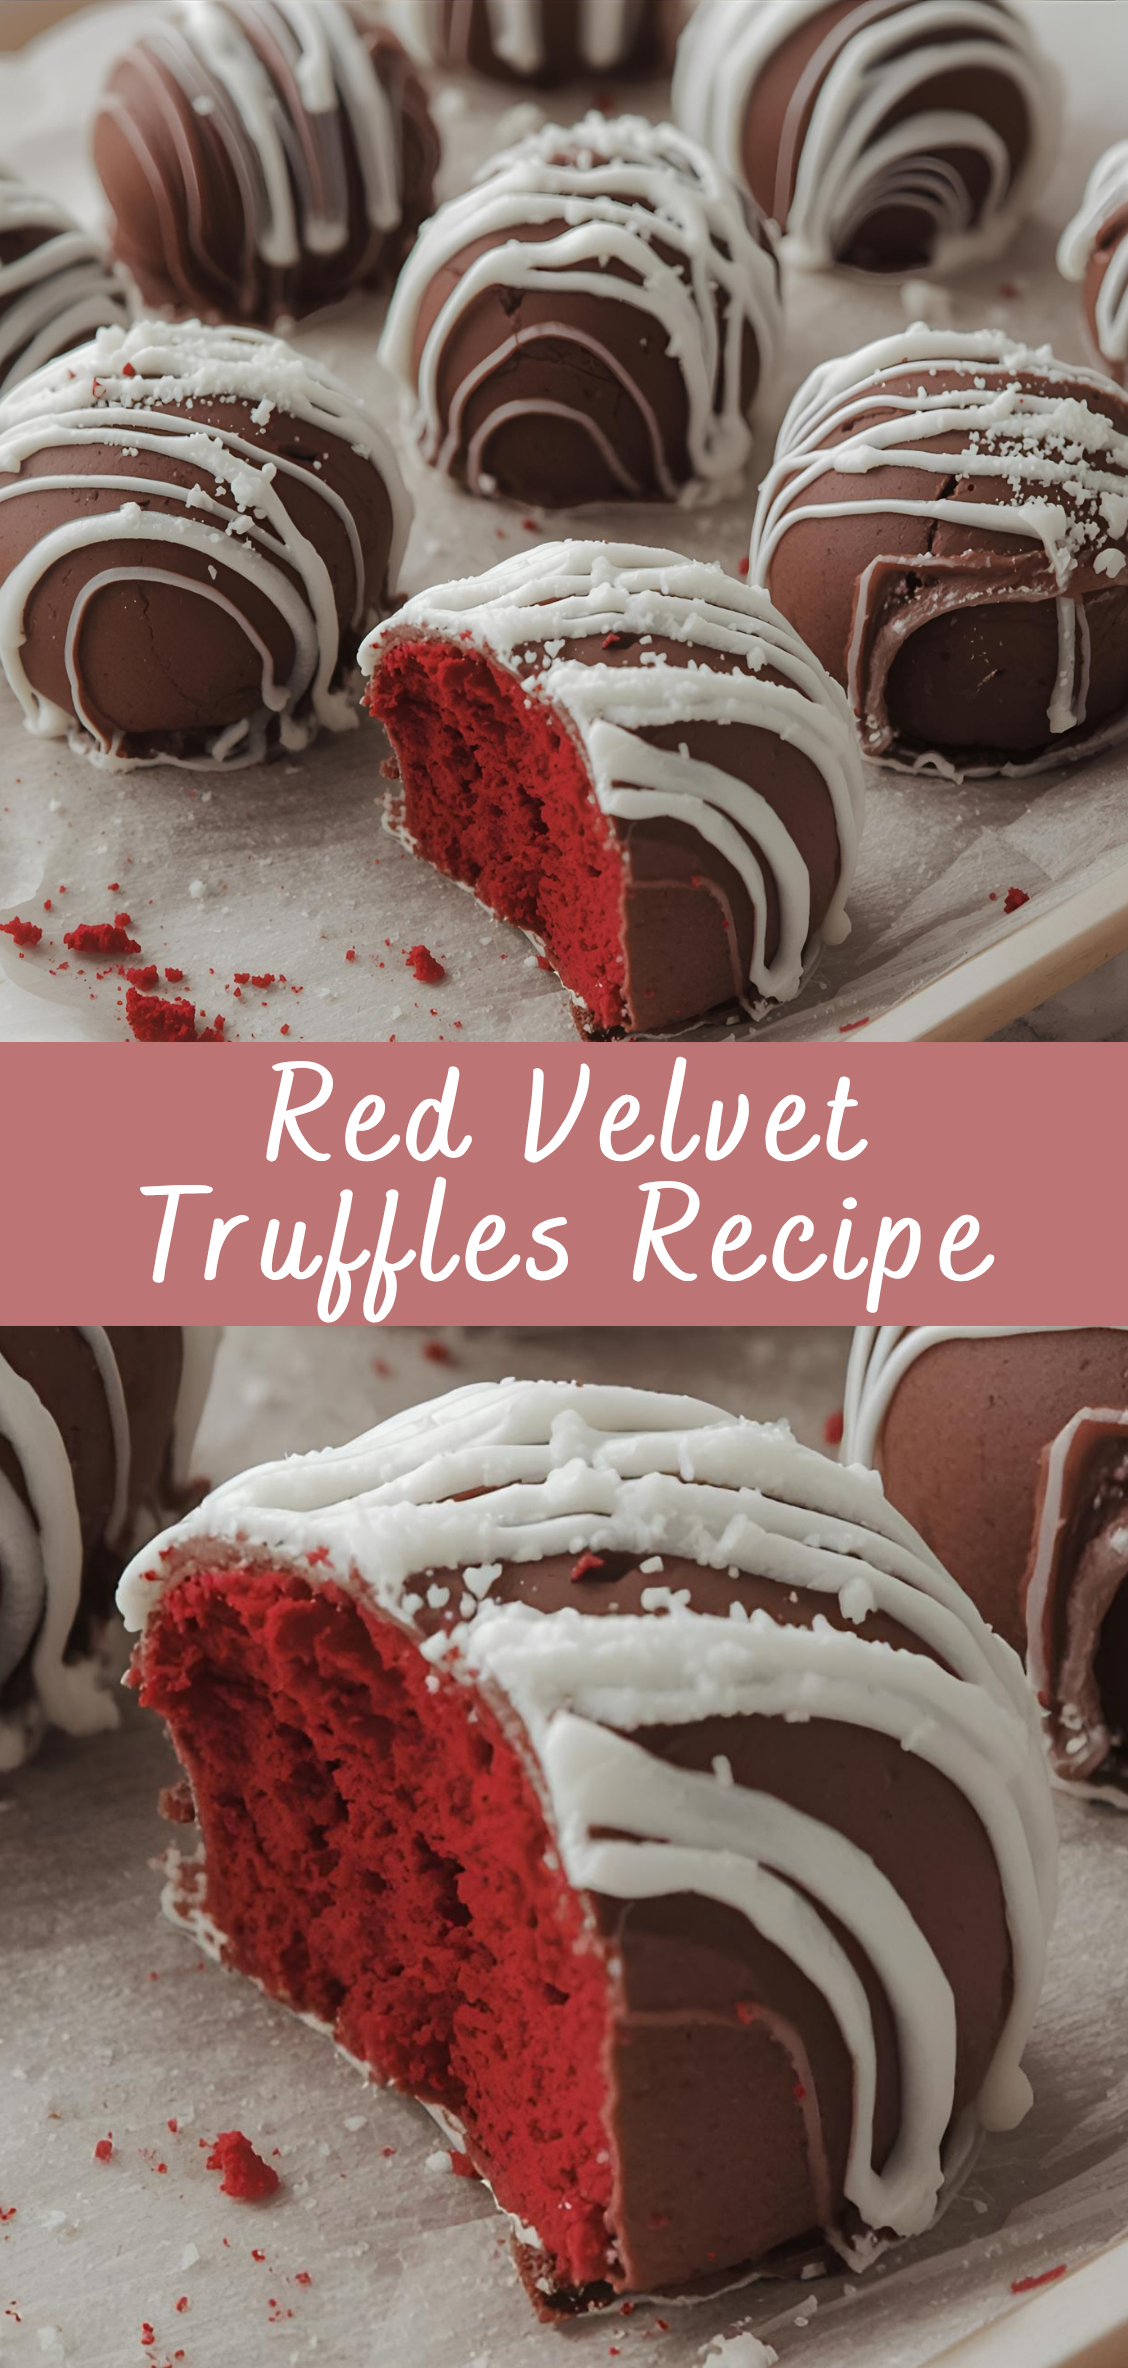
Part 5: Coating the Truffles
Coating your truffles is where the transformation truly begins. A silky shell of chocolate adds texture, flavor, and visual appeal.
Step-by-Step Coating Process
-
Melt the Chocolate
In a microwave-safe bowl or using a double boiler, melt your white chocolate or candy melts. Stir every 15–20 seconds until fully smooth.Optional: Add a teaspoon of coconut oil for a thinner coating and shinier finish.
-
Dip the Truffles
Using a fork or dipping tool, lower each chilled truffle into the melted chocolate. Tap gently to remove excess coating. -
Place on Tray
Carefully transfer the coated truffle to a parchment-lined tray. Use a toothpick to nudge it off the fork cleanly. -
Decorate Quickly (if desired)
While the chocolate is still wet, sprinkle:-
Reserved cake crumbs
-
Sprinkles
-
Crushed nuts
-
Edible glitter
Or drizzle with contrasting chocolate for a two-tone effect.
-
-
Let Set
Allow truffles to set at room temperature or refrigerate for 15–20 minutes until the coating is firm.
Part 6: Optional Decoration Techniques
If you want to go beyond the basics, here are some advanced decorating ideas:
Chocolate Drizzle
-
Melt dark or milk chocolate and use a piping bag or spoon to drizzle over set white chocolate coating for contrast.
Color-Tinted White Chocolate
-
Tint white chocolate with oil-based food coloring for festive occasions like Valentine’s Day (pink), Christmas (green/red), or Halloween (orange).
Dusting and Finishing
-
Dust with edible gold powder, cocoa powder, or powdered sugar using a fine sieve for a professional finish.
Red Velvet Truffles Recipe
Few desserts evoke the same sense of indulgent luxury as red velvet. With its vibrant crimson hue, subtle cocoa flavor, and creamy richness, red velvet has long been a favorite among dessert lovers. Traditionally known in the form of cake or cupcakes, red velvet has now found a new and equally delightful expression—red velvet truffles.
Ingredients
- For the Red Velvet Cake (if making from scratch):
- 1 1/4 cups (160g) all-purpose flour
- 1 cup (200g) granulated sugar
- 1 tbsp cocoa powder (unsweetened)
- 1/2 tsp baking soda
- 1/2 tsp salt
- 1 large egg
- 3/4 cup (180ml) buttermilk
- 1/2 cup (120ml) vegetable oil
- 1 tbsp red food coloring
- 1 tsp vanilla extract
- 1/2 tsp white vinegar
- For the Truffle Mixture:
- 2 cups crumbled red velvet cake (from above or leftover cake)
- 1/2 cup (120g) cream cheese, softened
- For the Coating:
- 12 oz (340g) white chocolate or white candy melts
- Optional: Red sprinkles, red velvet crumbs, or drizzle for decoration
Instructions
1. Make the Red Velvet Cake (Skip if using leftover cake):
- Preheat oven to 350°F (175°C). Grease and flour an 8-inch round or square cake pan.
- In a bowl, sift together flour, cocoa powder, baking soda, and salt.
- In a separate bowl, whisk sugar, oil, egg, buttermilk, red food coloring, vanilla, and vinegar until smooth.
- Add dry ingredients to wet ingredients and stir until just combined.
- Pour into prepared pan and bake for 25–30 minutes, or until a toothpick comes out clean.
- Let cool completely before using in truffles.
2. Prepare the Truffle Mixture:
- Crumble 2 cups worth of red velvet cake into fine crumbs.
- In a mixing bowl, combine crumbs with softened cream cheese.
- Mix with a spoon or your hands until a moist, dough-like consistency forms.
3. Shape the Truffles:
- Scoop and roll into 1-inch balls. Place on a parchment-lined baking sheet.
- Chill in the freezer for 20–30 minutes (or refrigerator for 1 hour).
4. Dip in Chocolate:
- Melt white chocolate or candy melts in a microwave-safe bowl, in 30-second intervals, stirring in between.
- Using a fork or dipping tool, dip each chilled truffle into the melted chocolate, tap off excess, and return to the tray.
- Decorate immediately if using sprinkles or crumbs before the coating sets.
5. Set & Store:
- Let truffles set at room temperature or chill briefly to harden the coating.
- Store in an airtight container in the fridge for up to 5–7 days.
Notes
- Short on time? Use a box red velvet cake mix and canned cream cheese frosting.
- Too sticky to roll? Chill the mixture briefly before forming balls.
- Want a colored drizzle? Tint leftover white chocolate with gel food coloring and drizzle over set truffles.
- Flavor tip: Add a drop of almond or peppermint extract to the coating for a flavor twist.

