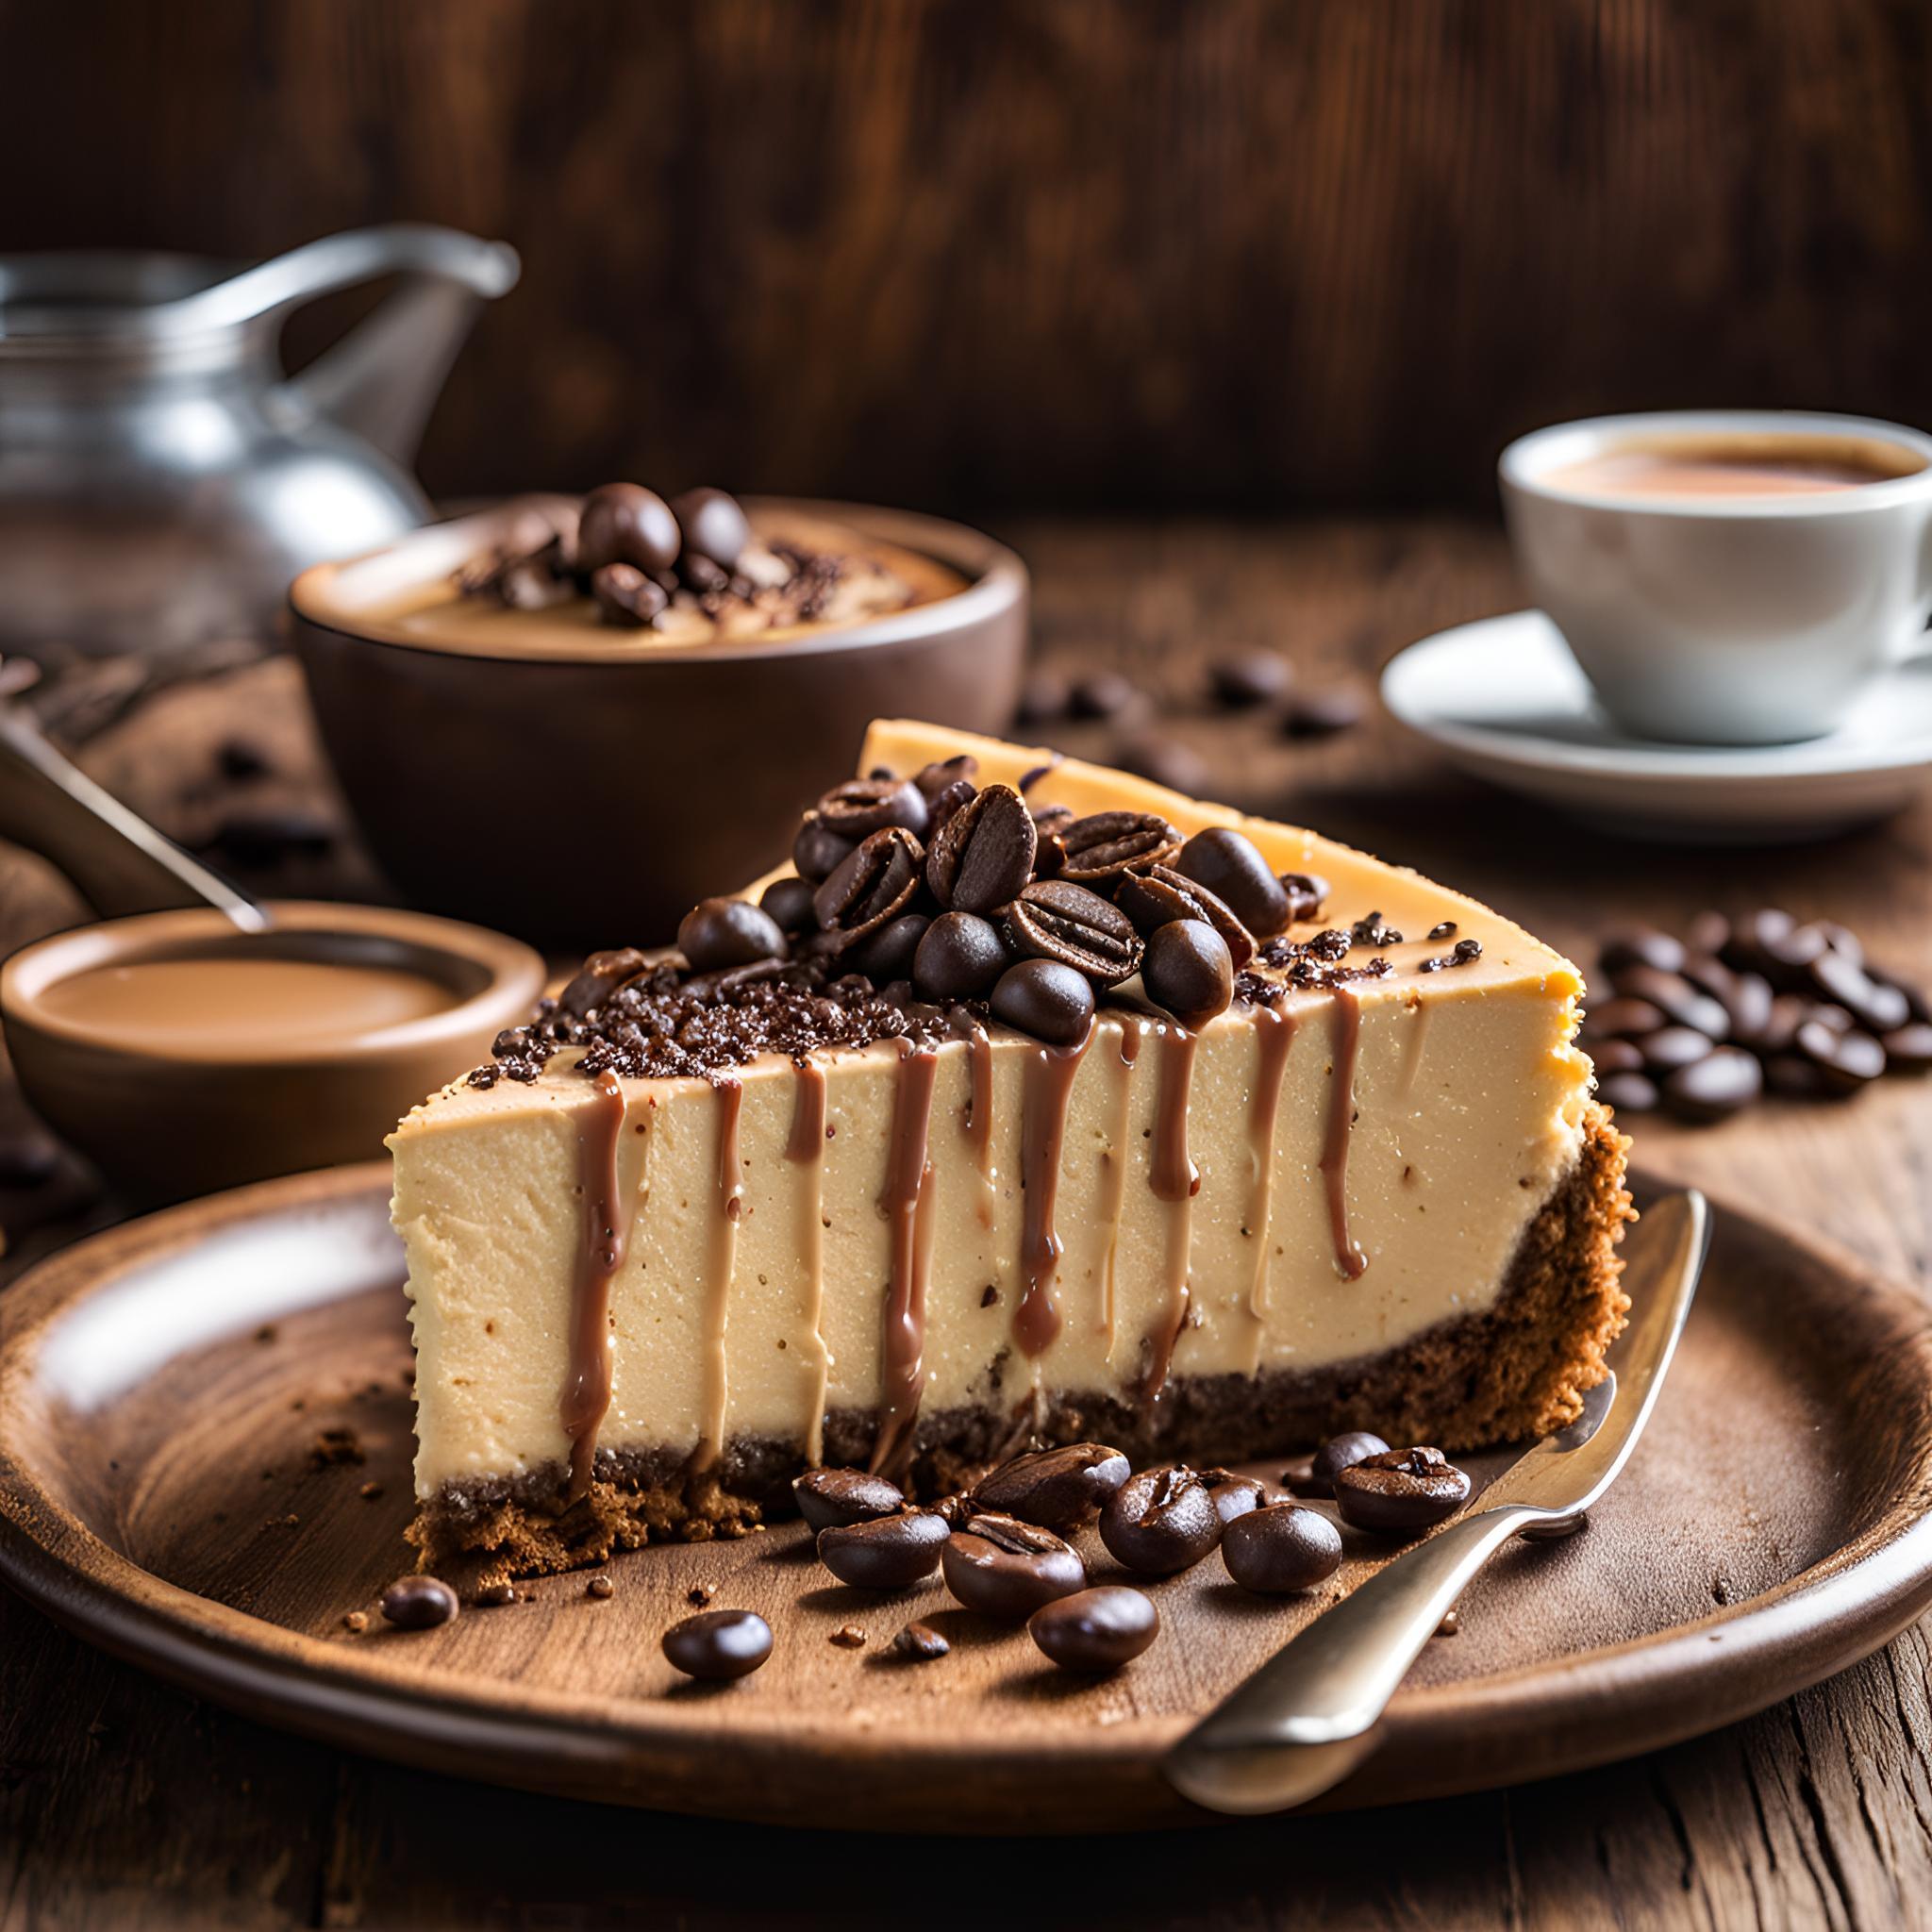
Rich Espresso Cheesecake Recipe
Cheesecake is one of the most versatile and indulgent desserts, and when paired with rich espresso, it transforms into a luxurious treat that is sure to captivate your taste buds. The combination of smooth, creamy cheesecake and the bold, roasted flavor of espresso creates an irresistible dessert that is perfect for coffee lovers and cheesecake enthusiasts alike. In this recipe, we will guide you through every step to make a decadent, rich espresso cheesecake that will be the star of your dessert table.

Instructions
Step 1: Preparing the Espresso Crust
- Preheat the Oven: Begin by preheating your oven to 325°F (163°C). This will allow the oven to reach the right temperature while you prepare the crust.
- Prepare the Crust Ingredients: In a food processor, pulse the graham crackers into fine crumbs. If you don’t have a food processor, place the graham crackers in a resealable plastic bag and crush them using a rolling pin.
- Mix the Dry Ingredients: In a medium-sized bowl, combine the graham cracker crumbs, cocoa powder, sugar, and salt. Stir to ensure the dry ingredients are evenly mixed.
- Add Butter and Espresso: In a small bowl, dissolve the espresso powder in 1 tablespoon of hot water (use hot tap water or microwave it for 20 seconds). Add this espresso mixture and melted butter to the dry ingredients.
- Combine: Stir the ingredients together until the mixture resembles wet sand and holds together when pressed.
- Form the Crust: Press the crust mixture into the bottom of a 9-inch springform pan. Use the bottom of a measuring cup or your fingers to pack it in tightly and evenly.
- Bake the Crust: Place the pan in the preheated oven and bake for 10 minutes. Once baked, remove the crust from the oven and let it cool while you prepare the cheesecake filling.
Step 2: Preparing the Espresso Cheesecake Filling
- Dissolve Espresso Powder: In a small saucepan, heat 1/4 cup of water over medium-low heat. Once it is warm, whisk in 2 tablespoons of espresso powder until fully dissolved. Set aside to cool slightly.
- Beat the Cream Cheese: In the bowl of a stand mixer, beat the softened cream cheese on medium speed until smooth and creamy, about 3 minutes. If using a hand mixer, beat in a large bowl. Scrape down the sides of the bowl as needed.
- Add the Sugars: Add the granulated sugar and brown sugar to the cream cheese, beating on medium speed until combined and smooth.
- Add the Eggs: With the mixer on low speed, add the eggs one at a time, beating well after each addition. Make sure not to overmix, as this can cause cracking during baking.
- Incorporate the Sour Cream and Vanilla: Add the sour cream and vanilla extract to the cream cheese mixture. Mix on low until just combined. The sour cream will help create a creamy texture and provide a slight tang.
- Blend in the Espresso: Add the cooled espresso mixture to the cheesecake batter. Mix on low speed until fully incorporated, ensuring the rich coffee flavor is evenly distributed throughout the filling.
- Add the Heavy Cream: Pour in the heavy cream and mix on low speed until smooth. The heavy cream helps make the cheesecake filling rich and velvety.
- Add Flour and Salt: Finally, sift in the all-purpose flour and salt. This helps to stabilize the filling and provides a smooth texture once baked. Mix until fully combined.
Step 3: Assembling the Cheesecake
- Prepare the Water Bath: Place the springform pan with the cooled crust into a large, deep roasting pan. This will be used to create a water bath, which helps prevent cracking by ensuring even heat distribution during baking. Bring a kettle of water to a boil.
- Pour the Filling: Pour the cheesecake filling into the prepared crust. Use a spatula to smooth the top evenly.
- Create the Water Bath: Once the cheesecake is in the pan, carefully pour the hot water from the kettle into the roasting pan until it reaches about halfway up the sides of the springform pan. This will help maintain a moist environment while baking and prevent the cheesecake from cracking.
- Bake the Cheesecake: Place the pan in the preheated oven and bake for 60 to 70 minutes, or until the edges of the cheesecake are set but the center is still slightly jiggly. The center should not be fully set to the touch, as it will firm up as it cools. Be careful not to overbake the cheesecake.
- Turn off the Oven and Cool: Once the cheesecake is done, turn off the oven and leave the door slightly ajar. Let the cheesecake cool in the oven for 1 hour. This gradual cooling helps prevent cracks from forming.
- Chill the Cheesecake: After an hour, remove the cheesecake from the oven and water bath. Allow it to cool to room temperature before transferring it to the refrigerator. Chill the cheesecake for at least 4 hours, or preferably overnight, to let it set fully and develop its flavors.
Step 4: Making the Espresso Whipped Cream (Optional)
- Whip the Cream: In a mixing bowl, combine the heavy cream, powdered sugar, espresso powder, and vanilla extract. Use a hand mixer or stand mixer to whip the cream until soft peaks form.
- Top the Cheesecake: When the cheesecake is fully chilled and ready to serve, spread the whipped cream on top. You can use a spatula to create decorative peaks or smooth it over the top for a clean look.
- Garnish with Chocolate: For an extra touch of decadence, shave some dark chocolate over the whipped cream or sprinkle a dusting of espresso powder on top for added visual appeal.
Step 5: Serving the Espresso Cheesecake
- Remove the Cheesecake from the Pan: Run a warm knife around the edges of the springform pan to loosen the cheesecake. Carefully remove the sides of the pan.
- Slice and Serve: Slice the cheesecake with a sharp knife. If you want clean slices, dip the knife in hot water and wipe it dry between each cut. Serve chilled, topped with a dollop of espresso whipped cream and a sprinkle of grated dark chocolate or cocoa powder.
Tips for Success
- Room Temperature Ingredients: Ensure your cream cheese, eggs, and sour cream are at room temperature before mixing. This will help create a smoother, creamier batter and prevent lumps in the filling.
- Don’t Overmix: Overmixing the batter can incorporate too much air, leading to cracks in the cheesecake. Mix on low speed and stop as soon as the ingredients are combined.
- Use a Water Bath: A water bath helps maintain a consistent temperature and moisture level during baking, preventing cracks in the cheesecake’s surface.
- Chill Overnight: Cheesecake tastes best when it has had time to set in the refrigerator. Ideally, chill it for at least 4 hours, but overnight chilling will give the flavors more time to develop.
- Prevent Cracks: If you’re worried about cracks, you can lightly run a butter knife or spatula around the edges of the cheesecake once it’s cooled to help release any stuck areas.
Variations and Additions
- Chocolate Espresso Cheesecake: Add 1/2 cup of melted dark chocolate to the cheesecake filling for a mocha-inspired twist.
- Caramel Drizzle: Drizzle homemade or store-bought caramel sauce over the top for an additional layer of flavor.
- Nutty Crust: Mix in crushed espresso-flavored cookies or toasted nuts (such as hazelnuts or almonds) with the graham cracker crumbs for added texture.
Conclusion
This rich espresso cheesecake is the perfect balance of creamy, tangy, and bold espresso flavors. It’s a dessert that combines the indulgence of cheesecake with the warmth and complexity of espresso, creating an unforgettable treat for any occasion. Whether you’re hosting a dinner party or simply indulging in a quiet dessert moment, this cheesecake will leave a lasting impression. Enjoy every bite!
Additional Tips for Perfecting Your Espresso Cheesecake
Making a cheesecake, especially one as luxurious and detailed as this espresso cheesecake, can require attention to detail and patience. Here are some more tips and tricks to help you achieve the best results possible.
1. Using High-Quality Espresso
The flavor of the espresso is crucial in this recipe, as it’s the primary flavoring for the cheesecake. Always choose high-quality espresso powder or freshly ground espresso beans for the best taste. Instant espresso powder, which dissolves easily, is typically used in recipes, but if you prefer freshly ground beans, you can use them as long as they are finely ground and fully dissolved in water before adding them to the batter.
2. Experiment with Coffee Liqueurs
If you’re a fan of coffee liqueurs like Kahlúa or Bailey’s Irish Cream, consider adding 2 to 3 tablespoons of one of these liqueurs to your cheesecake filling. It will give your cheesecake an extra depth of flavor, adding a hint of sweetness and richness. Just make sure to adjust the sugar slightly, as the liqueur will add sweetness.
3. Preventing Cracks in the Cheesecake
Cracking is one of the most common issues when baking cheesecakes. Here are several strategies to prevent cracks:
- Avoid Overmixing: As mentioned earlier, overmixing the batter can incorporate air into the cheesecake, leading to cracks. Be sure to mix only until the ingredients are combined.
- Water Bath: The water bath (bain-marie) is essential for creating a moist baking environment, which helps reduce the risk of cracking. Ensure the water bath water is hot (but not boiling), and make sure it reaches at least halfway up the side of the springform pan.
- Slow Cooling: After baking, let the cheesecake cool slowly by turning off the oven and leaving the door ajar for about an hour. This gradual cooling helps prevent sudden temperature changes, which can lead to cracks. Once out of the oven, allow the cheesecake to cool completely on the countertop before chilling in the fridge.
4. Cheesecake Texture and Consistency
A perfect cheesecake should have a silky, smooth, and creamy texture. To ensure this, it’s important to properly beat the cream cheese until it’s completely smooth before adding other ingredients. Scrape the bowl often to ensure the mixture is even. Also, be cautious with adding too much air, which can cause the filling to become too fluffy, resulting in an undesirable texture.
5. Chilling Time
Chilling your cheesecake is a key step to achieving the correct texture. It needs to set in the refrigerator for at least 4 hours, but preferably overnight. This not only allows the cheesecake to firm up but also gives the flavors time to meld. When slicing, make sure the cheesecake is cold, as this helps achieve clean, neat slices.
6. Serving and Storing the Cheesecake
This espresso cheesecake is rich and indulgent, so a small slice usually suffices. If you’re serving it for a gathering, you can also offer small coffee-flavored chocolates or dark chocolate truffles alongside the cheesecake to complement its flavor.
Serving Suggestions
Though the cheesecake is decadent on its own, you can pair it with a variety of garnishes and sides for added flair.
- Fresh Berries: A few raspberries, strawberries, or even blueberries can provide a tart contrast to the rich coffee flavor. The freshness of the fruit adds brightness and balance to the dessert.
- Chocolate Sauce: A drizzle of warm chocolate ganache or chocolate syrup over the top of each slice can make the cheesecake even more indulgent.
- Coffee Ice Cream: Pair the cheesecake with a scoop of coffee ice cream or gelato for a delicious coffee-on-coffee combination. Vanilla ice cream or whipped cream also pairs well for a more neutral contrast.
Variations You Can Try
This rich espresso cheesecake is a solid base that can be customized in several ways, depending on your preferences and the occasion. Here are a few fun variations:
1. Espresso and Hazelnut Cheesecake
Incorporate hazelnuts into the crust for a nutty flavor that complements the coffee. To do this, simply add 1/2 cup of finely chopped toasted hazelnuts to the graham cracker and cocoa powder crust. Alternatively, sprinkle chopped toasted hazelnuts over the top of the cheesecake before serving.
2. Mocha Cheesecake
If you love the combination of chocolate and coffee, you can turn this cheesecake into a mocha-flavored treat by adding melted bittersweet chocolate to the filling. About 1/2 cup of melted chocolate mixed into the batter will create a deliciously mocha-flavored cheesecake.
3. Espresso and Caramel Cheesecake
Add a swirl of caramel sauce to your espresso cheesecake for a sweet, salty contrast. Drizzle a tablespoon or two of caramel sauce into the cheesecake batter before baking. You can also drizzle caramel over the top after chilling for a visually appealing presentation.
4. Vegan Espresso Cheesecake
For those who prefer a plant-based option, you can substitute dairy ingredients with vegan alternatives. Use a plant-based cream cheese (such as almond-based or coconut-based cream cheese) and replace the eggs with a flaxseed mixture or cornstarch. Substitute coconut milk for heavy cream and opt for a vegan-friendly crust made from graham crackers or nuts.
5. Espresso Cheesecake Bites
If you’re looking for a fun, bite-sized version of this rich espresso cheesecake, you can create cheesecake bites. Instead of using a 9-inch springform pan, pour the cheesecake batter into mini muffin tins lined with paper liners. Bake at 325°F (163°C) for 20-25 minutes, or until the centers are just set. Top each bite with a swirl of whipped cream or a dusting of cocoa powder.
Final Thoughts
This rich espresso cheesecake is the ultimate dessert for coffee lovers and cheesecake fans alike. Its velvety smooth texture and bold, deep espresso flavor are perfect for any special occasion or just as a treat to enjoy with friends or family. The process may seem long, but with careful attention to each step, you’ll be rewarded with an elegant and luxurious dessert that will leave everyone impressed.
Rich Espresso Cheesecake Recipe
This rich espresso cheesecake combines the creamy indulgence of classic cheesecake with the bold and robust flavor of espresso. It’s the perfect dessert for coffee lovers and cheesecake enthusiasts alike. Below is the full recipe, including prep time, cook time, ingredients, and step-by-step instructions.
Ingredients
- For the Espresso Crust:
- 1 1/2 cups graham cracker crumbs (about 12 graham crackers, crushed)
- 1/4 cup unsweetened cocoa powder
- 1/4 cup granulated sugar
- 1/2 cup unsalted butter, melted
- 1 tablespoon instant espresso powder (or espresso granules)
- Pinch of salt
- For the Espresso Cheesecake Filling:
- 3 (8 oz) packages cream cheese, softened
- 1 cup sour cream, at room temperature
- 3/4 cup granulated sugar
- 1/2 cup brown sugar, packed
- 3 large eggs, at room temperature
- 1 tablespoon vanilla extract
- 1/2 cup heavy cream
- 2 tablespoons instant espresso powder or finely ground espresso beans
- 1/4 cup hot water
- 1 tablespoon all-purpose flour
- 1/4 teaspoon salt
- For the Espresso Whipped Cream (Optional Topping):
- 1 cup heavy cream
- 1 tablespoon powdered sugar
- 1 tablespoon instant espresso powder
- 1/2 teaspoon vanilla extract
- Dark chocolate shavings (optional)
Instructions
Step 1: Preparing the Espresso Crust
- Preheat the Oven:Preheat your oven to 325°F (163°C).
- Prepare the Crust Ingredients:In a food processor, pulse the graham crackers into fine crumbs. If you don’t have a food processor, place the graham crackers in a resealable plastic bag and crush them using a rolling pin.
- Mix the Dry Ingredients:In a medium-sized bowl, combine the graham cracker crumbs, cocoa powder, sugar, and salt. Stir to mix evenly.
- Add Butter and Espresso:In a small bowl, dissolve the espresso powder in 1 tablespoon of hot water. Add the dissolved espresso and melted butter to the dry ingredients.
- Combine the Crust Mixture:Stir until the mixture resembles wet sand and holds together when pressed.
- Form the Crust:Press the crust mixture into the bottom of a 9-inch springform pan, ensuring it’s even and compact. Use the bottom of a measuring cup to press it down firmly.
- Bake the Crust:Place the crust in the preheated oven and bake for 10 minutes. After baking, set the crust aside to cool while you prepare the cheesecake filling.
Step 2: Preparing the Espresso Cheesecake Filling
- Dissolve the Espresso Powder:In a small saucepan, heat 1/4 cup of water over medium-low heat. Once warm, whisk in the 2 tablespoons of espresso powder until completely dissolved. Set aside to cool.
- Beat the Cream Cheese:In the bowl of a stand mixer, beat the softened cream cheese on medium speed until smooth and creamy, about 3 minutes. Scrape down the sides of the bowl as needed.
- Add the Sugars:Add granulated sugar and brown sugar to the cream cheese. Beat on medium speed until smooth and combined.
- Add the Eggs:With the mixer on low speed, add the eggs one at a time, beating well after each addition. Scrape down the sides of the bowl after each egg.
- Incorporate the Sour Cream and Vanilla:Add the sour cream and vanilla extract. Mix on low speed until just combined.
- Blend in the Espresso Mixture:Pour in the cooled espresso mixture and mix until fully incorporated.
- Add the Heavy Cream, Flour, and Salt:Add the heavy cream, flour, and salt. Mix on low until smooth and combined.
Step 3: Assembling the Cheesecake
- Prepare the Water Bath:Place the springform pan with the cooled crust into a large, deep roasting pan. Fill the roasting pan with hot water until it reaches about halfway up the side of the springform pan.
- Pour the Filling:Pour the cheesecake filling into the prepared crust. Use a spatula to smooth the top.
- Bake the Cheesecake:Carefully transfer the cheesecake to the preheated oven. Bake for 60 to 70 minutes, or until the edges are set but the center still jiggles slightly. The cheesecake should be slightly puffed up at the edges but soft in the middle.
- Cool the Cheesecake:Turn off the oven, crack the door slightly, and let the cheesecake cool in the oven for 1 hour. This helps prevent cracking. After an hour, remove the cheesecake from the oven and let it cool to room temperature.
- Chill the Cheesecake:Once the cheesecake reaches room temperature, transfer it to the refrigerator and chill for at least 4 hours, or preferably overnight. This allows the cheesecake to fully set and develop its flavor.
Step 4: Making the Espresso Whipped Cream (Optional)
- Whip the Cream:In a mixing bowl, combine the heavy cream, powdered sugar, espresso powder, and vanilla extract.
- Beat the Whipped Cream:Using a hand mixer or stand mixer, whip the cream until it forms soft peaks.
- Top the Cheesecake:Once the cheesecake is fully chilled, spread the whipped cream over the top of the cheesecake. You can smooth it out or leave it slightly swirled for a decorative effect.
- Garnish with Chocolate (Optional):If desired, garnish the whipped cream with dark chocolate shavings or a dusting of cocoa powder.

