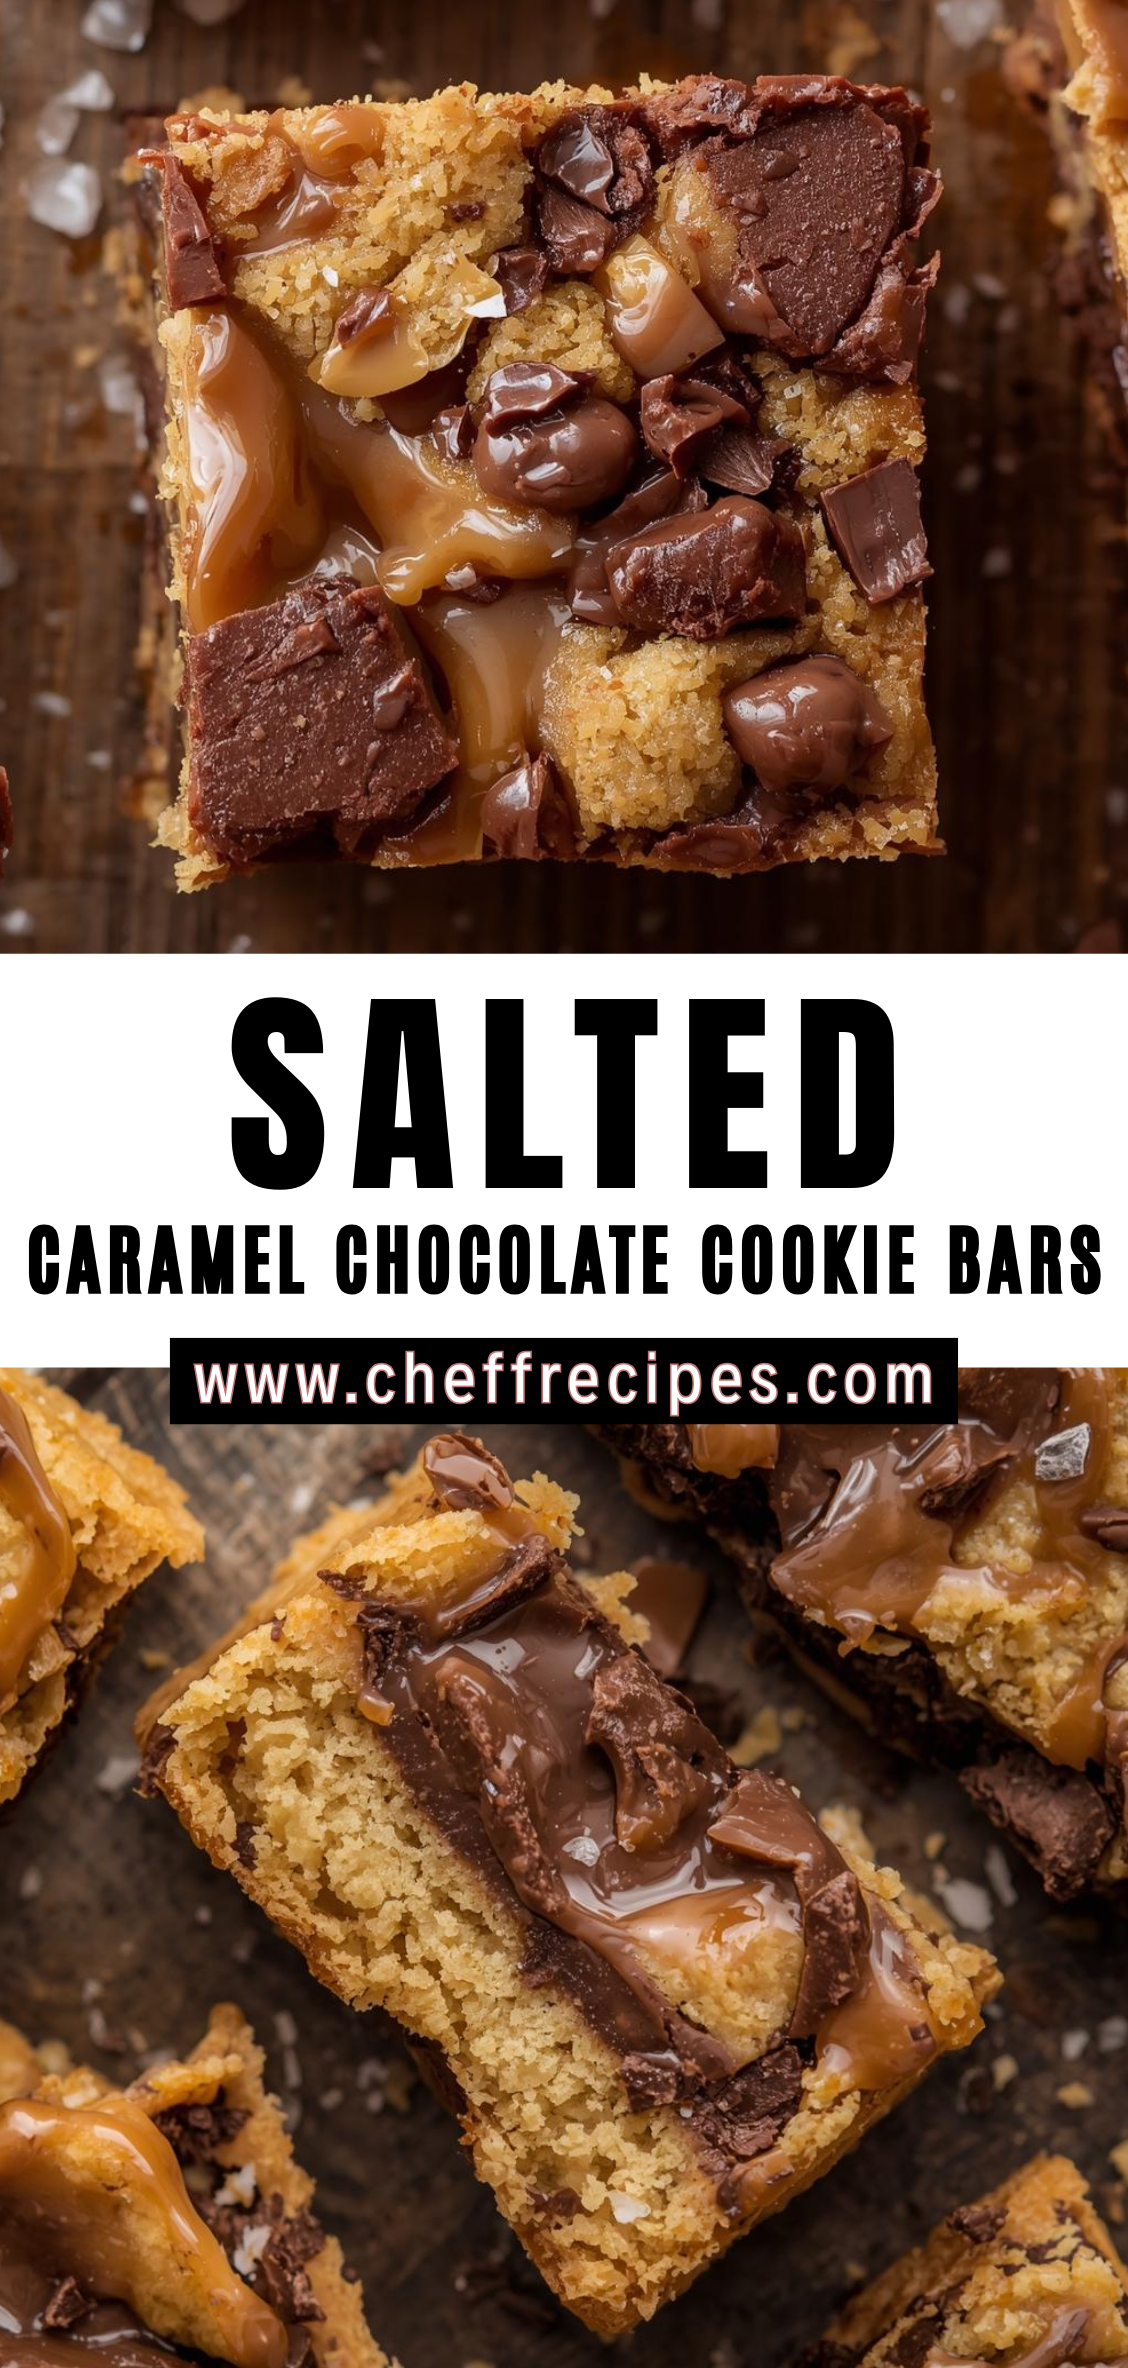
Few desserts strike a balance between indulgence and comfort quite like salted caramel chocolate cookie bars. They combine layers of rich, buttery cookie, decadent chocolate, and luscious caramel, all finished with a subtle sprinkle of sea salt that elevates every bite. Unlike simple cookies or brownies, these bars deliver a multidimensional flavor experience, offering contrasting textures and layers that make each mouthful an adventure. The soft, chewy cookie base provides a satisfying bite, while the creamy caramel layer adds depth and richness. Topping it with a chocolate layer not only enhances the visual appeal but also adds a luxurious finish that makes these bars irresistible. The delicate touch of salt ties all the flavors together, accentuating the sweetness of caramel and chocolate while adding a sophisticated note that makes this dessert feel both comforting and elegant.
The appeal of salted caramel chocolate cookie bars extends beyond their flavor. Their structure allows for versatility: they are easy to cut into uniform portions, making them perfect for sharing at parties, gifting to friends, or simply enjoying as an afternoon treat. Unlike individual cookies that bake separately or cupcakes that require precise frosting, these bars combine convenience with indulgence. The layered approach also offers flexibility in preparation. Each component—the cookie base, the caramel filling, and the chocolate topping—can be prepared in stages or made ahead of time, allowing for stress-free assembly and baking. This makes the recipe ideal for both beginner bakers seeking a straightforward yet impressive dessert and experienced bakers looking to experiment with flavor variations or decorative finishes.
Another aspect that makes these bars particularly special is the interplay of textures and flavors. The cookie layer is designed to be soft and chewy, with edges that may crisp slightly for contrast. The caramel is smooth, rich, and slightly sticky, creating a luscious bridge between cookie and chocolate. The chocolate layer, whether dark, milk, or a combination, adds a creamy, slightly firm finish that holds the bars together while providing a satisfying snap when cut. Finally, the subtle sprinkle of flaky sea salt highlights the natural sweetness of the caramel and chocolate, offering a flavor profile that is complex, balanced, and far from overly sugary. This combination of sweet, salty, chewy, and creamy makes these bars memorable and addictive.
Salted caramel chocolate cookie bars also allow for creativity and personalization. Bakers can adjust the chocolate type to suit their taste—dark for intense richness, milk for a smoother, sweeter profile, or even white chocolate for a bold variation. The caramel can be homemade for a deeper, more nuanced flavor, or store-bought for convenience. Toppings can range from a simple layer of chocolate to drizzles, sprinkles, or nuts for added texture. With each adjustment, the base concept remains the same: a harmonious marriage of cookie, caramel, and chocolate elevated by a touch of salt. This adaptability is part of what makes the recipe a staple in both home baking repertoires and professional dessert menus.
In addition to their flavor and versatility, salted caramel chocolate cookie bars embody a sense of celebration. The layers, the rich aroma of baked butter and chocolate, and the glossy finish of melted chocolate create an inviting experience that is as much about presentation and atmosphere as it is about taste. They are the kind of dessert that commands attention on a dessert table, elicits compliments when shared, and satisfies cravings in a deeply fulfilling way. Even for solo indulgence, each bite feels deliberate and luxurious, offering a moment of joy that is both immediate and lingering.
As you move through the subsequent sections of this recipe, you will find detailed instructions for preparing each component, tips for achieving the perfect texture, and suggestions for variations that allow you to make this dessert uniquely your own. From selecting high-quality ingredients to mastering the delicate balance of sweetness and salt, every step is designed to guide you toward consistently exceptional results. Whether you are baking for a special occasion, a casual gathering, or a simple treat at home, these salted caramel chocolate cookie bars promise a memorable experience that delights the senses and elevates everyday moments into something truly indulgent.
Detailed Instructions
Step 1: Preparing the Ingredients
Before you begin baking, proper preparation ensures the process is smooth and the final bars come out perfect. Baking is as much about precision and organization as it is about creativity.
-
Measure all ingredients
Gather your flour, baking soda, salt, unsalted butter, brown sugar, granulated sugar, eggs, vanilla extract, chocolate chips, caramel, and optional sea salt. Measuring accurately is critical in baking, as slight variations can affect texture, sweetness, and structure. -
Bring butter to room temperature
Softened butter incorporates more easily with sugar, helping to create a smooth, even cookie dough. Remove butter from the fridge at least 30–60 minutes before baking. It should be soft enough to press gently with a finger without melting. -
Prep baking pan
Line a 9×13-inch or similar-sized baking pan with parchment paper, leaving an overhang on two sides. This makes lifting the bars out after baking much easier. Lightly grease the parchment to prevent sticking. -
Preheat oven
Set your oven to 350°F (175°C). Preheating ensures the cookie dough bakes evenly from the start, creating a soft interior with slightly crisp edges.
Step 2: Making the Cookie Base
The cookie base forms the foundation of your bars, and its texture determines how the caramel layer will hold. A chewy, buttery base works best.
-
Cream butter and sugars
In a large mixing bowl, combine softened butter with brown and granulated sugar. Use an electric mixer on medium speed or a sturdy wooden spoon to cream together until the mixture is pale, fluffy, and smooth. Creaming incorporates air into the dough, which contributes to a soft, tender texture. -
Add eggs and vanilla
Beat in two large eggs, one at a time, ensuring each is fully incorporated. Add 1–2 teaspoons of vanilla extract. The eggs provide structure, while the vanilla enhances flavor depth. -
Combine dry ingredients
In a separate bowl, whisk together all-purpose flour, baking soda, and salt. This ensures even distribution of leavening agents and prevents clumps of baking soda from creating uneven texture. -
Mix wet and dry ingredients
Gradually fold the flour mixture into the butter mixture. Use a spatula or spoon and mix until just combined. Overmixing can develop gluten, resulting in a tougher base, so stop as soon as the dough comes together. -
Add chocolate chips
Fold in chocolate chips or chunks. Choose a combination of semisweet and milk chocolate for depth, or customize with your favorite chocolate variety. Even distribution ensures every bar has pockets of melted chocolate. -
Press dough into pan
Transfer the cookie dough into the prepared pan and spread it evenly using a spatula or your hands. Press lightly to create a uniform layer; this prevents uneven caramel coverage and ensures bars bake consistently. -
Par-bake (optional for sturdier bars)
Some bakers prefer par-baking the cookie base for 8–10 minutes before adding the caramel. This creates a slightly firmer foundation that better supports the caramel layer without mixing. This step is optional but recommended for thicker bars.
Step 3: Adding the Caramel Layer
The caramel is the heart of these bars, providing a rich, indulgent layer that contrasts with the chewy cookie base.
-
Prepare caramel
Use store-bought caramel or make homemade caramel by melting sugar slowly and incorporating butter and cream. Ensure the caramel is pourable but not too hot, as extremely hot caramel can sink into the cookie base. -
Pour over cookie base
Gently spread the caramel evenly across the partially or fully baked cookie base. Use a spatula to reach the edges without disturbing the base. -
Smooth the surface
For even layering, tilt the pan gently or use a small offset spatula. A smooth, level layer ensures that every bar has consistent caramel coverage. -
Optional: sprinkle sea salt
Lightly sprinkle flaky sea salt over the caramel layer. The salt balances the sweetness of the caramel and chocolate while enhancing overall flavor complexity.
Step 4: Topping with Chocolate
The chocolate layer completes the bars, providing both flavor and structure. Proper technique ensures a glossy, firm top that is easy to cut.
-
Melt chocolate
Melt chocolate chips or chopped chocolate using a double boiler or microwave in short intervals (15–20 seconds), stirring in between to avoid burning. Add a teaspoon of butter or cream for a glossier finish if desired. -
Spread chocolate over caramel
Pour or spoon the melted chocolate over the caramel layer. Use an offset spatula to spread it evenly to the edges. Work gently to avoid piercing the caramel underneath. -
Smooth and chill
Smooth the chocolate and place the pan in the refrigerator for at least 1–2 hours. Chilling allows the chocolate to firm up and makes cutting the bars clean and easy.
Step 5: Cutting and Serving
The final step is cutting the bars into uniform pieces, which ensures a polished presentation and portion control.
-
Lift bars from pan
Use the parchment overhang to lift the entire block of bars from the pan. This prevents breaking or crumbling at the edges. -
Use a sharp knife
Cut the bars with a sharp, slightly warm knife (run it under hot water and dry it before cutting). Warm the knife between cuts to achieve clean edges and prevent chocolate from cracking. -
Cut into desired sizes
Depending on preference, cut into squares or rectangles, typically 2×2 or 2×3 inches. Uniform sizing ensures even portions and a professional look. -
Optional garnish
Sprinkle a tiny additional pinch of sea salt or drizzle extra melted chocolate over the top for presentation. -
Serving
Serve the bars at room temperature or slightly chilled. They pair beautifully with coffee, milk, or a scoop of vanilla ice cream for an extra indulgent treat.
Step 6: Tips for Perfect Bars
-
Consistency matters: Ensure cookie dough is even before adding caramel to avoid thin spots.
-
Caramel temperature: Slightly cooled caramel prevents it from sinking into the cookie base.
-
Chill before cutting: Cold bars cut cleaner and reduce the risk of gooey edges.
-
Chocolate quality: Use high-quality chocolate for smooth, glossy finish and deep flavor.
Salted Caramel Chocolate Cookie Bars
Few desserts strike a balance between indulgence and comfort quite like salted caramel chocolate cookie bars. They combine layers of rich, buttery cookie, decadent chocolate, and luscious caramel, all finished with a subtle sprinkle of sea salt that elevates every bite. Unlike simple cookies or brownies, these bars deliver a multidimensional flavor experience, offering contrasting textures and layers that make each mouthful an adventure. The soft, chewy cookie base provides a satisfying bite, while the creamy caramel layer adds depth and richness. Topping it with a chocolate layer not only enhances the visual appeal but also adds a luxurious finish that makes these bars irresistible. The delicate touch of salt ties all the flavors together, accentuating the sweetness of caramel and chocolate while adding a sophisticated note that makes this dessert feel both comforting and elegant.
Ingredients
- For the Cookie Base:
- 1 cup (2 sticks) unsalted butter, melted
- 1 cup brown sugar, packed
- ½ cup granulated sugar
- 2 large eggs
- 2 tsp vanilla extract
- 2 ½ cups all-purpose flour
- ½ tsp baking soda
- ½ tsp salt
- 1 cup chocolate chips or chunks
- For the Salted Caramel Layer:
- 1 cup caramel sauce (store-bought or homemade)
- Flaky sea salt, for sprinkling
Instructions
- Preheat oven: Preheat to 350°F (175°C). Line a 9x13-inch baking pan with parchment paper, leaving overhang for easy removal.
- Make the cookie dough: In a large bowl, whisk melted butter, brown sugar, and granulated sugar until smooth. Add eggs and vanilla, mixing until combined. In a separate bowl, whisk flour, baking soda, and salt. Gradually add to wet ingredients until dough forms. Fold in chocolate chips.
- Layer the cookie bars: Press half of the cookie dough evenly into the prepared pan. Pour caramel sauce over the dough, spreading evenly. Sprinkle lightly with flaky sea salt. Drop the remaining cookie dough in spoonfuls on top of the caramel and gently spread to cover most of the caramel layer (don’t worry about small gaps).
- Bake: Bake 25–28 minutes, until the top is golden brown and a toothpick inserted into the cookie layer (not caramel) comes out mostly clean.
- Cool and slice: Let bars cool completely in the pan on a wire rack. Lift out using parchment overhang and cut into squares or rectangles.
Notes
- Texture tip: For gooier caramel, slightly underbake the bars.
- Chocolate variation: Use milk, dark, or white chocolate chips, or a mix.
- Homemade caramel: Combine 1 cup sugar, 6 tbsp butter, and ½ cup heavy cream in a saucepan over medium heat until smooth. Cool slightly before layering.

