Tiramisu Truffles Recipe: A Luxurious Bite-Sized Twist on an Italian Classic
Few desserts capture the essence of indulgence quite like tiramisu. The name itself, which translates from Italian as “pick me up,” hints at the spirited lift of espresso mingled with creamy mascarpone and the delicate sweetness of ladyfingers. Traditionally served as layered squares in a glass dish, tiramisu has become a beloved symbol of Italian hospitality and culinary artistry. But what if the soul of tiramisu could be transformed into something smaller, more intimate—something you can hold between your fingers and savor in one decadent bite? Enter Tiramisu Truffles, the elegant confection that distills all the richness of the classic dessert into a single, luxurious morsel.
Tiramisu truffles are a modern reinvention of a timeless favorite. They capture every hallmark of the original: the deep aroma of espresso, the velvety texture of mascarpone, the hint of cocoa bitterness, and the faint warmth of liqueur—often Marsala, rum, or coffee-flavored Kahlúa. Yet, they do so in a way that’s playful, portable, and undeniably charming. Each truffle is like a secret kept in chocolate, its center revealing layers of creaminess and coffee-kissed sophistication that unfold on the tongue with slow delight.
Unlike traditional tiramisu, which demands careful layering and chilling, these truffles offer simplicity without sacrificing elegance. They can be made ahead of time, stored easily, and served at any occasion—from intimate gatherings and dinner parties to festive celebrations and gift boxes. Their small size makes them approachable, yet their flavor is anything but modest. Every bite invites you into the heart of Italian dessert tradition while offering a contemporary flair that feels at home in today’s kitchens.
What makes tiramisu truffles so remarkable is their balance. The mascarpone provides a luxurious softness that pairs beautifully with the slight crunch of crushed ladyfingers or cookies, while the espresso and liqueur add depth and aroma. A coating of cocoa powder or tempered chocolate finishes them perfectly, adding that essential whisper of bitterness that defines great tiramisu. These truffles are not only about taste—they are about texture, fragrance, and the ritual of enjoyment.
This recipe will guide you through every step of creating tiramisu truffles that rival even the finest patisserie confections. You’ll learn how to craft a silky mascarpone filling, infuse it with espresso and liqueur, shape it into delicate spheres, and finish each one with the polish of a professional chocolatier. Along the way, we’ll explore variations, techniques, and serving ideas that allow you to make the recipe truly your own.
Whether you are an experienced baker looking to expand your repertoire or a home cook eager to impress guests with something both simple and exquisite, this recipe offers an opportunity to transform everyday ingredients into something transcendent. Tiramisu truffles are more than a dessert—they are a small act of art, a moment of indulgence, and a reminder that even the smallest bites can carry the grandeur of tradition.
In the sections that follow, we will delve into the origins of tiramisu, understand the essence of its flavor profile, and then bring those elements together in a truffle that is both faithful to its roots and refreshingly innovative. Prepare your espresso, gather your cocoa, and ready your hands—the journey to crafting the perfect tiramisu truffle begins here.
How to Make Tiramisu Truffles: Step-by-Step Instructions
Crafting tiramisu truffles is a sensory process—a combination of patience, precision, and play. The ingredients are simple, but the key lies in how they’re treated: the temperature of the mascarpone, the fineness of the crumbs, the balance of espresso and sweetness, and the gentleness of each motion as the truffles are rolled and coated. Below is a comprehensive, detailed guide that takes you through each stage of the process, ensuring that every truffle is as luscious as the last.
Ingredients You Will Need
Before beginning, take a moment to measure and prepare all ingredients. Working with organized mise en place not only simplifies the process but also ensures that each step flows smoothly.
For the Truffle Base:
-
1 ½ cups (150 g) finely crushed ladyfingers (savoiardi) or vanilla wafer cookies
-
1 cup (225 g) mascarpone cheese, cold but pliable
-
2 tablespoons (30 ml) strong espresso, cooled to room temperature
-
2 tablespoons (30 ml) coffee liqueur (such as Kahlúa or Marsala; optional but recommended)
-
¼ cup (30 g) powdered sugar, sifted
-
1 teaspoon pure vanilla extract
-
A pinch of fine sea salt
For the Coating:
-
¾ cup (90 g) unsweetened cocoa powder, for dusting
or -
8 oz (225 g) good-quality dark or milk chocolate, melted and tempered
Optional Garnishes:
-
Finely grated chocolate or espresso powder
-
White chocolate drizzle for contrast
-
Crushed ladyfingers or chocolate shavings
Equipment Needed
-
Mixing bowls (medium and large)
-
A rubber or silicone spatula
-
Electric hand mixer or stand mixer (optional but helpful)
-
Small cookie scoop or teaspoon
-
Baking sheet lined with parchment paper
-
Fine mesh sieve (for cocoa dusting)
-
Double boiler or microwave-safe bowl (for melting chocolate)
-
Refrigerator space for chilling
Step 1: Preparing the Cookie Base
The foundation of tiramisu truffles is the crumb mixture, which mirrors the soaked ladyfinger layer of traditional tiramisu. The key here is to achieve the right balance between texture and moisture.
-
Crush the Ladyfingers:
Place your ladyfingers in a food processor and pulse until they form fine crumbs. Avoid overprocessing, as you don’t want the mixture to become powdery; a little texture helps bind the truffles without making them pasty. If you prefer, you can also place the cookies in a sealed bag and crush them manually with a rolling pin. -
Check the Consistency:
The crumbs should resemble coarse sand—light, dry, and slightly grainy to the touch. If your ladyfingers are very crisp, allow them to sit for a few minutes in open air to absorb slight humidity, as excessively dry crumbs can make the mixture crumbly later on.
Step 2: Creating the Mascarpone Mixture
This stage captures the creamy heart of tiramisu. Mascarpone gives the truffles their signature richness and smoothness.
-
Beat the Mascarpone:
In a medium mixing bowl, use a rubber spatula or a hand mixer on low speed to gently beat the mascarpone until smooth. Do not overbeat, as mascarpone can curdle if worked too vigorously or if it warms up too much. -
Add Flavorings:
Incorporate the powdered sugar, espresso, coffee liqueur, vanilla extract, and salt. Mix just until combined. The result should be a silky, fragrant cream—lightly sweet, deeply aromatic, and just firm enough to hold its shape when chilled. -
Taste and Adjust:
This is your opportunity to fine-tune the balance. If you want a more pronounced coffee flavor, add another teaspoon of espresso. For a hint of extra indulgence, a splash more liqueur can add warmth and complexity. The flavor should be bold but harmonious—no one note overpowering the others.
Step 3: Combining the Elements
Now comes the moment when crumb meets cream—the blending that forms the truffle base.
-
Fold the Mixtures Together:
Add the crushed ladyfingers to the mascarpone mixture in two or three additions, folding gently with a spatula after each. Avoid stirring too vigorously; you’re aiming for a soft, cohesive dough rather than a paste. -
Assess the Texture:
The mixture should be thick, slightly sticky, and malleable. If it feels too loose to roll, add an extra tablespoon or two of crumbs. Conversely, if it’s too dry, a teaspoon of espresso or liqueur can restore the desired consistency. -
Chill the Mixture:
Cover the bowl with plastic wrap and refrigerate for at least 30–45 minutes. This resting period allows the crumbs to absorb the moisture from the mascarpone and espresso, resulting in a firm, shapeable texture.
Step 4: Shaping the Truffles
The rolling process is both meditative and tactile. Consistency in size helps ensure even chilling and a refined presentation.
-
Scoop and Shape:
Using a small cookie scoop or teaspoon, portion the mixture into even mounds. Roll each portion gently between your palms to form smooth, round balls approximately 1 inch (2.5 cm) in diameter. -
Work Efficiently:
If the mixture begins to soften as you roll, return it to the refrigerator for a few minutes. Warm hands can melt the mascarpone, which makes shaping difficult and causes the truffles to lose their structure. -
Chill Again:
Place the shaped truffles on the parchment-lined baking sheet. Once all are formed, refrigerate them for another 30 minutes. Firm truffles will be easier to coat and less likely to absorb too much cocoa or chocolate later on.
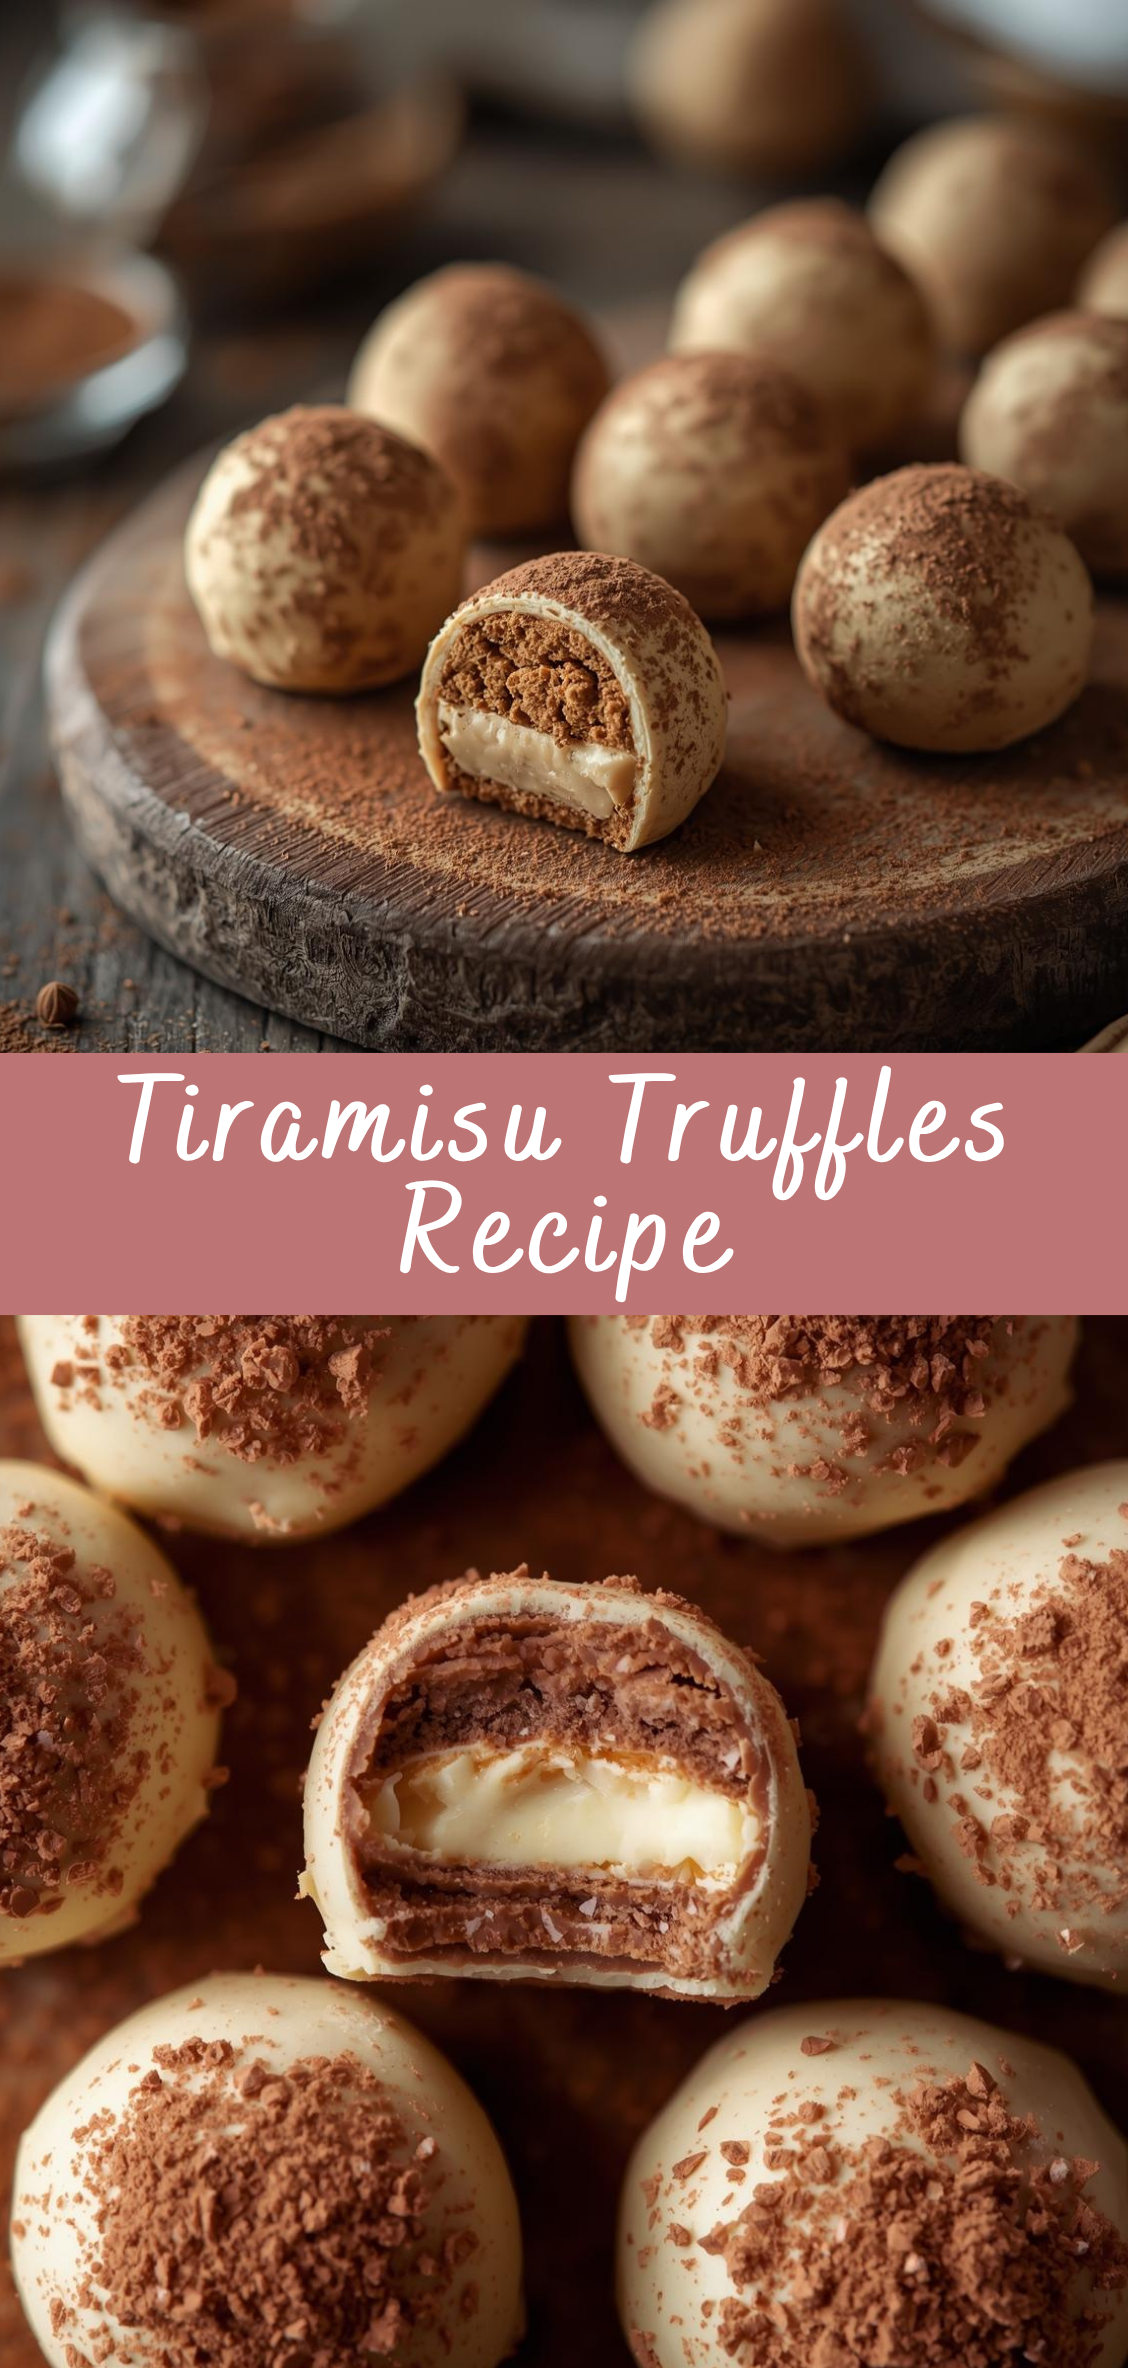
Step 5: Coating and Finishing
Here lies the transformation—the point at which the truffles take on their final elegance. You can choose between a traditional cocoa dusting for an authentic tiramisu flavor or a chocolate coating for a more decadent, candy-like shell.
Option 1: Cocoa-Dusted Truffles (Classic Style)
-
Prepare the Cocoa:
Sift the cocoa powder into a shallow bowl to eliminate any lumps. This ensures an even, velvety coating. -
Roll and Dust:
Roll each chilled truffle in the cocoa powder, turning gently until evenly coated. Tap off excess powder with a fork or your fingertips. -
Final Chill:
Arrange the finished truffles in a single layer on a clean parchment-lined tray and refrigerate them for another 15–20 minutes. This helps the cocoa adhere and deepens the flavor as it mingles with the espresso and mascarpone base.
Option 2: Chocolate-Coated Truffles (Modern Variation)
-
Melt the Chocolate:
In a double boiler or microwave-safe bowl, gently melt the dark or milk chocolate until smooth and glossy. If you wish to temper the chocolate for a snappier finish, bring it to 115°F (46°C), then cool to 82°F (28°C), and rewarm slightly to 88–90°F (31–32°C). -
Dip the Truffles:
Using a fork or dipping tool, lower each chilled truffle into the melted chocolate, coating it completely. Lift it out, allowing the excess chocolate to drip off before placing it back onto parchment. -
Optional Garnishes:
Before the coating sets, sprinkle each truffle with a touch of cocoa powder, crushed ladyfingers, or finely grated chocolate for texture and contrast. -
Set and Store:
Allow the chocolate to firm at room temperature or refrigerate briefly until hardened.
Step 6: Storing and Serving
-
Storage:
Store tiramisu truffles in an airtight container in the refrigerator for up to 5 days. For longer storage, they can be frozen (without the cocoa coating) for up to one month. Allow them to thaw in the refrigerator before dusting or serving. -
Serving:
Serve the truffles chilled or at cool room temperature. Their flavor is most balanced when the mascarpone softens slightly, releasing its creaminess against the cocoa or chocolate shell. -
Presentation Ideas:
-
Arrange them in petite paper cups for an elegant dessert tray.
-
Serve them alongside espresso or dessert wine for a refined pairing.
-
Gift them in decorative boxes lined with parchment paper—perfect for holidays or celebrations.
-
Tiramisu Truffles Recipe
Few desserts capture the essence of indulgence quite like tiramisu. The name itself, which translates from Italian as “pick me up,” hints at the spirited lift of espresso mingled with creamy mascarpone and the delicate sweetness of ladyfingers. Traditionally served as layered squares in a glass dish, tiramisu has become a beloved symbol of Italian hospitality and culinary artistry. But what if the soul of tiramisu could be transformed into something smaller, more intimate—something you can hold between your fingers and savor in one decadent bite? Enter Tiramisu Truffles, the elegant confection that distills all the richness of the classic dessert into a single, luxurious morsel.
Ingredients
- For the truffle mixture:
- 1 cup (100 g) ladyfingers (about 8–10 cookies), finely crushed
- 8 oz (225 g) mascarpone cheese, softened
- 2 Tbsp strong brewed espresso or coffee, cooled
- 2 Tbsp coffee liqueur (like Kahlúa) – optional
- ¼ cup (30 g) powdered sugar
- ½ tsp vanilla extract
- Pinch of salt
- For coating:
- ½ cup (50 g) unsweetened cocoa powder, for rolling
- Optional: Melted dark or white chocolate for dipping or drizzling
Instructions
- Prepare the mixture:
In a medium bowl, combine mascarpone, espresso, coffee liqueur (if using), powdered sugar, vanilla extract, and salt. Stir until smooth and creamy. - Add the ladyfingers:
Fold in the finely crushed ladyfingers until a soft, dough-like consistency forms. The mixture should be slightly sticky but firm enough to roll. - Chill:
Cover and refrigerate the mixture for about 30 minutes to firm up. - Shape the truffles:
Using a small cookie scoop or spoon, portion out about 1 tablespoon of mixture at a time and roll into smooth balls. - Coat:
Roll each truffle in cocoa powder until evenly coated. Alternatively, dip them in melted chocolate, then let set on parchment paper. - Set:
Place coated truffles on a parchment-lined tray and refrigerate for at least 30 minutes before serving.
Notes
- Texture tip: For a firmer truffle, add a bit more crushed ladyfingers; for a softer one, a touch more mascarpone.
- Serving idea: Dust with extra cocoa powder right before serving for a fresh, elegant look.

