Decadent Simplicity: The Ultimate No-Bake Chocolate Cheesecake
Few desserts command the kind of universal admiration that cheesecake does. With its smooth texture, creamy richness, and irresistible balance between sweet and tangy, cheesecake has earned its place as a classic across cuisines and cultures. When you bring chocolate into the mix, you elevate this timeless dessert into something truly indulgent. Now, imagine capturing all that decadence—without ever turning on your oven. Welcome to the world of No-Bake Chocolate Cheesecake.
This dessert is more than just a shortcut; it’s a revelation. The no-bake method not only simplifies the preparation process but also yields a silky, mousse-like texture that many find even more appealing than its baked counterpart. It’s a perfect solution for hot days when the idea of heating up the kitchen is unbearable—or for those moments when you need an elegant, show-stopping dessert with minimal fuss.
The beauty of a no-bake chocolate cheesecake lies in its versatility and approachability. Whether you’re a seasoned home baker or a complete novice, this is a recipe that delivers consistent, impressive results. With just a few accessible ingredients—cream cheese, chocolate, cream, sugar, and a buttery cookie crust—you can create a dessert that tastes like it came straight from a high-end patisserie.
But this isn’t just about a simple recipe. In this comprehensive guide, we’ll explore everything you need to know to master the no-bake chocolate cheesecake. We’ll discuss ingredient selection in detail, including how different types of chocolate affect the outcome. We’ll cover techniques for achieving the perfect consistency, troubleshooting common issues like cracking or grainy texture, and even dive into creative variations—from peanut butter swirls to espresso infusions and gluten-free crust options.
You’ll also find tips for presentation, make-ahead strategies for entertaining, and proper storage guidelines to ensure your cheesecake remains flawless even days after preparation. Whether you’re serving it at a dinner party, holiday gathering, birthday celebration, or simply treating yourself on a quiet night in, this dessert is sure to make a lasting impression.
By the end of this guide, you won’t just have a recipe—you’ll have a deeper understanding of the techniques behind it, the confidence to experiment, and the inspiration to make it your own. From silky smooth filling to the perfect crumbly crust, every element will be covered in detail.
Let’s begin this delicious journey with the first step: understanding the ingredients that make up the foundation of a great no-bake chocolate cheesecake.
Part 1: Ingredients and Equipment
Before we dive into the actual steps, it’s essential to go over the ingredients in detail and the equipment you’ll need. In no-bake desserts, precise preparation and quality ingredients matter even more because there’s no baking step to mask mistakes.
Ingredients Overview
For the Crust:
-
2 cups (200g) chocolate cookie crumbs (e.g., Oreo cookies with filling removed, or chocolate graham crackers)
-
½ cup (115g) unsalted butter, melted
-
2 tablespoons granulated sugar (optional, enhances sweetness in less sweet cookies)
-
Pinch of salt (optional, enhances flavor)
For the Filling:
-
12 oz (340g) semi-sweet or dark chocolate (use baking bars or chips – high-quality is key)
-
24 oz (680g) full-fat cream cheese, softened to room temperature
-
1 cup (240ml) heavy whipping cream, cold
-
¾ cup (90g) powdered sugar, sifted
-
1 teaspoon vanilla extract
-
¼ teaspoon salt (balances sweetness)
Optional Toppings:
-
Shaved chocolate
-
Whipped cream
-
Fresh berries
-
Chocolate ganache
-
Crushed nuts (hazelnuts, almonds)
Part 2: Equipment You’ll Need
-
Springform pan (9-inch preferred)
-
Mixing bowls (at least two – one large, one medium)
-
Electric hand mixer or stand mixer with paddle and whisk attachments
-
Rubber spatula
-
Measuring cups and spoons
-
Food processor or rolling pin (for crust preparation)
-
Saucepan or microwave-safe bowl (for melting chocolate)
-
Offset spatula (for smoothing top)
Part 3: Prepare the Crust
A solid foundation is critical. This crust is simple but crucial for structural support and flavor contrast. A chocolate base enhances the richness of the filling and complements the creamy texture.
Step-by-Step Crust Instructions
-
Prepare the pan:
-
Lightly grease the bottom of a 9-inch springform pan.
-
Optional: Line the bottom with parchment paper for easier removal and a cleaner presentation.
-
-
Make the crumbs:
-
If using whole cookies, pulse them in a food processor until they resemble fine sand.
-
If you don’t have a food processor, place cookies in a zip-top bag and crush them with a rolling pin.
-
-
Mix the crust:
-
In a bowl, combine 2 cups of cookie crumbs, ½ cup melted butter, and 2 tablespoons sugar.
-
Stir with a fork until the mixture is evenly moistened. It should resemble wet sand but hold together when pressed.
-
-
Form the crust:
-
Pour the mixture into the springform pan.
-
Use the back of a spoon or the bottom of a flat glass to firmly press the crumbs into the base and slightly up the sides of the pan.
-
Tip: Pressing firmly and evenly is key to a sturdy, sliceable crust that won’t fall apart.
-
Chill:
-
Refrigerate for at least 30 minutes, or freeze for 15–20 minutes while you make the filling. This helps the crust set and firm up.
-
Part 4: Make the Chocolate Filling
This is where the magic happens. The filling must be smooth, creamy, and rich without being too dense or too airy.
Step 1: Melt the Chocolate
-
Chop the chocolate into small, even pieces if using bars. This ensures it melts evenly.
-
Use a double boiler or microwave:
-
Double boiler: Place chocolate in a heatproof bowl over a saucepan with simmering water. Stir until melted.
-
Microwave: Heat in 20-second intervals, stirring between each, until smooth.
-
-
Let it cool slightly (about 10 minutes). It should be melted and fluid but not hot to the touch, or it will seize the cream cheese.
Tip: Avoid adding water to the chocolate at any stage—moisture can cause it to seize and clump.
Step 2: Whip the Cream
-
In a cold bowl, beat the heavy whipping cream until stiff peaks form.
-
Set aside in the refrigerator while you prepare the rest of the filling.
Why whip separately? This folding step later creates a mousse-like texture, making your cheesecake airy instead of dense.
Step 3: Beat the Cream Cheese
-
In a large mixing bowl, beat the softened cream cheese until completely smooth and fluffy (about 2–3 minutes). Scrape the sides often.
-
Add the sifted powdered sugar, vanilla, and salt, and continue beating until well combined and silky.
Tip: Your cream cheese must be room temperature. Cold cream cheese leads to lumps that are difficult to fix later.
Step 4: Combine with Melted Chocolate
-
Slowly pour the cooled melted chocolate into the cream cheese mixture.
-
Beat on low to medium speed until the mixture is uniform and creamy.
Note: Don’t overmix after adding chocolate. Overbeating at this stage can deflate the airiness or cause texture issues.
Step 5: Fold in Whipped Cream
-
Retrieve the whipped cream from the fridge.
-
Using a spatula, gently fold the whipped cream into the chocolate cream cheese mixture in thirds.
-
Continue folding until no streaks remain.
Do not stir vigorously. Gentle folding preserves the airiness and results in that light, mousse-like texture.
Part 5: Assemble and Chill the Cheesecake
Step 1: Transfer the Filling
-
Pour the finished chocolate cheesecake filling over the chilled crust.
-
Smooth the top with an offset spatula or back of a spoon for an even finish.
Step 2: Chill
-
Cover the pan tightly with plastic wrap or aluminum foil.
-
Refrigerate for at least 6 hours, preferably overnight. This allows the cheesecake to set fully and develop a firm but creamy texture.
Tip: Avoid freezing unless you’re in a rush. Freezing can change the texture from creamy to crumbly upon thawing.
Part 6: Unmolding and Finishing Touches
Step 1: Release from Pan
-
Run a thin knife around the edges of the springform pan to loosen the cheesecake.
-
Gently unlock the springform ring and lift it off.
If you used parchment on the base, you can carefully slide the cake onto a serving plate.
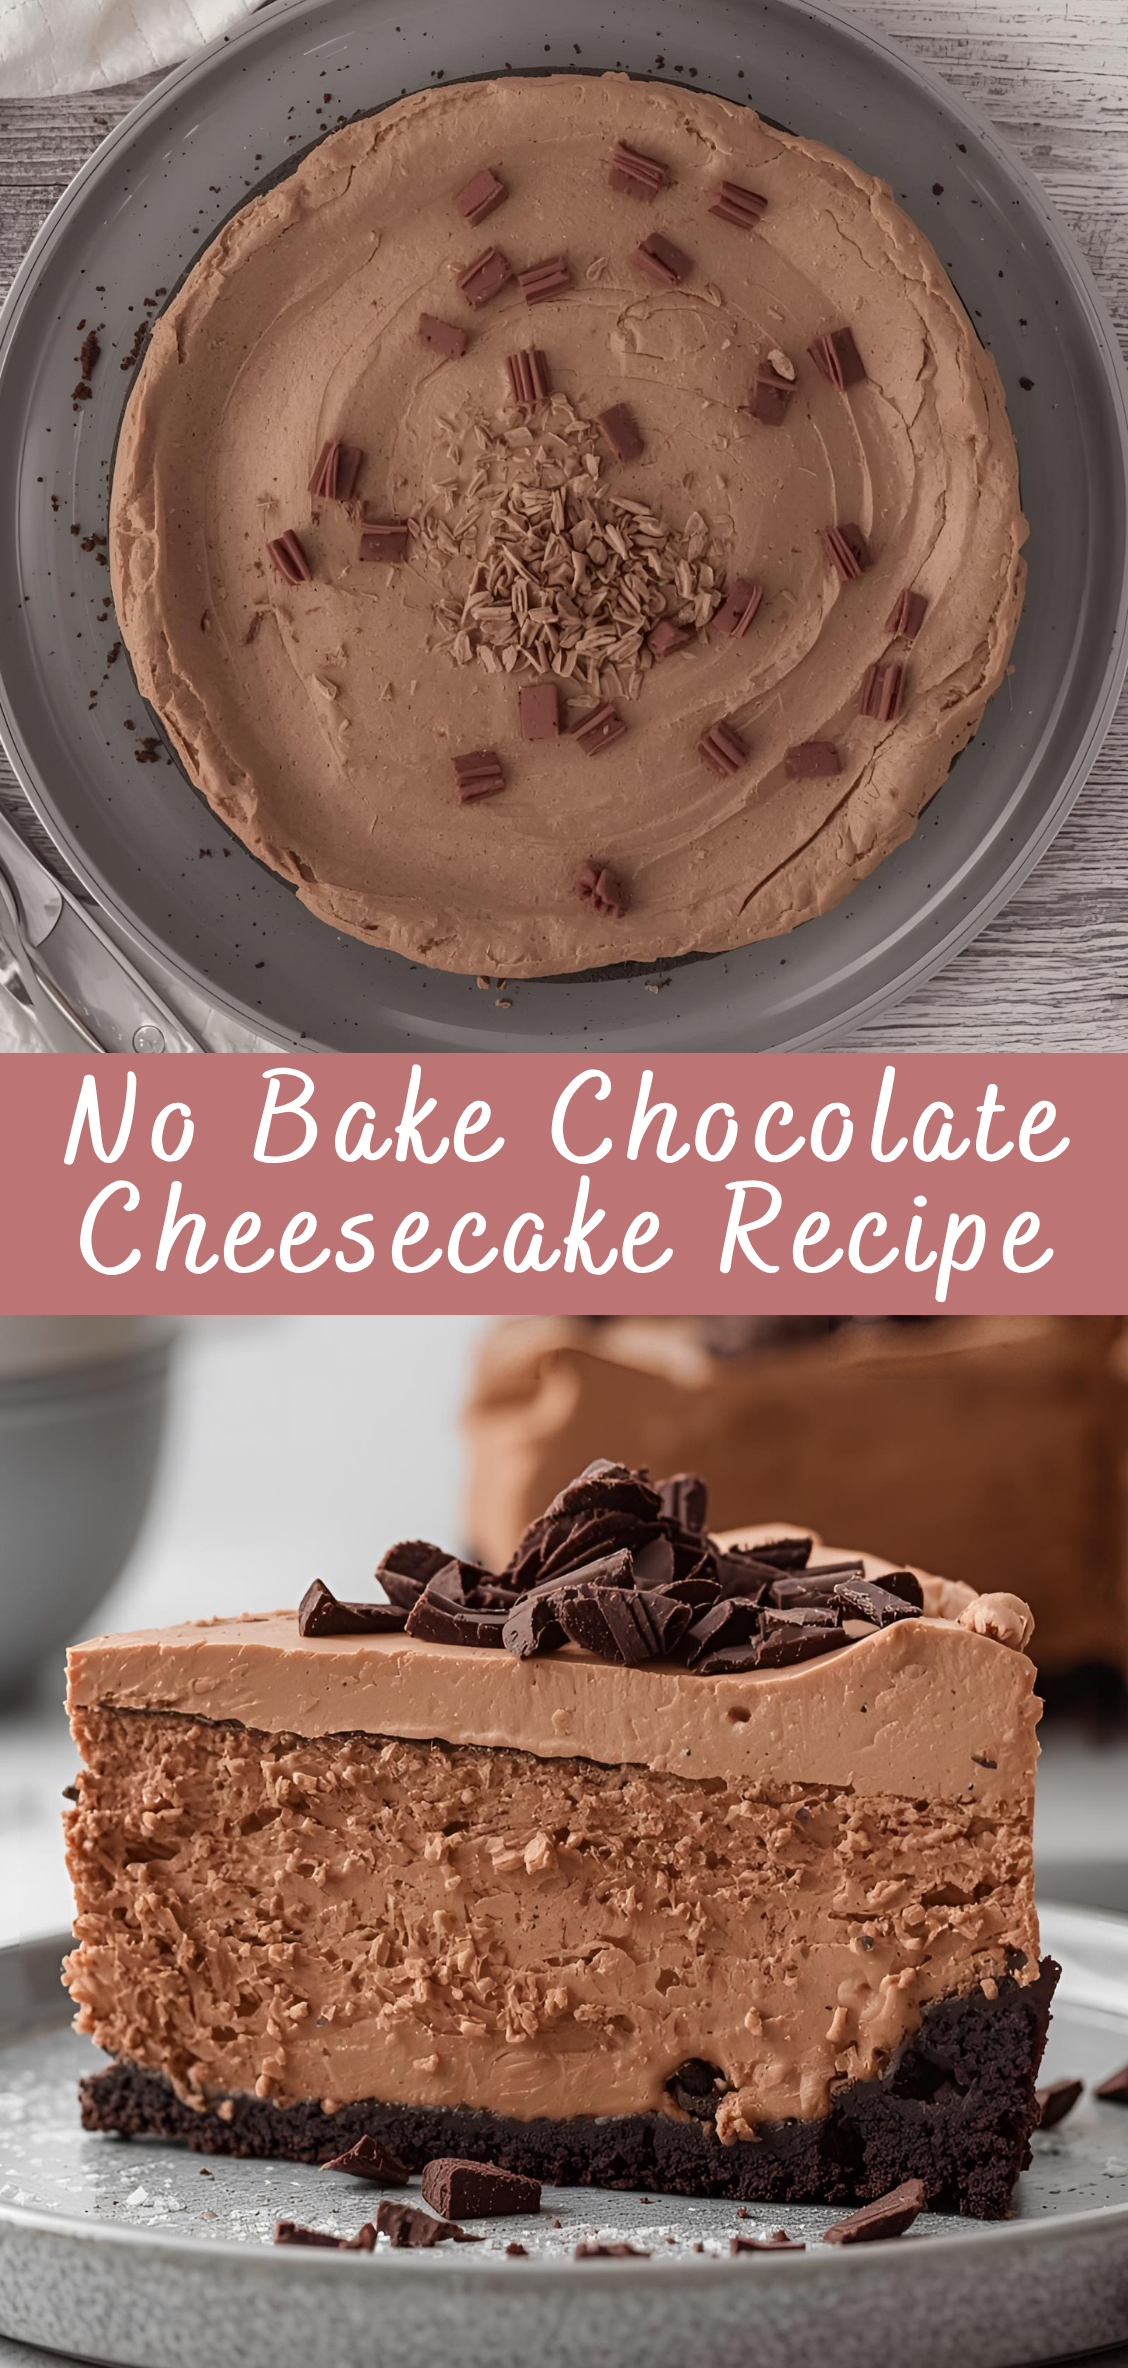
Step 2: Optional Toppings and Decoration
-
Whipped cream swirls piped around the edge
-
Chocolate shavings or curls sprinkled on top
-
Drizzle of ganache or melted chocolate
-
Fresh berries for a tart contrast
-
Chopped toasted nuts for crunch
Presentation Tip: Less is often more. Choose one or two garnishes that complement the flavor profile and keep the visual elegant.
No Bake Chocolate Cheesecake Recipe
Few desserts command the kind of universal admiration that cheesecake does. With its smooth texture, creamy richness, and irresistible balance between sweet and tangy, cheesecake has earned its place as a classic across cuisines and cultures. When you bring chocolate into the mix, you elevate this timeless dessert into something truly indulgent. Now, imagine capturing all that decadence—without ever turning on your oven. Welcome to the world of No-Bake Chocolate Cheesecake.
Ingredients
- For the Crust:
- 1 ½ cups chocolate cookie crumbs (e.g. Oreo or chocolate graham crackers, finely crushed)
- ¼ cup unsalted butter, melted
- For the Chocolate Cheesecake Filling:
- 12 oz (340g) semi-sweet or dark chocolate, chopped (or use good-quality chocolate chips)
- 16 oz (2 blocks) cream cheese, softened
- 1 cup powdered sugar
- 1 tsp vanilla extract
- 1 ½ cups heavy whipping cream, cold
Instructions
1. Make the Crust:
- Mix chocolate cookie crumbs and melted butter in a bowl until well combined.
- Press mixture firmly into the bottom of a 9-inch springform pan.
- Place in the fridge to chill while you prepare the filling.
2. Melt the Chocolate:
- Melt the chocolate using a double boiler or microwave in 20-second intervals, stirring until smooth.
- Let it cool to room temperature (but still pourable).
3. Make the Cheesecake Filling:
- In a large bowl, beat the softened cream cheese until smooth and creamy.
- Add powdered sugar and vanilla; mix until combined.
- Slowly mix in the melted chocolate until fully incorporated.
- In a separate bowl, whip the cold heavy cream to stiff peaks.
- Gently fold the whipped cream into the chocolate cream cheese mixture until smooth and fluffy.
4. Assemble the Cheesecake:
- Spread the filling over the chilled crust and smooth the top with a spatula.
- Cover with plastic wrap and refrigerate for at least 4–6 hours, or overnight for best results.
5. Serve:
- Carefully remove from the springform pan.
- Garnish with chocolate shavings, whipped cream, or berries if desired.
- Slice and enjoy!
Notes
- Crust alternatives: You can use graham crackers, digestive biscuits, or even pretzels for a sweet-salty twist.
- Chocolate options: Adjust sweetness by choosing between milk, semi-sweet, or dark chocolate.
- Make it ahead: This dessert is perfect for making a day in advance.

