Among the many appetizers that have endured through generations of home cooking, party spreads, and family gatherings, ham and cheese pinwheels stand out as a timeless classic. Their charm lies not only in their inviting spiral shape and golden-brown exterior but in the comforting combination of flavors that evoke warmth, nostalgia, and simplicity. The pairing of savory ham and melted cheese is familiar and universally loved, and the compact, hand-held form of a pinwheel transforms this classic duo into a versatile dish suitable for nearly any occasion.
Though now enjoyed worldwide, the concept of pinwheels has culinary roots that extend back centuries. Rolls, spirals, and layered pastries appear in numerous global cuisines, from European puff pastry traditions to savory roulades in French cooking. The modern ham and cheese pinwheel, however, is a distinctly approachable, home-kitchen evolution of these more elaborate dishes—an accessible fusion of convenience ingredients, classic flavors, and straightforward technique. Whether made with soft flour tortillas, buttery puff pastry, homemade dough, or crescent roll sheets, the pinwheel structure is inherently inviting: easy to prepare, easy to serve, and easy to eat.
What makes ham and cheese pinwheels particularly beloved is their adaptability. They can be served warm from the oven, where melted cheese stretches softly between layers of flaky pastry or tender dough, or they can be enjoyed chilled as a convenient make-ahead appetizer or lunchbox snack. The filling can be kept simple—just thinly sliced ham and a mild cheese like cheddar or Swiss—or expanded with spreads, herbs, sauces, or vegetables to create a more complex flavor profile. Their versatility extends even to the type of dough used; each variety lends a unique texture, from crisp to airy to soft, allowing cooks to tailor the pinwheels to the occasion or their personal preference.
At their core, ham and cheese pinwheels occupy a comforting middle ground between familiar and elevated. They evoke memories of family gatherings, holiday brunches, game-day snacks, school parties, and potlucks. Yet, with thoughtful ingredient choices and refined technique, they can easily be transformed into elegant hors d’oeuvres suitable for more formal occasions. Something as simple as adding a mustard spread or incorporating herbs such as chives or thyme can bring layers of flavor that elevate the dish without complicating its preparation.
The culinary science behind pinwheels is also surprisingly fascinating. The success of the final dish relies on balance—balancing moisture so the dough doesn’t become soggy, balancing fat content so the roll bakes evenly, and balancing structure so the pinwheels hold their shape in the oven. Cheese meltability, ham moisture level, and dough elasticity all play significant roles. Understanding these elements empowers any cook, from beginner to experienced, to produce consistently beautiful spirals with crisp edges, tender interiors, and a cohesive swirl of flavorful filling.
Texture plays an essential role in the appeal of ham and cheese pinwheels. There is the initial crisp or flaky bite from the pastry or baked dough, followed by the soft, savory chew of the ham and the creamy richness of melted cheese. At their best, the pinwheels offer contrast while maintaining harmony in every bite. The seasoning or spread used—ranging from Dijon mustard to garlic butter to herb cream cheese—adds depth and ensures the flavor does not rely solely on the ham and cheese. When prepared thoughtfully, each layer works in concert, creating a satisfying, well-rounded experience.
Culturally, ham and cheese pinwheels reflect a longstanding appreciation for portable, shareable foods. Similar to sandwiches, empanadas, and wraps, pinwheels exist in the tradition of preparing foods that are easy to slice, serve, and enjoy without utensils. This practicality makes them ideal for gatherings where guests mingle, graze, or enjoy finger foods. Their spiral presentation is visually appealing, making them a common choice for party platters, brunch buffets, holiday dinners, and picnic baskets alike. The symmetry of the roll, combined with the contrast between the golden exterior and the pink and creamy interior, makes ham and cheese pinwheels as attractive as they are delicious.
Furthermore, the recipe’s simplicity makes it highly approachable for home cooks of all skill levels. Children can help assemble the rolls, making it a wonderful introduction to hands-on cooking, while experienced cooks can experiment with techniques and ingredients to create gourmet versions. This duality—simple yet customizable—explains why ham and cheese pinwheels continue to be a cherished staple in countless households.
In this comprehensive guide, we will explore the art and craft of making perfect ham and cheese pinwheels from scratch. We will examine ingredient selection, the science of dough handling, the characteristics of different cheeses and hams, assembly techniques, baking methods, and presentation tips. We will also discuss variations that allow you to adapt the recipe to dietary needs or flavor preferences, from using whole-grain tortillas to incorporating spicy mustards, fresh herbs, or gourmet cheeses. Finally, we will cover storage, reheating, and serving strategies so your pinwheels remain delicious long after they leave the oven.
Whether you are preparing a quick appetizer, a lunchbox staple, a party platter centerpiece, or a comforting family snack, ham and cheese pinwheels promise satisfaction in every bite. Their blend of tradition, simplicity, and versatility makes them a recipe worth mastering. With this in-depth recipe and detailed instructions, you will learn not only how to make them but how to tailor them to your tastes and occasions, creating a dish that is timeless, crowd-pleasing, and wholly your own.
Ingredients and Preparation Notes
Before beginning, it’s important to understand the ingredients and how each contributes to the final pinwheel. These notes help ensure consistency, ideal flavor, and structural integrity.
Dough Options (Choose One Based on Preference)
-
Puff pastry sheet (1 sheet, thawed).
Produces a flaky, layered, bakery-style pinwheel with crisp edges and buttery layers. -
Crescent roll dough (1 tube).
Creates a soft, slightly fluffy pinwheel with a tender crumb that appeals to kids and casual snack platters. -
Homemade pinwheel dough (soft yeast dough or enriched dough).
This gives a bread-like, hearty texture, ideal for lunchboxes or savory brunch trays. -
Flour tortillas (large burrito size).
Used for no-bake or chilled pinwheel versions; excellent for cold lunches or appetizer platters.
Filling Ingredients
-
Sliced ham: 8–12 ounces, thinly sliced. Thinner slices roll more easily and stick to the dough better.
-
Cheese: 1–2 cups, shredded or thinly sliced (cheddar, Swiss, provolone, mozzarella, Gruyère, or a blend). Meltability influences texture.
-
Spread: 2–4 tablespoons (Dijon mustard, garlic butter, cream cheese, herb spread, or mayonnaise). This acts as the binding layer to keep the roll tight and moist.
-
Optional seasoning:
-
Black pepper
-
Italian herbs
-
Paprika
-
Crushed red pepper
-
Dried parsley
-
Step-by-Step Instructions
Step 1: Preparing the Dough
-
Thaw puff pastry properly
If using puff pastry, place it in the refrigerator for several hours or overnight. Quick-thawing on the counter can cause uneven softening, making it sticky or fragile.
Roll it gently on a floured surface to smooth creases. Do not press too hard, or the layers may compress, reducing flakiness. -
Using crescent roll dough
Unroll carefully to avoid stretching the perforated seams. Pinch any visible seams together to form one uniform sheet.
A seamless sheet ensures tight pinwheels that do not burst during baking. -
Tortilla method
Use large tortillas. Warm them slightly (10 seconds in the microwave) to increase flexibility and prevent cracking when rolling. -
Homemade dough method
Roll to a rectangle approximately ¼-inch thick. Too thick creates bulky rolls that may not cook evenly; too thin may tear when filled.
Step 2: Preparing the Filling
-
Spread the base layer
Apply a thin, even coat of your chosen spread: mustard for tang, cream cheese for richness, or mayonnaise for moisture.
This layer has three purposes:-
It enhances flavor.
-
It helps the ham adhere to the dough.
-
It prevents dryness by creating moisture barriers.
-
-
Layer the ham
Place slices evenly across the surface, slightly overlapping. Avoid thick bunches or folded corners, which create uneven rolling.
Overhang the ham slightly at the edges to ensure filling reaches every bite. -
Add the cheese
If using shredded cheese, sprinkle evenly. For sliced cheese, place slices so they cover the ham without creating overly thick pockets.
The cheese melts and acts as a binding agent, helping the roll hold shape. -
Season lightly
Add a dash of black pepper or herbs if desired. Salt is rarely needed due to the natural saltiness of ham and cheese.
Step 3: Rolling the Pinwheels
-
Begin with the long side
Roll tightly from the long edge of the rectangle. Rolling from the short side creates fewer spirals and thicker slices. -
Keep tension steady
Too loose: the pinwheels unroll during baking.
Too tight: the dough may tear or fillings may squeeze out. -
Seal the roll
When you reach the end, gently pinch the seam to secure it. For puff pastry or homemade dough, a dab of water helps seal. For tortillas, press firmly for a few seconds until it sticks. -
Chill before slicing (important)
Refrigerate the rolled log for 10–20 minutes.
This firms the structure and makes slicing cleaner. Warm dough or soft fillings lead to squashed pinwheels.
Step 4: Slicing the Pinwheels
-
Use a sharp serrated knife
A dull blade presses instead of slicing, deforming the spiral and compressing layers. -
Slice ½-inch to ¾-inch thick pieces
Thinner slices may unravel; thicker slices may bake unevenly. -
Place cut-side up on a baking sheet
Line the sheet with parchment to prevent sticking. Space pinwheels at least 1 inch apart, as dough will expand.
Step 5: Baking the Pinwheels (for baked versions)
-
Preheat the oven to 375°F (190°C)
This temperature ensures even browning. Puff pastry may require 400°F (205°C) for optimal rise. -
Brush tops lightly with egg wash (optional)
Creates glossy, golden surfaces that look professional. -
Bake 12–18 minutes
Timing varies with dough type:-
Puff pastry: 15–18 minutes
-
Crescent dough: 12–14 minutes
-
Homemade dough: 15–20 minutes
-
-
Look for visual cues
-
Edges should be golden brown.
-
Cheese should be melted and bubbling slightly.
-
Dough should appear set, not raw, in inner spirals.
-
-
Cool slightly before serving
Cheese is extremely hot right out of the oven and needs 5–10 minutes to firm slightly for easier handling.
Step 6: Preparing No-Bake or Chilled Pinwheels (tortilla method)
-
Spread, layer, and roll the tortilla as instructed.
-
Chill the rolled tortilla tightly wrapped for 30 minutes
Chilling is essential for clean slicing. -
Slice into 1-inch rounds
Thinner slices fall apart more easily when made cold. -
Arrange on a platter and keep refrigerated until serving.
Step 7: Storing, Reheating, and Serving
-
Refrigeration
Baked pinwheels can be stored in the refrigerator for 3–4 days.
Reheat at 350°F (175°C) for 5–8 minutes to re-crisp. -
Freezing
Freeze unbaked or baked pinwheels. Freeze in a single layer first, then transfer to bags.-
Unbaked: Bake from frozen, adding 3–5 extra minutes.
-
Baked: Reheat directly from frozen at 350°F.
-
-
Serving suggestions
-
Pair with honey mustard.
-
Serve with marinara for an Italian twist.
-
Add to brunch boards beside eggs, fruits, and pastries.
-
Step 8: Optional Variations and Enhancements
Flavor variations:
-
Spinach and ham
-
Ham, Swiss, and Dijon
-
Cheddar and caramelized onion
-
Ham, provolone, and pesto
-
Jalapeño–ham–pepper jack for a spicy version
Dough variations:
-
Whole wheat tortillas for a healthier cold version
-
Croissant dough for extra buttery spirals
-
Pizza dough for hearty, chewy pinwheels
Cheese variations:
-
Gruyère for nutty flavor
-
Mozzarella for stretch
-
Sharp cheddar for boldness
-
Smoked gouda for depth
Sauce variations inside the roll:
-
Ranch dressing
-
Horseradish aioli
-
Garlic herb butter
-
Cream cheese blended with herbs
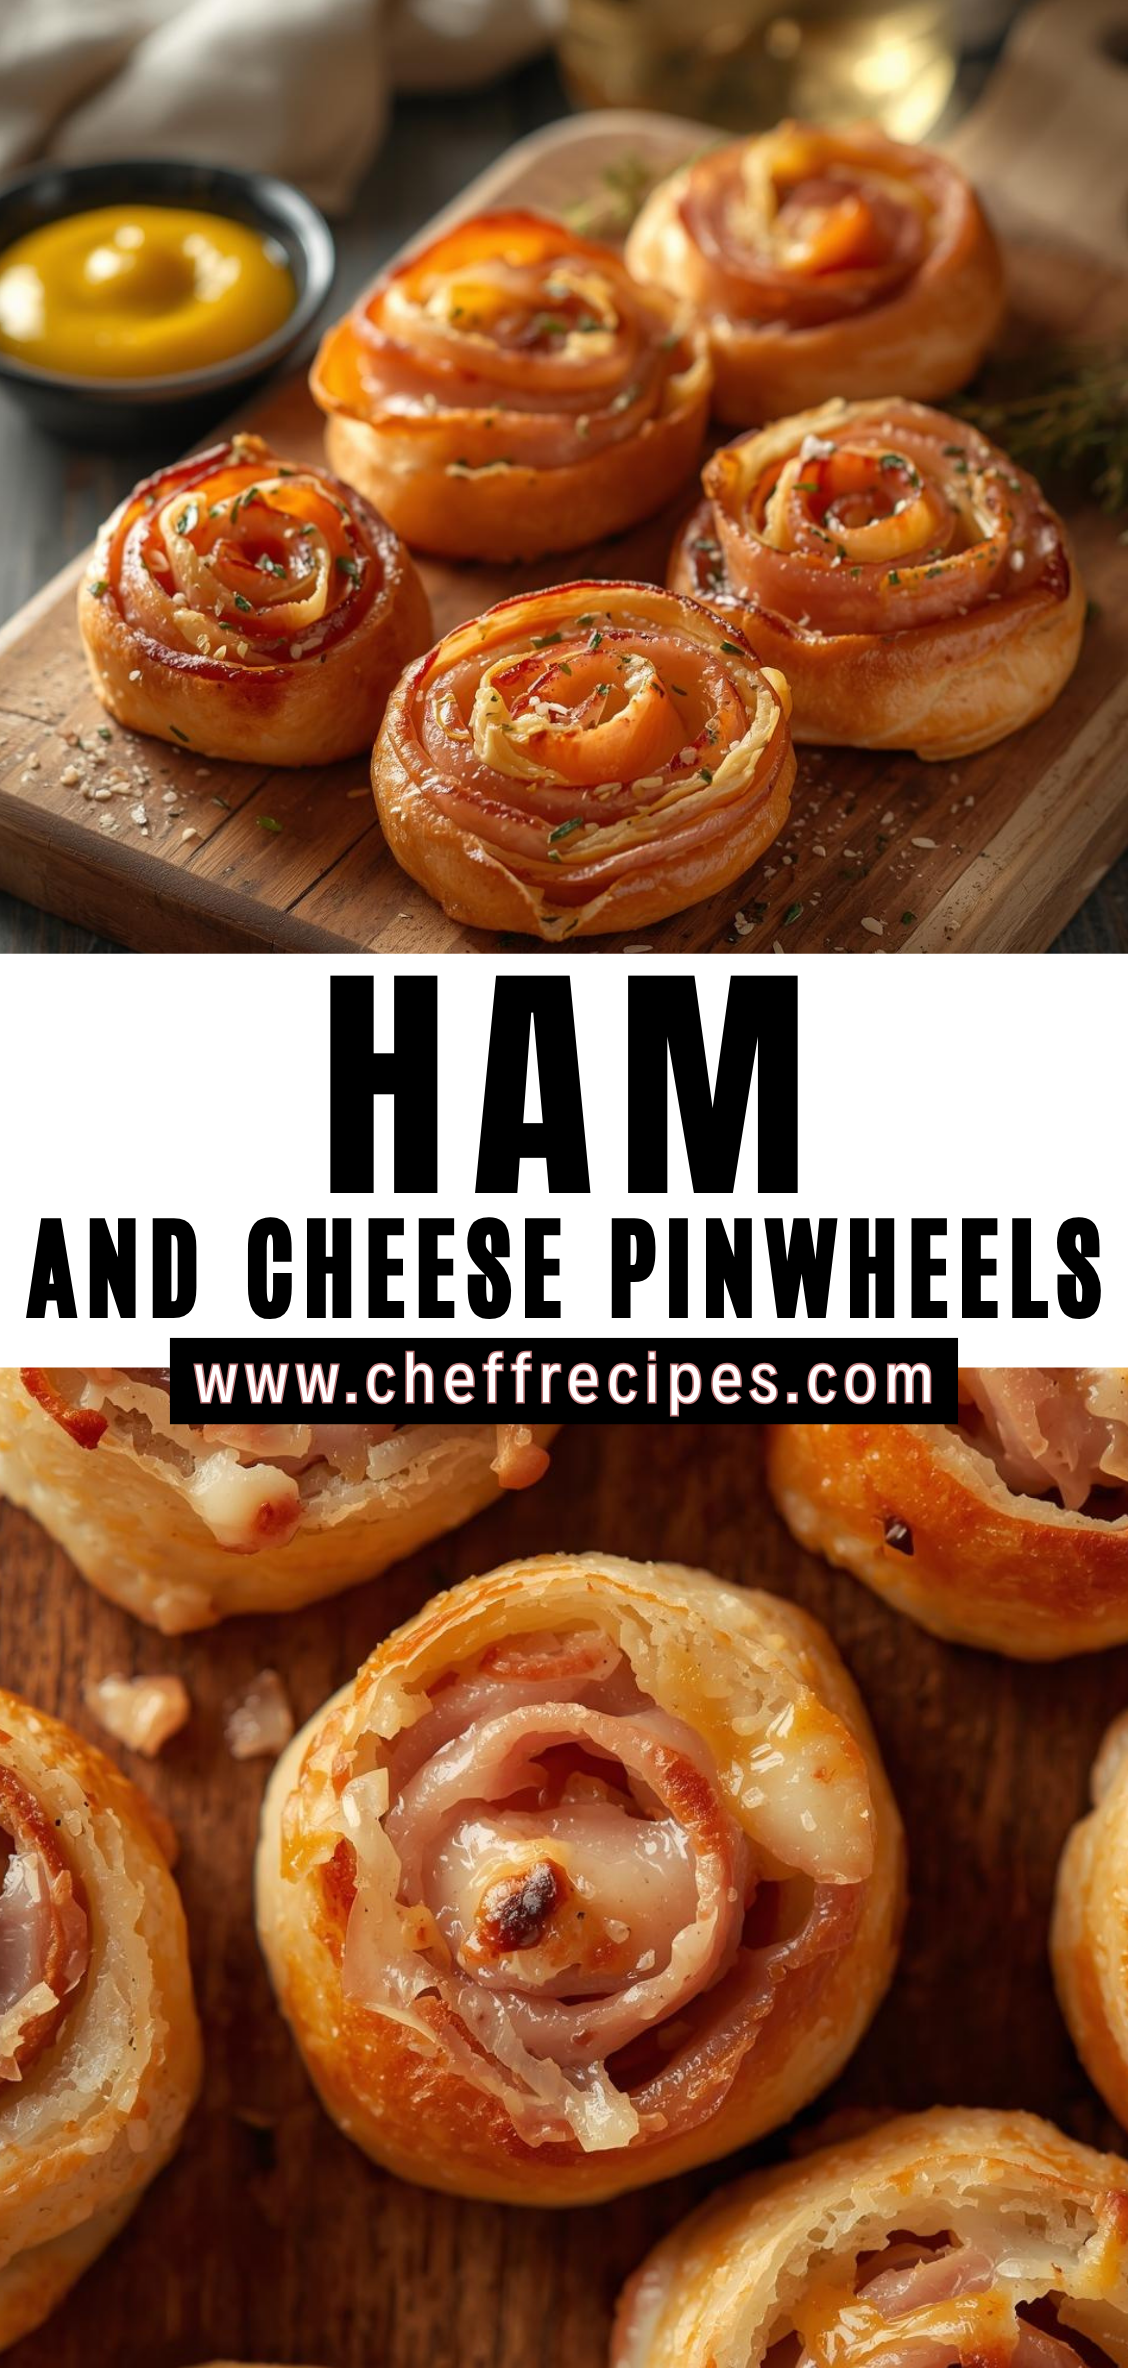
Ham and Cheese Pinwheels
Among the many appetizers that have endured through generations of home cooking, party spreads, and family gatherings, ham and cheese pinwheels stand out as a timeless classic.
Ingredients
- 1 sheet puff pastry, thawed
- 2 tbsp Dijon mustard (or mayonnaise)
- 6–8 slices deli ham
- 1 cup shredded Swiss or cheddar cheese
- 1 egg, beaten (for egg wash)
- Optional: 1 tsp dried Italian herbs or everything bagel seasoning
Instructions
1. Prepare the Puff Pastry
- Preheat your oven to 400°F (200°C).
- Lightly flour a surface and unfold the thawed puff pastry sheet.
- Roll it out gently to smooth any creases.
2. Add the Filling
- Spread Dijon mustard evenly over the surface of the puff pastry.
- Arrange the ham slices in a single layer.
- Sprinkle shredded cheese evenly over the ham.
- Add herbs or seasoning if desired.
3. Roll and Slice
- Starting from the long edge, roll the pastry tightly into a log.
- Brush the edge with a little beaten egg to seal.
- Use a sharp knife to slice the log into 1-inch pinwheels.
4. Bake the Pinwheels
- Arrange the pinwheels on a parchment-lined baking sheet, spacing them slightly apart.
- Brush the tops with the remaining egg wash.
- Bake for 15–18 minutes, or until golden brown and puffed.
5. Serve
- Let cool slightly before serving warm.
Notes
- Variations: Add spinach, caramelized onions, or a thin layer of cream cheese for extra flavor.
- Make Ahead: Assemble the log and refrigerate for up to 24 hours before slicing and baking.
- Freezing Tip: Freeze the rolled log for 20 minutes before slicing to keep the pinwheels perfectly round.
- Serving Ideas: Great for parties, potlucks, and kid-friendly snacks.

