Chinese Style Mango Chicken Stir Fry Recipe: A Burst of Flavors in Every Bite
Are you craving a delightful fusion of flavors that will tantalize your taste buds? Look no further than this Chinese Style Mango Chicken Stir Fry recipe. Combining the succulent goodness of chicken with the sweetness of mangoes, this dish is a harmonious marriage of Eastern and tropical influences. In this article, we’ll guide you through the step-by-step process of creating this mouthwatering dish that’s bound to become a family favorite. Let’s dive in!

Table of Contents
- Introduction
- Ingredients You’ll Need
- Preparing the Marinade
- Searing the Chicken to Perfection
- Sautéing the Aromatics
- Adding the Vegetables
- Incorporating the Mango Magic
- Creating the Stir Fry Sauce
- Bringing It All Together
- Serving and Garnishing
- Tips for the Best Mango Chicken Stir Fry
- Frequently Asked Questions (FAQs)
Introduction
When it comes to creating a dish that’s both visually appealing and bursting with flavors, this Chinese Style Mango Chicken Stir Fry takes the cake. The marriage of tender chicken and ripe mangoes creates a dance of tastes and textures that’s sure to leave you craving for more.
Ingredients You’ll Need
Before you embark on this culinary journey, make sure you have the following ingredients ready:
- Boneless, skinless chicken breasts
- Ripe mangoes
- Assorted bell peppers (for a burst of color)
- Onion
- Garlic cloves
- Fresh ginger
- Soy sauce
- Oyster sauce
- Hoisin sauce
- Cornstarch
- Sesame oil
- Vegetable oil
- Cashews (for an added crunch)
- Fresh cilantro (for garnishing)
- Steamed rice (for serving)
Preparing the Marinade
Begin by marinating the chicken to infuse it with flavor. In a bowl, mix soy sauce, minced garlic, grated ginger, and a dash of sesame oil. Slice the chicken into thin strips and coat them in the marinade. Allow the chicken to marinate for at least 15 minutes.
Searing the Chicken to Perfection
Heat a wok or a large skillet over high heat. Add vegetable oil and let it heat up. Carefully add the marinated chicken, allowing it to sear for a couple of minutes on each side until it’s cooked through and has a nice golden color. Remove the chicken from the wok and set it aside.
Sautéing the Aromatics
In the same wok, add a bit more vegetable oil if needed. Toss in finely chopped onion and garlic, and sauté until they turn fragrant and translucent. The aroma that fills your kitchen will have you eagerly anticipating the final dish!
Adding the Vegetables
To add a pop of color and crunch, toss in the assorted bell peppers. Let them cook briefly to maintain their vibrant color and crispness.
Incorporating the Mango Magic
Ah, the star of the show: ripe mangoes! Dice the mangoes into bite-sized pieces and gently fold them into the stir fry. Their natural sweetness will provide a delightful contrast to the savory elements of the dish.
Creating the Stir Fry Sauce
Mix oyster sauce, hoisin sauce, and a touch of cornstarch in a bowl. This sauce will tie all the flavors together and give your stir fry its signature glaze.
Bringing It All Together
Return the seared chicken to the wok and pour the sauce over the ingredients. Toss everything together, ensuring that each piece of chicken and mango is coated with the luscious sauce.
Serving and Garnishing
Your Chinese Style Mango Chicken Stir Fry is now ready to be served. Plate it alongside steamed rice and garnish with cashews and fresh cilantro. The medley of colors and textures will make it look as good as it tastes.
Tips for the Best Mango Chicken Stir Fry
- Choose ripe but firm mangoes for the best balance of sweetness and texture.
- Feel free to add more vegetables like snap peas or baby corn for extra variety.
- Adjust the level of spiciness by adding red pepper flakes or fresh chilies.
- For a vegetarian version, swap the chicken with tofu or tempeh.
Frequently Asked Questions (FAQs)
Can I use frozen mangoes for this recipe?
While fresh mangoes are recommended for optimal flavor and texture, you can use frozen mangoes in a pinch. Just make sure to thaw and drain them before use.
Is this dish very spicy?
The heat level of this dish can be adjusted based on your preference. Feel free to add more or less spice to suit your taste.
Can I make the stir fry sauce in advance?
Absolutely! Prepare the sauce ahead of time and store it in the refrigerator. Just remember to give it a good stir before adding it to the stir fry.
What can I serve with Mango Chicken Stir Fry?
Besides steamed rice, you can serve this stir fry with noodles or even as a filling for lettuce wraps.
Can I use other types of protein?
Yes, you can substitute chicken with other proteins like shrimp, beef, or even a meat substitute.
Indulge in the symphony of flavors that this Chinese Style Mango Chicken Stir Fry brings to your plate. With its aromatic spices, tender chicken, and the fruity sweetness of mangoes, it’s a dish that showcases the art of stir-frying at its finest.
Source: whiskaffair.com
Cioppino Recipe
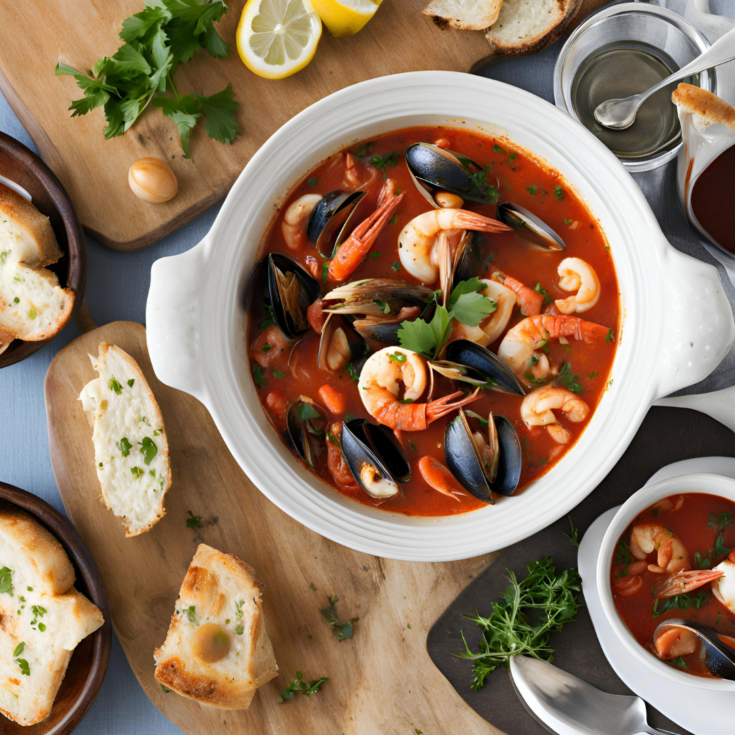
Cioppino is a delightful seafood stew that hails from the Italian-American community of San Francisco. It’s a tomato-based dish packed with a variety of fresh seafood, making it a favorite for seafood lovers. The combination of flavors and textures in Cioppino is truly a culinary experience.
Ingredients
- Olive oil
- 1 large onion, finely diced
- 1 medium fennel bulb, fronds removed, cored and finely diced
- Sea salt
- Black pepper
- ½ teaspoon red chili pepper flakes (or more if desired)
- 1 large bay leaf
- 8 cloves garlic, pressed through garlic press
- 2 ½ tablespoons tomato paste
- 1 ½ cups white wine (pinot grigio is good)
- 2 (28 ounce) cans whole tomatoes, juices reserved and chopped/crushed into small pieces (or sub crushed tomatoes)
- 3 cups seafood stock
- 1 ½ pounds halibut (or cod), cut into 1 ½ – 2 inch chunks
- 1 pound littleneck clams, scrubbed
- 1 pound large shrimp, peeled and deveined
- 1 pound black mussels, de-bearded and scrubbed
- 1 tablespoon chopped flat-leaf parsley, for garnish
- Sliced and toasted sourdough bread, for serving on the side
- Lemon wedges (optional, served on the side)
Instructions
- Place a large soup pot over medium heat, and drizzle in about ¼ cup of olive oil; once the oil is hot, add in the diced onion and fennel, along with a couple of good pinches of salt and pepper, plus the red chili pepper flakes and the bay leaf, and stir to combine.
- Saute together for about 5-7 minutes, until the veggies begin to soften and become aromatic; then, add in the garlic and stir to incorporate, and once it becomes aromatic (about 30 seconds), add in the tomato paste and stir to combine and cook for a moment or so.
- Next, add in the white wine, the chopped/crushed whole tomatoes along with their juices (or canned crushed tomatoes, if using those instead), and the seafood stock, and stir to combine. Taste the cioppino broth and add a couple of very generous pinches of salt to taste (as it may need quite a bit), and a pinch or two of black pepper as well.
- Bring the broth to the boil, then reduce the heat and allow the tomato broth to gently simmer, uncovered, for 40 minutes.
- After 40 minutes, remove the bay leaf, and taste the broth to see if more red pepper flakes and/or salt and pepper is needed; then, with the broth vigorously simmering, begin adding your seafood to the pot starting with the halibut (or cod) pieces first, next the clams, then the shrimp, followed by the mussels. Using a wooden spoon, just barely nudge them into the broth a little bit to partly submerge them.
- Cover the pot with a lid and allow the seafood to cook for 10 minutes at a vigorous simmer, or until the clams and the mussels are opened up (take care to not over-cook to avoid rubbery seafood).
- Before serving, check to see if any clams or mussels remained closed, and if so, remove those as they are not good to eat. Drizzle a generous amount of olive oil over the cioppino and garnish with parsley, then ladle into shallow bowls and serve with toasted sourdough, as well as some lemon wedges, if desired.
Notes
- You choose your seafood: I'm using a total of about 4 ½ pounds of various types seafood for this recipe, which works well. I love the combo of clams, mussels, halibut and shrimp, but if you'd like to add scallops or crab meat, then just substitute a portion of some of the seafood, if you'd like.
- Cleaning the clams and mussels: Mussels will typically have little stringy “beards” on the sides of their shells, so just pull those off to remove them. And if the they seem a bit sandy, give them a scrub under cold, running water with a vegetable brush to clean them. Soaking clams and mussels (separately) in cold, fresh water will also help them to spit out any residual sand from their shells. Then, drain them and keep them cold in the fridge until ready to use.
- Halibut or cod: Because this cioppino is a real treat, I love to use halibut because it is meaty in texture and mild. It is quite pricey, however, so if you'd prefer to spend a little less, then opt for cod. It is also a terrific white fish to use in cioppino, with a mild flavor, and a lot less pricey.
- Make it spicy, or not so much: A spicy, garlicky tomato broth is something that I really enjoy, so I tend to add quite a bit of red pepper flakes to my pot of cioppino. I kept the amount called for in the recipe to a medium/mild level, but you can add more or less, depending on your preference.
- How to reheat cioppino: I've found that it's easy to reheat cioppino the next day (or even the day after) by ladling out an individual portion into a small sauce pan or pot, and very gently heating until nice and hot. Do not vigorously simmer the stew when reheating, as this will further cook your seafood, making it rubbery, rather than just warming it through.