Cider Braised Chicken with Caramelized Onions
Introduction:
Imagine the delightful aroma of caramelized onions mingling with the sweet, tangy scent of apple cider, all enveloping tender, succulent chicken. This is the essence of Cider Braised Chicken with Caramelized Onions—a dish that perfectly marries the flavors of autumn. In this article, we’ll dive into the world of this mouthwatering creation and discover how to prepare it.
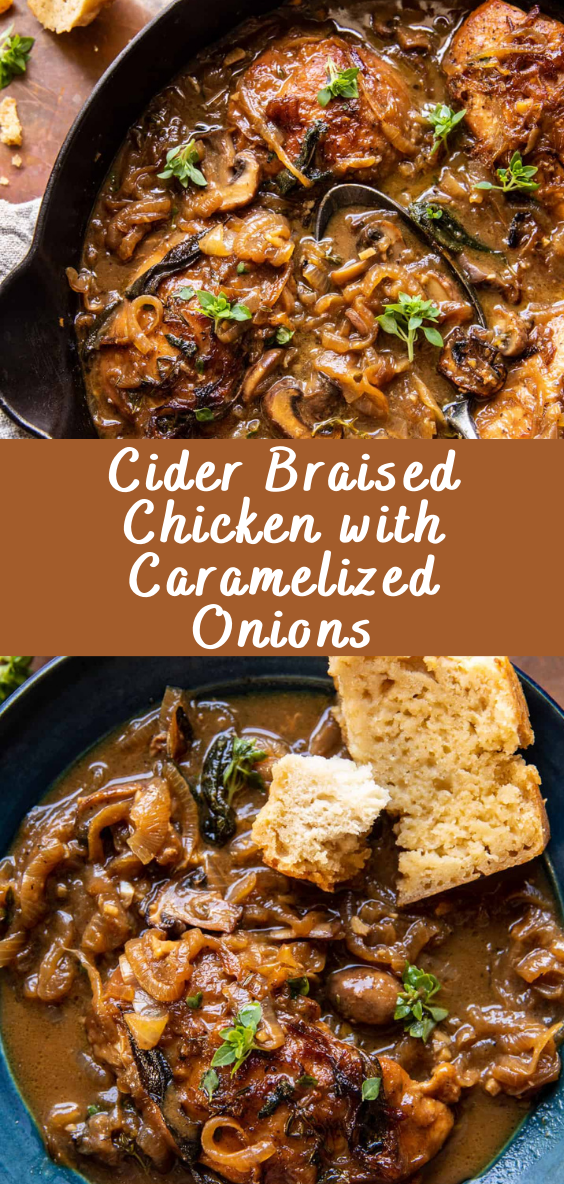
Table of Contents:
- What You’ll Need
- The Art of Braising
- Preparing the Chicken
- Creating the Caramelized Onions
- Combining the Flavors
- Slow and Tender Cooking
- Serving Suggestions
- Health Benefits of Cider
- Variations and Substitutions
- Tips for Perfect Cider Braised Chicken
- Frequently Asked Questions
- Conclusion
1. What You’ll Need:
Before we begin our culinary journey, let’s gather the essential ingredients:
- Chicken Pieces: You can use thighs, drumsticks, or a combination.
- Apple Cider: Choose a quality cider for that authentic apple flavor.
- Onions: For caramelization and depth of flavor.
- Fresh Thyme: To add aromatic herbal notes.
- Chicken Broth: For a savory base.
- Butter: For sautéing and richness.
- Olive Oil: For searing the chicken.
- Salt and Pepper: To season to perfection.
2. The Art of Braising:
Braising is a cooking technique that involves browning meat, then simmering it in liquid until tender. It’s the secret to achieving juicy, fall-off-the-bone chicken.
3. Preparing the Chicken:
Season the chicken pieces with salt and pepper. Sear them in a hot pan until they develop a golden-brown crust.
4. Creating the Caramelized Onions:
Sauté onions in butter until they turn a rich, golden brown. This process caramelizes the natural sugars in the onions, intensifying their flavor.
5. Combining the Flavors:
Add the apple cider, chicken broth, and fresh thyme to the caramelized onions, creating a flavorful liquid base.
6. Slow and Tender Cooking:
Return the seared chicken to the pot, cover, and let it simmer slowly until the meat becomes tender and infused with the delicious apple and onion flavors.
7. Serving Suggestions:
Serve your Cider Braised Chicken with Caramelized Onions over a bed of creamy mashed potatoes, rice, or buttered noodles. Pour the flavorful sauce over the top for a truly satisfying meal.
8. Health Benefits of Cider:
Apple cider is not only delicious but also nutritious. It contains antioxidants and vitamins, making it a healthy choice.
9. Variations and Substitutions:
Feel free to get creative with your Cider Braised Chicken. You can add apples or pears for extra sweetness or incorporate bacon for a smoky twist.
10. Tips for Perfect Cider Braised Chicken:
- Use bone-in, skin-on chicken pieces for the best flavor and texture.
- Don’t rush the caramelization of onions; low heat and patience are key.
- Keep the chicken pieces snug in the pot to ensure even cooking.
11. Frequently Asked Questions:
Q1: Can I use boneless chicken for this recipe? Bone-in chicken is recommended for the most flavorful and tender results, but boneless can be used if preferred.
Q2: What type of apple cider should I use? Choose a good-quality, unfiltered apple cider for the best flavor.
Q3: Can I make this dish in advance? Absolutely! It reheats beautifully, and the flavors continue to meld over time.
Q4: Can I use a different type of meat? You can adapt this recipe for pork or turkey if you prefer.
Q5: What’s the ideal cooking time for the chicken? Simmer for approximately 45 minutes to 1 hour, or until the chicken is tender.
12. Conclusion:
Cider Braised Chicken with Caramelized Onions is a celebration of autumn’s flavors. With the sweet tang of apple cider, the richness of caramelized onions, and tender, succulent chicken, this dish embodies comfort and warmth. So, embrace the art of braising, savor the fall-inspired aromas, and enjoy a comforting meal that’s perfect for any occasion.
Source: halfbakedharvest.com
Rosemary Butter Mushroom and Cheese Ravioli
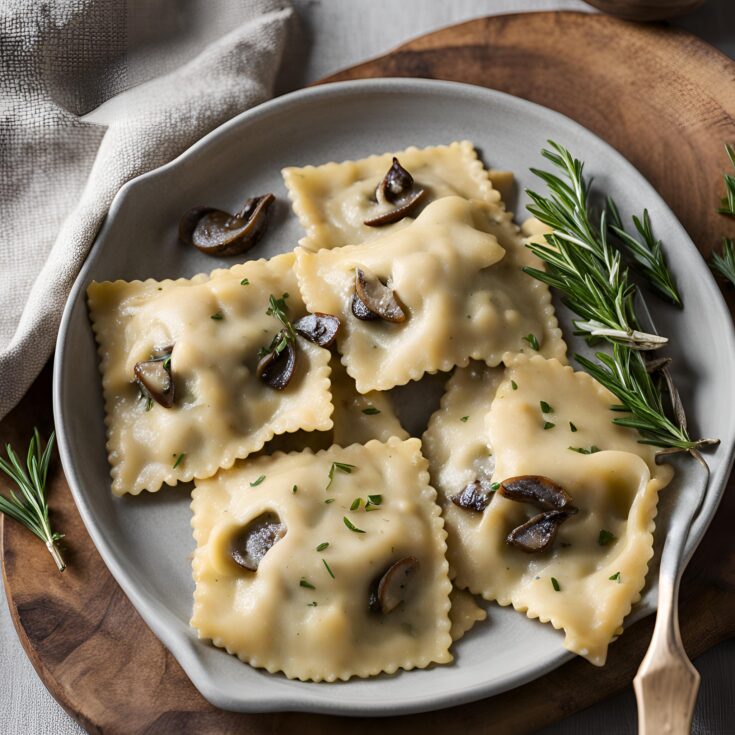
Indulge in the comforting and elegant flavors of Rosemary Butter Mushroom and Cheese Ravioli. This homemade dish combines the earthy taste of mushrooms with creamy cheese, all enveloped in delicate pasta and topped with a fragrant rosemary butter sauce. Whether you're looking to impress guests or simply treat yourself to a gourmet meal, this recipe is a must-try.
Ingredients
- 2 tablespoons extra virgin olive oil
- 3 cups shiitake or cremini mushrooms, sliced
- 6 tablespoons salted butter
- 3 cloves garlic, minced or grated
- kosher salt and black pepper
- 1 tablespoon chopped fresh rosemary, plus 2 rosemary sprigs
- 1/2 cup dry white wine, such as Pinot Grigio or Sauvignon Blanc
- 1 cup low sodium vegetable or chicken broth
- 1 pound cheese ravioli, homemade or store-bought
- BREADCRUMBS
- 2 cups torn sourdough bread
- 2 tablespoons extra virgin olive oil
- 3 ounces prosciutto (omit if vegetarian)
- 1/2 cup grated Manchego cheese
- 1/2 teaspoon crushed red pepper flakes
Instructions
1. To make the breadcrumbs, preheat oven to 425° F. On a baking sheet, toss the bread, olive oil, manchego, and a pinch of salt. Lay the prosciutto around the bread. Bake 10 minutes, until the prosciutto is crisp. Crumble the bread/prosciutto into fine crumbs using your fingers or pulse in a food processor. Toss with red pepper flakes.
2. Bring a large pot of salted water to a boil. Cook the ravioli according to package directions until al dente. Drain the ravioli.
3. Meanwhile, heat the olive oil in a large skillet over medium-high heat. When the oil shimmers, add the mushrooms. Cook undisturbed for 5 minutes or until golden. Add the butter, garlic, rosemary, a pinch of crushed red pepper flakes, salt, and pepper. Cook 4-5 minutes, until fragrant. Pour in the wine and broth and bring to a boil. Season with salt and pepper. Cook 5 minutes or until the sauce has reduced slightly.
4. Drop the ravioli into the sauce, gently toss to combine. Divide the ravioli and sauce between plates. Top with breadcrumbs. Enjoy!
Nutrition Information:
Amount Per Serving: Calories: 710