Classic Chili with Beans and Corn: A Hearty, Flavor-Packed Comfort Dish for Every Season
Few dishes evoke the comforting warmth and soul-satisfying richness of a bowl of classic chili. Thick, spicy, and bursting with layers of flavor, chili is one of those timeless recipes that seems to have as many variations as there are cooks. Whether it’s simmering on a stovetop during a cold winter afternoon, bubbling in a slow cooker at a tailgate, or served at a casual family dinner, chili has earned its place as a cornerstone of American comfort food.
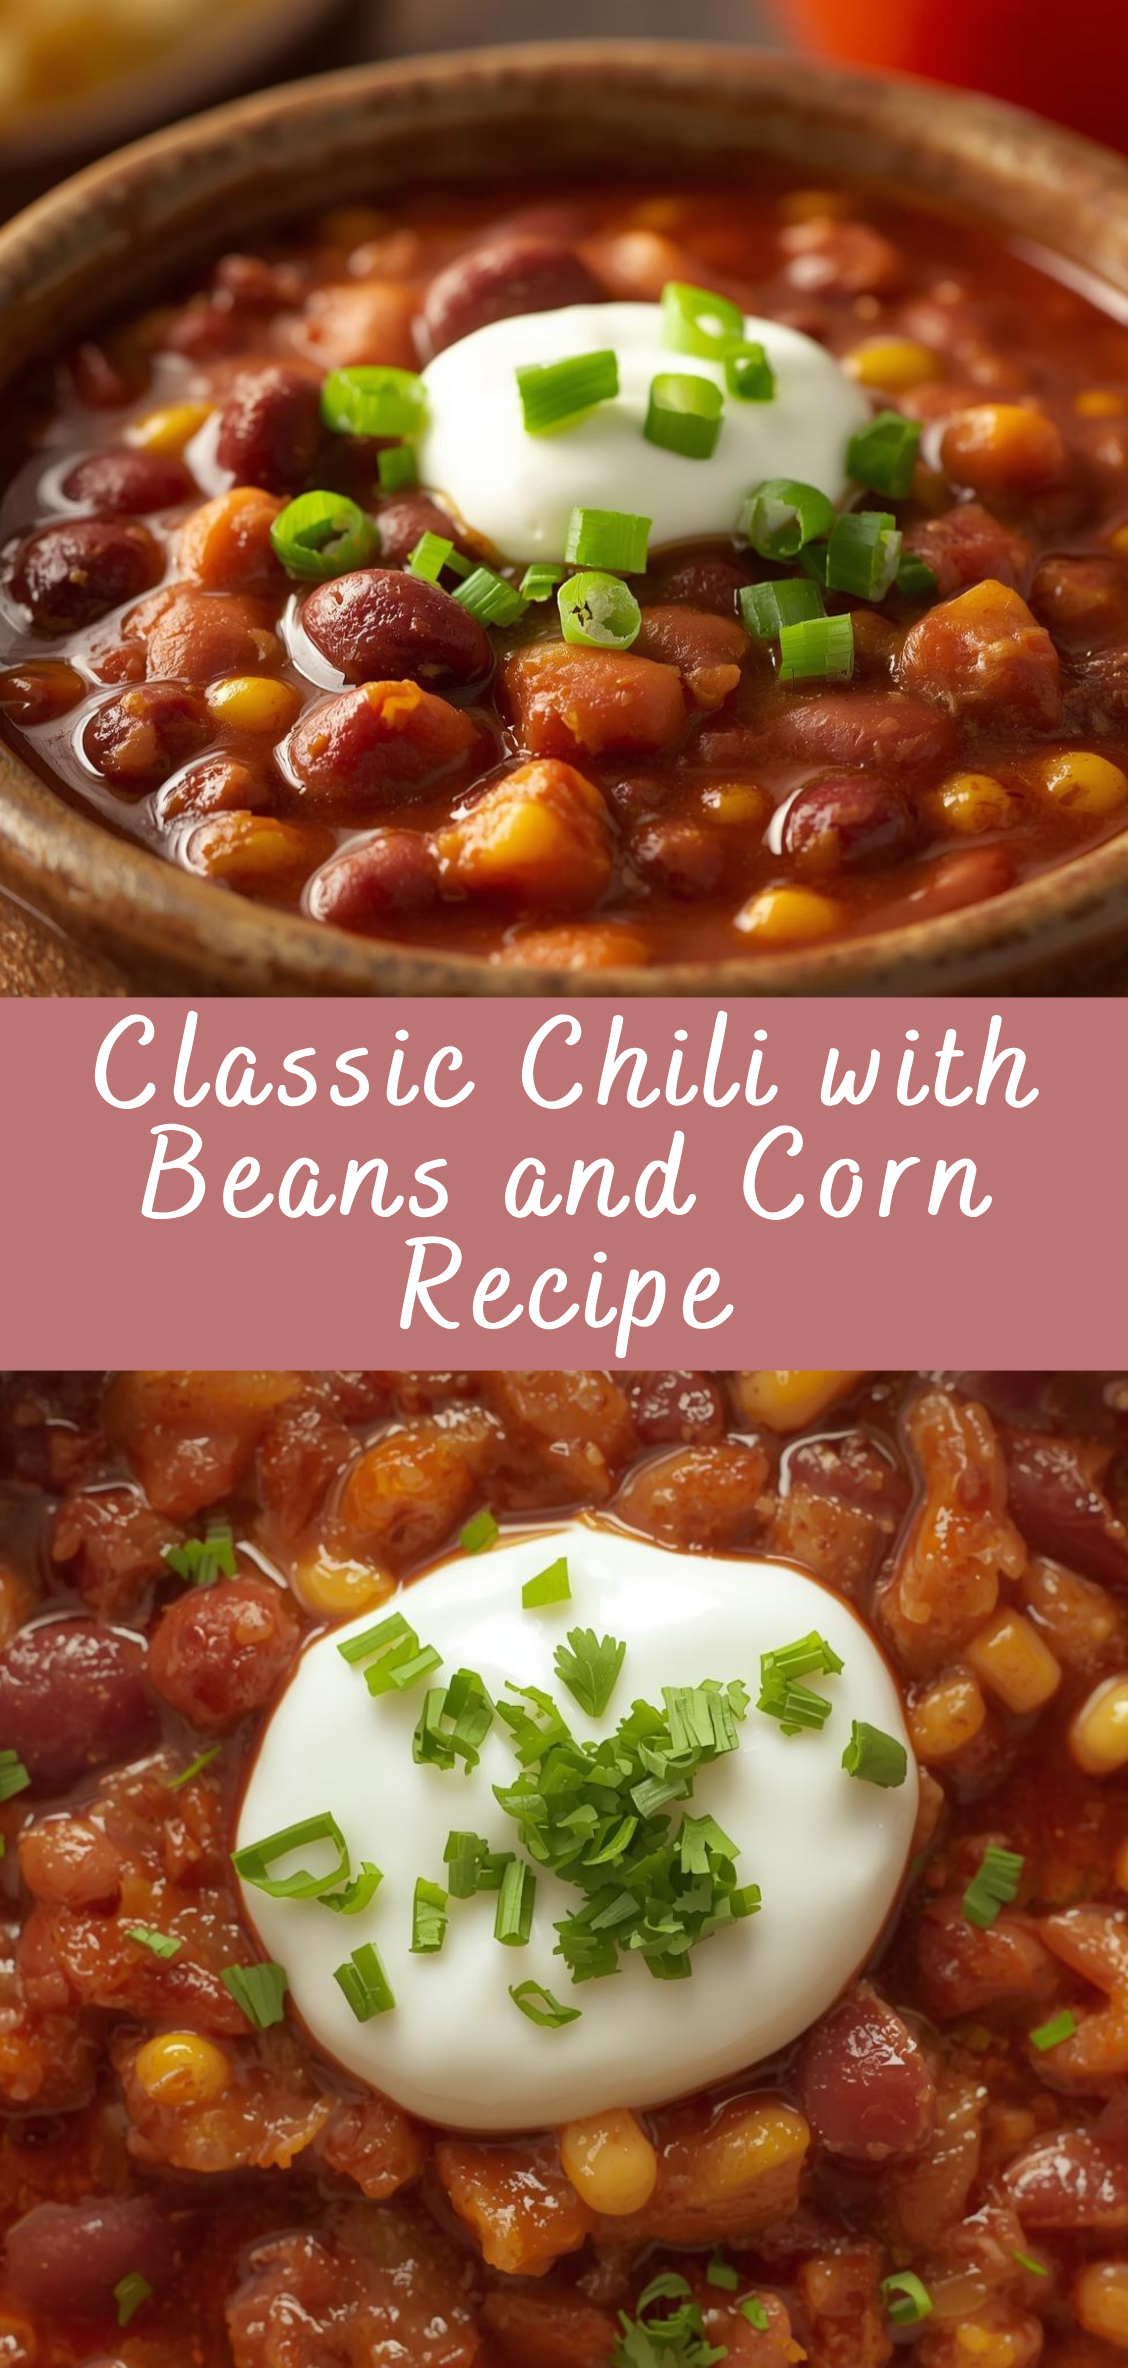
This version — Classic Chili with Beans and Corn — celebrates the best of tradition while embracing the hearty additions that make modern chili so beloved. It’s meaty, robust, and simmered to perfection with tender beans, sweet corn, and aromatic spices that build warmth without overwhelming the palate. Each spoonful tells a story of time-honored flavors refined through generations of home cooking.
The Spirit of Chili: A Dish Born of Adaptation
Chili is more than a recipe — it’s a reflection of resourcefulness, community, and flavor evolution. While its precise origins are debated, most culinary historians agree that chili con carne — literally “chili with meat” — first emerged in the 19th century along the borderlands of Texas and Northern Mexico. It was a dish of necessity: affordable ingredients cooked slowly to extract maximum flavor and nutrition.
Cowboys, ranchers, and settlers relied on ingredients that could travel — dried chilies, beans, cornmeal, and cured meats — transforming them into hearty stews that fueled long days of labor. Over time, these humble beginnings evolved into regional traditions, from Texas-style chili (fiercely beanless and meaty) to the thick, tomato-forward versions loved across the Midwest and beyond.
In this recipe, we celebrate that spirit of adaptability. The inclusion of beans and corn not only enhances texture and nutrition but also pays homage to chili’s agricultural roots — corn and beans being two of the earliest cultivated foods of the Americas. The result is a dish that honors tradition while embracing balance and heartiness.
A Perfect Union of Flavors
Great chili is a symphony of contrasts: the deep savoriness of browned beef against the gentle sweetness of corn, the earthiness of beans balanced by the acidity of tomatoes, and the slow-building heat of chili powder and cumin softened by a touch of sweetness and smoke.
In this classic recipe, every element serves a purpose:
-
Ground beef forms the savory backbone, developing richness through browning.
-
Onions, garlic, and bell peppers add aromatic depth.
-
Crushed tomatoes and tomato paste create a luscious base.
-
A blend of spices — chili powder, cumin, smoked paprika, and oregano — infuses every bite with warmth and complexity.
-
Kidney beans and black beans contribute body, color, and a satisfying texture.
-
Sweet corn introduces bursts of freshness that balance the chili’s boldness.
Simmered low and slow, these ingredients meld into something magical — a stew that’s not just a meal, but an experience.
Why This Chili Stands Out
There are countless chili recipes, each claiming the title of “the best.” But what makes this Classic Chili with Beans and Corn truly special is its balance and versatility. It’s hearty without being heavy, spicy but not overwhelming, and satisfying whether served alone or with your favorite toppings.
Here’s what sets it apart:
-
Perfect texture: Thick and spoonable, not soupy or dry.
-
Layered flavor: Built through proper browning, spice blooming, and patient simmering.
-
Balanced heat: Enough spice to warm you, but not enough to overpower the other flavors.
-
One-pot simplicity: Easy to make, easy to clean up, and ideal for busy weeknights or relaxed weekends.
-
Customizable: Delicious as-is, yet adaptable for vegetarians, spice-lovers, or those who prefer leaner meats.
This is the kind of chili that brings people together — whether served at a Super Bowl party, ladled over rice, spooned onto baked potatoes, or enjoyed with a side of cornbread on a chilly evening.
A Dish for Every Table
Chili has always been a social food. It’s the star of cook-offs, a go-to for gatherings, and a staple at community events. The scent of chili simmering in a pot instantly makes a space feel welcoming — it’s comfort food that invites conversation and connection.
What’s wonderful about this version is that it’s equally suited for casual dinners or meal prepping for the week ahead. The flavors deepen as it sits, making it one of those rare dishes that tastes even better the next day. It freezes beautifully, feeds a crowd, and adapts easily to different dietary needs. In short, it’s a recipe every home cook should master — simple, dependable, and endlessly rewarding.
The Role of Time and Technique
Chili is not a dish that rewards haste. The secret lies in patience — the time it takes for the flavors to blend and the ingredients to transform. Browning the meat correctly builds a foundation of umami; blooming the spices in oil unlocks their fragrance; simmering slowly allows everything to meld into a harmonious whole.
The process isn’t complicated, but it demands respect for each step. In this recipe, we’ll walk through each phase carefully, explaining not just what to do, but why it matters. By the end, you’ll understand how a handful of simple ingredients can evolve into a dish rich enough to anchor any meal.
Comfort, Warmth, and Versatility
Few meals are as comforting as a steaming bowl of chili. It’s the kind of food that brings relief after a long day, warms you during a cold evening, and fills the kitchen with aromas that promise satisfaction. Chili transcends seasons — perfect for crisp fall nights, snowy winter dinners, or even cool summer evenings when served outdoors.
Add your favorite toppings — shredded cheese, sour cream, diced avocado, cilantro, or crushed tortilla chips — and you can personalize every bowl. Pair it with cornbread, rice, or even a simple green salad, and it becomes a complete, balanced meal that feels both homey and indulgent.
The Promise of This Recipe
What follows isn’t just a recipe — it’s a guide to creating your own signature chili. You’ll learn how to balance seasoning, build flavor from the ground up, and adjust the texture and spice level to your exact liking. Whether you’re a chili novice or a seasoned cook seeking the perfect all-around recipe, this version is designed to deliver reliable results every single time.
By the time your pot of chili finishes simmering, you’ll understand why this dish has endured for generations. It’s more than a combination of beans, meat, and spices — it’s a symbol of shared tables, full hearts, and the quiet joy of a meal made with care.
So, gather your ingredients, grab your favorite pot, and prepare to create a Classic Chili with Beans and Corn that will fill your kitchen with warmth, your bowl with flavor, and your table with smiles.
How to Make Classic Chili with Beans and Corn
Making a truly memorable chili isn’t difficult, but it’s an art of layers — each ingredient adds depth, each technique builds structure. The goal is to create harmony: a balance of spice, sweetness, acidity, and texture. Below, you’ll find the step-by-step guide that turns simple pantry staples into a bowl of hearty, complex, deeply satisfying chili.
1. Gather Your Ingredients
Before you begin, assemble everything you’ll need. Having all ingredients prepped and measured — the French call it mise en place — will keep your cooking smooth and stress-free.
Main Ingredients
-
2 tablespoons olive oil (or vegetable oil)
-
1 ½ pounds (680 g) ground beef (80/20 blend for ideal richness)
-
1 large yellow onion, diced
-
1 green bell pepper, diced
-
1 red bell pepper, diced
-
3–4 cloves garlic, minced
-
1 tablespoon tomato paste
-
1 (28-ounce / 800 g) can crushed tomatoes
-
1 (15-ounce / 425 g) can diced tomatoes, with juices
-
2 cups beef broth (or chicken/vegetable broth for a lighter flavor)
-
1 (15-ounce / 425 g) can kidney beans, drained and rinsed
-
1 (15-ounce / 425 g) can black beans, drained and rinsed
-
1 ½ cups sweet corn kernels (fresh, frozen, or canned, drained)
Spice Blend
-
3 tablespoons chili powder (mild or hot depending on taste)
-
1 tablespoon ground cumin
-
2 teaspoons smoked paprika
-
1 teaspoon dried oregano
-
½ teaspoon ground coriander (optional, for subtle citrusy notes)
-
¼ teaspoon cayenne pepper (adjust to spice preference)
-
1 ½ teaspoons salt (to start; adjust later)
-
½ teaspoon freshly ground black pepper
Optional Flavor Enhancers
-
1 tablespoon brown sugar (balances acidity and heat)
-
1 tablespoon Worcestershire sauce
-
1 teaspoon cocoa powder or a small piece of dark chocolate (for deeper color and richness)
-
½ cup beer or red wine (adds complexity; optional but recommended)
For Serving
-
Fresh cilantro or green onions, chopped
-
Shredded cheddar or Monterey Jack cheese
-
Sour cream or plain Greek yogurt
-
Crushed tortilla chips or cornbread on the side
2. Prepare the Vegetables
Dice the onion and bell peppers into small, even pieces — about ½-inch cubes. The uniform size ensures they cook evenly and blend into the chili base. Mince the garlic finely; its flavor will bloom when sautéed but can burn easily if cut too large.
If using fresh corn, cut the kernels from the cob. Frozen corn can be used directly without thawing, while canned corn should be drained thoroughly.
3. Brown the Meat: Building the Flavor Base
Heat the olive oil in a large heavy-bottomed pot or Dutch oven over medium-high heat. Once the oil shimmers, add the ground beef in an even layer.
Technique tip: Don’t stir immediately. Allow the meat to sear undisturbed for 3–4 minutes. This creates the Maillard reaction, the browning process that develops deep, meaty flavor.
After the first side has browned, break the beef into chunks with a wooden spoon. Continue cooking for another 5–7 minutes, stirring occasionally, until the meat is fully browned and no pink remains.
Optional step: If the beef releases excess fat, drain off some (but not all) of it — leaving about a tablespoon behind to carry flavor into the aromatics.
4. Add the Aromatics
Reduce the heat slightly to medium. Add the onion and bell peppers to the pot with the browned meat. Sauté for 5–6 minutes, stirring often, until the vegetables soften and begin to caramelize around the edges.
Add the garlic and cook for 30–45 seconds, just until fragrant. Garlic cooks quickly, and burning it can make the chili taste bitter, so keep it brief.
5. Bloom the Spices
Add the tomato paste directly to the pot and stir it into the meat and vegetables. Let it cook for about 2 minutes, stirring constantly. This “toasts” the paste, developing a deeper, less acidic flavor.
Then sprinkle in all of the spices — chili powder, cumin, smoked paprika, oregano, coriander, cayenne, salt, and black pepper. Stir for 30 seconds to 1 minute.
This step, called blooming, is essential: warming the spices in fat releases their oils and intensifies their aroma, giving your chili a more complex flavor profile.
6. Deglaze and Build the Sauce
Pour in the beer (or wine) if using, scraping the bottom of the pot with your spoon to loosen the brown bits (fond) stuck to the bottom. These caramelized bits are packed with flavor and form the backbone of your chili’s depth.
After 1–2 minutes, add the crushed tomatoes, diced tomatoes, and broth. Stir to combine thoroughly, making sure the mixture is uniform.
Add the brown sugar, Worcestershire sauce, and cocoa powder (if using). These small touches balance the acidity of the tomatoes and the heat of the spices, giving the chili a round, harmonious taste.
7. Simmer: The Heart of Chili Cooking
Bring the pot to a gentle boil over medium-high heat. Once bubbling, reduce the heat to low and partially cover with a lid. Allow the chili to simmer gently for 45–60 minutes, stirring occasionally.
During this time, magic happens:
-
The flavors meld and deepen.
-
The sauce thickens naturally as moisture evaporates.
-
The spices mellow and integrate.
If the chili becomes too thick during simmering, stir in a little extra broth or water, ¼ cup at a time. The goal is a thick, hearty consistency — not soupy, but not dry either.
8. Add the Beans and Corn
About 20 minutes before the end of simmering, stir in the kidney beans, black beans, and corn kernels.
Because these ingredients are already cooked (canned or pre-prepared), they only need time to heat through and absorb the chili’s flavor. Adding them too early can cause them to break down or become mushy.
Taste the chili at this point and adjust seasoning — add more salt, pepper, or chili powder if desired.
9. Adjust and Perfect the Consistency
Every pot of chili behaves differently depending on the type of tomatoes, beans, and broth used. Adjust texture and balance near the end:
-
Too thick? Add a splash of broth or water and stir.
-
Too thin? Remove the lid and simmer uncovered for 10–15 minutes to reduce.
-
Too spicy? Stir in a teaspoon of brown sugar, a dollop of sour cream, or a squeeze of lime juice to soften the heat.
-
Too mild? Sprinkle in cayenne, chipotle powder, or hot sauce for a kick.
A perfect chili should cling to your spoon — thick enough to feel hearty, but fluid enough to ladle easily.
10. Rest Before Serving
When the chili is done, remove it from the heat and let it rest for 10–15 minutes before serving. This resting period allows the starches from the beans to settle, the flavors to meld fully, and the chili to thicken slightly.
If time permits, chili tastes even better after cooling and reheating — overnight resting in the refrigerator deepens the flavor further.
11. Serve and Garnish
Ladle the chili into warm bowls and finish with your favorite toppings. The garnishes add freshness, creaminess, or crunch — transforming each serving into a personalized experience.
Topping Ideas
-
Shredded cheddar, Monterey Jack, or pepper jack cheese
-
Sour cream or Greek yogurt (adds tang and cool contrast)
-
Fresh cilantro or parsley, finely chopped
-
Diced avocado for creaminess
-
Sliced green onions or red onions for sharpness
-
Crushed tortilla chips or cornbread crumbles for texture
-
A squeeze of lime juice to brighten the flavors
Serve with warm cornbread, buttered rolls, or steamed rice for a complete meal.
12. Optional Variations
Though this is a classic version, chili is wonderfully flexible. Here are a few creative twists:
-
Turkey or Chicken Chili: Substitute ground turkey or chicken for a leaner option.
-
Vegetarian Chili: Replace meat with diced zucchini, mushrooms, or extra beans; use vegetable broth.
-
Smoky Chipotle Chili: Add a tablespoon of adobo sauce from canned chipotle peppers for rich smokiness.
-
Sweet and Spicy: Stir in diced sweet potatoes or a handful of corn chips near the end for texture contrast.
-
Fire-Roasted Flavor: Use fire-roasted tomatoes instead of regular for extra depth.
Classic Chili with Beans and Corn Recipe
Few dishes evoke the comforting warmth and soul-satisfying richness of a bowl of classic chili. Thick, spicy, and bursting with layers of flavor, chili is one of those timeless recipes that seems to have as many variations as there are cooks. Whether it’s simmering on a stovetop during a cold winter afternoon, bubbling in a slow cooker at a tailgate, or served at a casual family dinner, chili has earned its place as a cornerstone of American comfort food.
Ingredients
- 1 tablespoon olive oil
- 1 lb (450 g) ground beef (or turkey)
- 1 medium onion, diced
- 1 green bell pepper, diced
- 3 cloves garlic, minced
- 1 (14.5 oz) can diced tomatoes
- 1 (15 oz) can tomato sauce
- 2 tablespoons tomato paste
- 1 (15 oz) can kidney beans, drained and rinsed
- 1 (15 oz) can black beans, drained and rinsed
- 1 cup frozen or canned corn (drained if canned)
- 1 cup beef broth (or water)
- 2 tablespoons chili powder
- 1 teaspoon ground cumin
- 1 teaspoon smoked paprika
- ½ teaspoon dried oregano
- ½ teaspoon salt (adjust to taste)
- ¼ teaspoon black pepper
- ¼ teaspoon cayenne pepper (optional, for heat)
- For serving (optional):
- Shredded cheddar cheese
- Sour cream
- Chopped green onions or cilantro
- Crushed tortilla chips
Instructions
- Brown the meat:
In a large pot or Dutch oven, heat olive oil over medium heat. Add ground beef and cook until browned, breaking it up with a spoon (about 5–7 minutes). Drain excess fat if needed. - Sauté vegetables:
Add diced onion, bell pepper, and garlic. Cook for 3–4 minutes, until softened and fragrant. - Add seasonings:
Stir in chili powder, cumin, smoked paprika, oregano, salt, black pepper, and cayenne. Cook for 1 minute to bloom the spices. - Add liquids and beans:
Stir in diced tomatoes, tomato sauce, tomato paste, beef broth, beans, and corn. Mix well. - Simmer:
Bring to a boil, then reduce heat to low. Cover partially and simmer for 30–35 minutes, stirring occasionally, until thickened and flavors meld together. - Taste and adjust:
Add more salt, pepper, or spice to taste. If too thick, stir in a bit more broth or water. - Serve:
Ladle into bowls and top with your favorite garnishes like cheese, sour cream, or tortilla chips.
Notes
- Make ahead: Chili tastes even better the next day — refrigerate and reheat gently.
- Vegetarian option: Omit the meat and double the beans or add lentils.
- Extra veggies: Add diced zucchini, carrots, or mushrooms for more nutrition.

