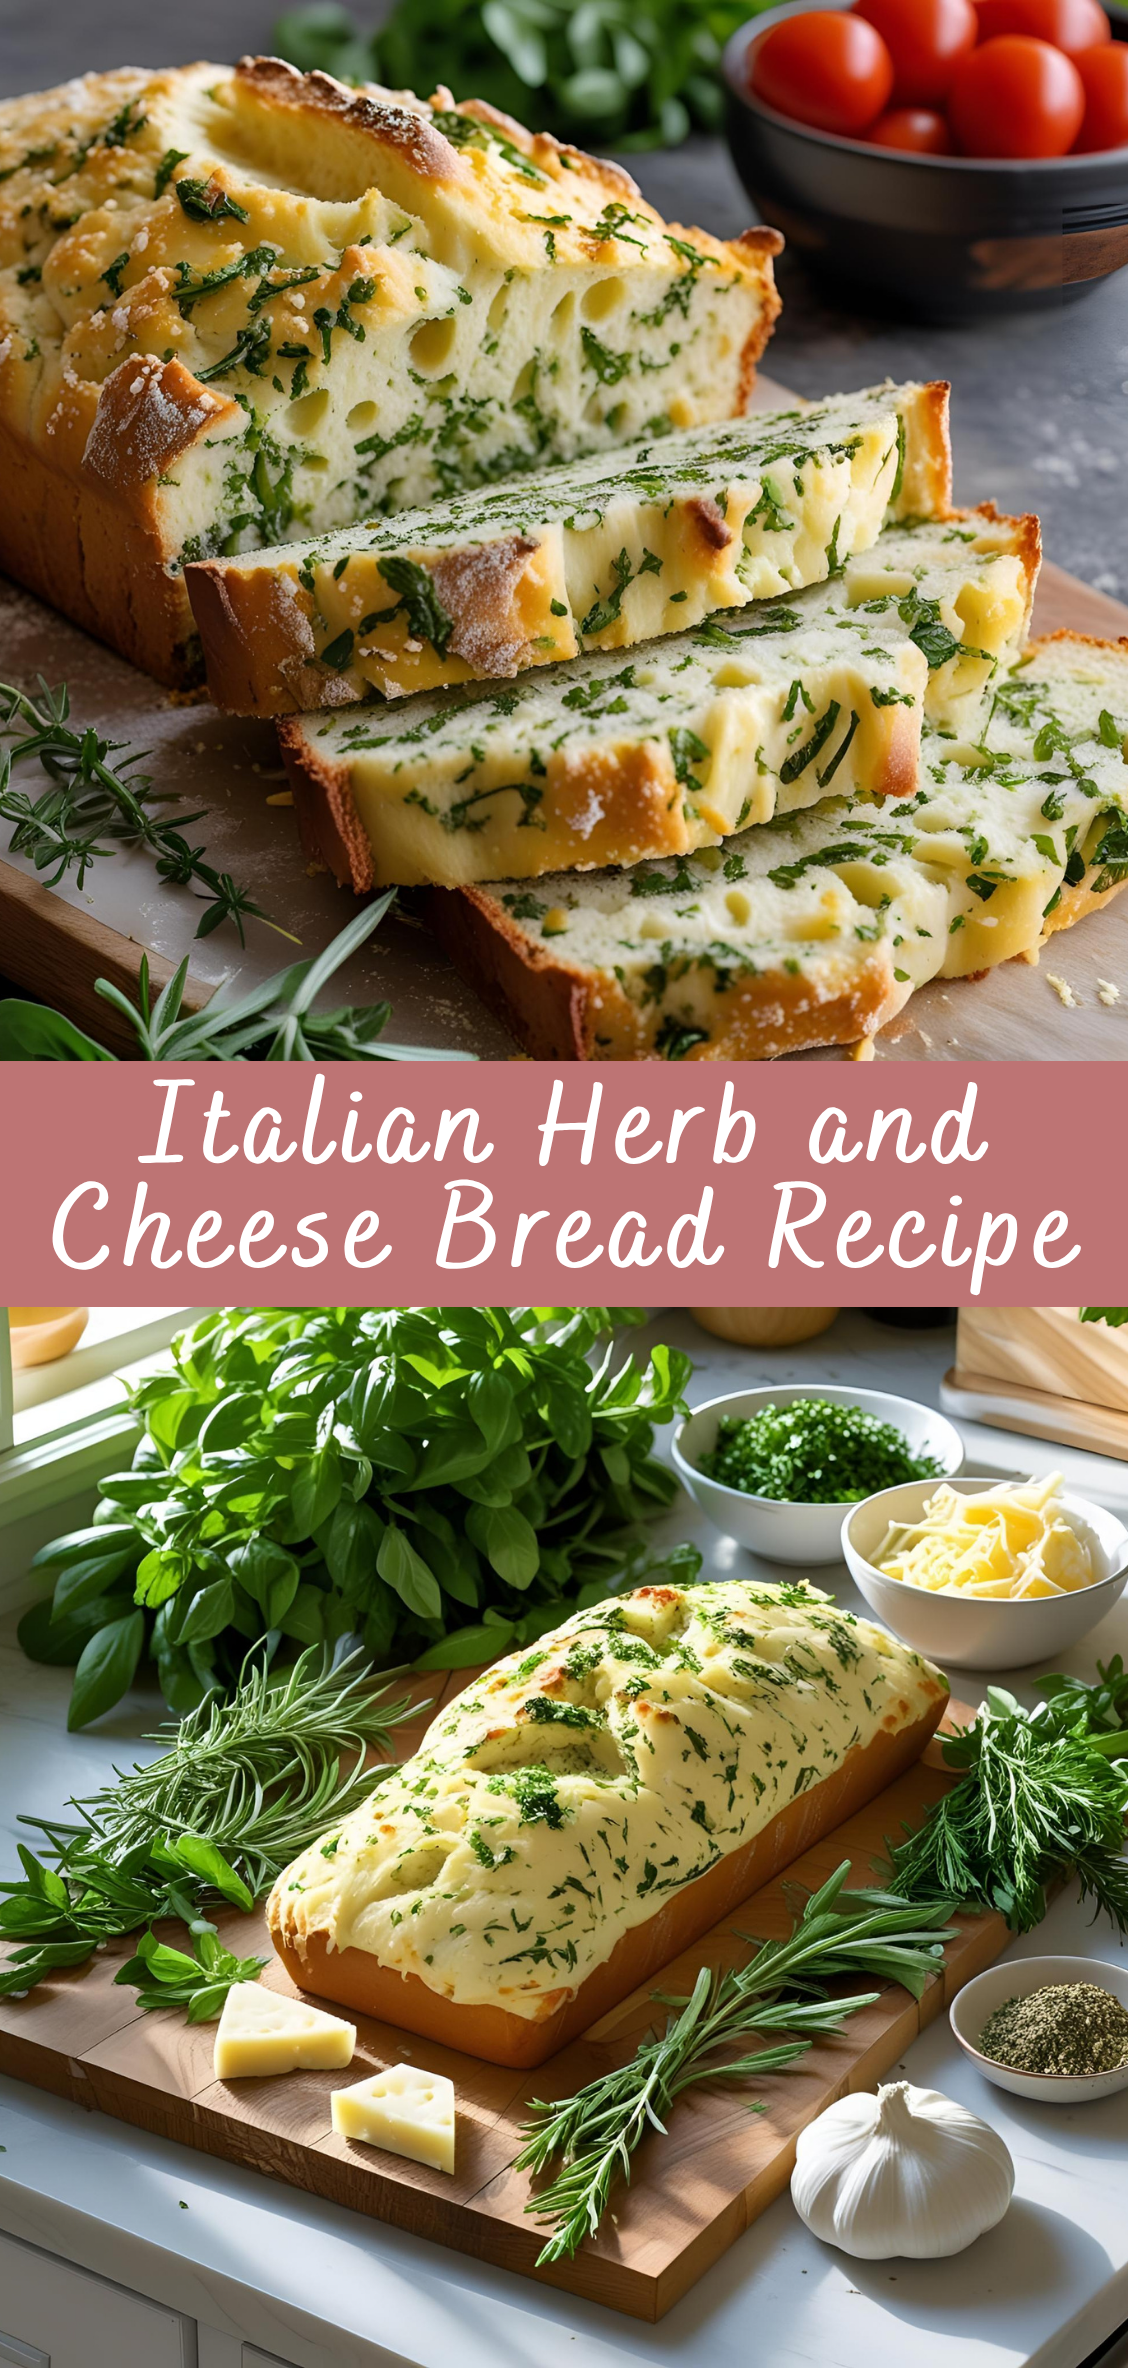
Italian Herb and Cheese Bread Recipe
Bread is a universal staple, and Italian bread is renowned for its simple yet bold flavors, rustic crusts, and tender crumb. The addition of fragrant Italian herbs and savory cheese elevates this humble food into a versatile accompaniment for meals or a satisfying snack on its own. This Italian Herb and Cheese Bread brings together aromatic rosemary, oregano, basil, and thyme with a rich blend of cheeses such as Parmesan and mozzarella, creating a loaf bursting with flavor and texture.
Baking bread at home can be a deeply rewarding experience — from mixing and kneading the dough to watching it rise and transform in the oven. Understanding the science behind yeast fermentation and gluten development not only improves your baking skills but also connects you to an age-old tradition. This recipe is designed for both novice and experienced bakers, with clear steps, ingredient options, and troubleshooting advice.
Beyond the basic loaf, this bread lends itself well to customization — adding different herbs, cheeses, or even inclusions like olives and sun-dried tomatoes. It pairs beautifully with soups, salads, and pasta dishes or simply enjoyed warm with a drizzle of olive oil or a pat of butter.
In the following sections, we will explore everything you need to know to bake Italian Herb and Cheese Bread from scratch, including ingredient selection, dough preparation, shaping, baking techniques, and serving suggestions. Along the way, I will share tips to perfect your crust and crumb, explain the role of each ingredient, and suggest variations to keep your baking exciting.
Step 1: Selecting Ingredients and Preparing Mise en Place
Flour
Choose a high-quality bread flour or all-purpose flour. Bread flour has higher protein content (about 12-14%) which helps develop gluten — the network of proteins that gives bread structure and chewiness. All-purpose flour (about 10-12% protein) can also work but might yield a slightly softer crumb.
Yeast
Use active dry yeast or instant (also called rapid-rise) yeast. Active dry yeast requires proofing in warm water before mixing, while instant yeast can be added directly to the dry ingredients.
Herbs
The classic Italian herb blend includes:
-
Rosemary (fresh or dried) — piney, aromatic.
-
Oregano — slightly bitter, warm.
-
Basil — sweet, peppery.
-
Thyme — earthy and minty.
You can adjust the ratios or use all fresh or all dried, but dried herbs are more potent and should be used sparingly (about 1 tsp total dried herbs).
Cheese
Choose flavorful cheeses that melt well and complement herbs:
-
Parmesan (grated, for sharpness and umami)
-
Mozzarella (shredded, for gooey meltiness)
-
Optional: Asiago, fontina, or provolone for variety.
Additional Ingredients
-
Salt: enhances flavor and controls yeast fermentation.
-
Olive oil: adds moisture, richness, and tenderness.
-
Warm water or milk: hydrates flour, activates yeast, and influences crumb texture.
-
Sugar or honey (optional): feeds yeast and helps crust browning.
Mise en Place
Before starting, measure all ingredients accurately. Prepare herbs and cheeses (grate/shred), and have your mixing tools ready (large bowl, wooden spoon or mixer with dough hook).
Step 2: Proofing the Yeast (if using Active Dry Yeast)
-
Warm water to about 100-110°F (38-43°C) — warm to touch but not hot.
-
Stir yeast and a pinch of sugar into the water.
-
Let sit for 5-10 minutes until foamy and bubbly. This confirms yeast is alive and active.
If yeast doesn’t foam, it may be expired or water too hot/cold — start over with fresh yeast.
Step 3: Mixing the Dough
-
In a large bowl or mixer bowl, combine flour, salt, and dried herbs (if using).
-
Make a well in the center and add the olive oil, proofed yeast mixture (or instant yeast directly), and warm water or milk.
-
Stir with a wooden spoon or dough hook until dough begins to come together.
At this stage, dough will be shaggy and sticky but cohesive.
Step 4: Kneading the Dough
Kneading develops gluten, giving bread its structure and chew.
By hand:
-
Turn dough onto a floured surface.
-
Push dough away with the heel of your hand, fold it back, turn, and repeat.
-
Continue kneading for about 8-10 minutes until dough is smooth, elastic, and slightly tacky.
Using a stand mixer:
-
Attach dough hook.
-
Knead on medium speed for about 6-8 minutes.
Tip: Dough should stretch without tearing easily (windowpane test).
Step 5: Incorporating Cheese
-
Flatten dough slightly and sprinkle shredded mozzarella and grated Parmesan evenly over the surface.
-
Fold dough over cheese and knead gently just until cheese is incorporated throughout the dough.
-
Avoid overkneading once cheese is added to prevent breaking the cheese strands too much.
Step 6: First Rise (Bulk Fermentation)
-
Lightly oil a clean bowl.
-
Place dough in bowl, turning to coat with oil.
-
Cover with a clean kitchen towel or plastic wrap.
-
Let dough rise in a warm, draft-free place until doubled in size — about 1 to 1.5 hours.
Step 7: Punching Down and Shaping
-
Gently deflate (punch down) dough to release gas.
-
Turn dough out onto floured surface.
-
Shape dough into desired form: loaf, boule, or baguette.
-
If making a loaf, place shaped dough into a greased loaf pan.
Step 8: Second Rise (Proofing)
-
Cover shaped dough again with towel or plastic wrap.
-
Let rise until nearly doubled — about 45 minutes to 1 hour.
-
Meanwhile, preheat your oven to 375°F (190°C).
Step 9: Scoring and Adding Final Touches
-
Just before baking, lightly dust the dough with flour.
-
Using a sharp knife or bread lame, make shallow cuts on top (scoring) — this controls expansion and adds decorative touch.
-
Optional: Brush surface with olive oil and sprinkle a bit more grated Parmesan and herbs.
Step 10: Baking the Bread
-
Place bread in preheated oven.
-
Bake for 25-35 minutes, depending on size and shape.
-
Bread is done when crust is golden brown and sounds hollow when tapped on the bottom.
-
Internal temperature should be about 190-200°F (88-93°C) when measured with a probe.
Step 11: Cooling and Serving
-
Remove bread from oven and transfer to a wire rack.
-
Let cool at least 30 minutes before slicing — this lets crumb set.
-
Serve warm or at room temperature with butter, olive oil, or as an accompaniment to meals.
Step 12: The Science Behind Yeast and Fermentation
Understanding how yeast works is essential to mastering bread baking.
Yeast is a living microorganism that consumes sugars in the dough, producing carbon dioxide gas and alcohol through fermentation. This gas gets trapped in the gluten network, causing the dough to rise and develop its airy structure.
-
Temperature: Yeast activity speeds up in warm temperatures (around 75-85°F or 24-29°C), but temperatures above 130°F (54°C) kill the yeast.
-
Sugar: A small amount of sugar or honey helps feed yeast, speeding fermentation.
-
Salt: Though essential for flavor, salt also slows yeast growth, balancing fermentation to avoid overproofing.
The first rise (bulk fermentation) is when most flavor develops due to yeast activity and byproducts like organic acids.
Step 13: Gluten Development and Kneading Explained
Gluten is a network of proteins (gliadin and glutenin) that form when flour is hydrated and kneaded. Kneading aligns and strengthens gluten strands, giving dough elasticity and the ability to trap fermentation gases.
-
Under-kneaded dough is sticky, tears easily, and yields dense bread.
-
Over-kneaded dough (usually by machine) becomes too tight and tough.
Testing for proper kneading can be done with the windowpane test: stretch a small piece of dough gently—if it forms a thin translucent membrane without tearing, gluten is well developed.
Step 14: Herb Selection and Preparation Tips
Fresh herbs offer vibrant flavor but contain more moisture, which can slightly affect dough hydration.
-
Dried herbs are more concentrated and convenient.
-
Fresh herbs should be finely chopped to evenly distribute flavor.
-
Toasting dried herbs briefly in a dry pan can release oils and enhance aroma.
Combining herbs (rosemary, oregano, thyme, basil) balances piney, earthy, sweet, and peppery notes, giving your bread complexity.
Step 15: Cheese in Bread — How and Why
Cheese adds richness, moisture, fat, and umami to bread.
-
Hard cheeses like Parmesan provide sharp, salty flavor but do not melt fully.
-
Mozzarella melts, creating pockets of gooey texture inside the crumb.
-
Adding cheese after initial kneading prevents it from breaking down too much and losing texture.
Cheese also affects dough hydration slightly, so if you add a large amount, you may need to adjust water content.
Step 16: Shaping Techniques for Different Loaf Types
The shape of your bread affects baking time and crust texture.
-
Round boule: Encourages a thicker crust and chewy interior.
-
Oval batard: Elongated shape that slices easily.
-
Loaf pan: Yields a uniform, sandwich-style bread with soft sides.
-
Braided or twisted shapes: Add visual appeal and slightly more crust area.
After shaping, ensure the dough surface is taut but not overly tight, allowing proper oven spring (final rise in oven).
Step 17: Scoring Bread — Purpose and Patterns
Scoring helps control expansion during baking and prevents random cracking.
-
Use a sharp blade to make shallow cuts 1/4 to 1/2 inch deep.
-
Traditional Italian breads often have simple slash patterns, but you can create artistic designs.
-
Scoring also directs steam release and creates appealing crust textures.
Step 18: Creating the Perfect Crust
The crust forms through Maillard browning and caramelization during baking.
-
Spraying or brushing the dough with water before baking encourages a crisp, shiny crust.
-
Adding steam to the oven in the first 10-15 minutes prevents crust from hardening too soon, allowing full oven spring.
-
Baking on a preheated baking stone or steel helps form a crisp bottom crust.
Step 19: Cooling Bread Properly
Allowing bread to cool on a wire rack is crucial.
-
The crumb continues to set as it cools.
-
Cutting too soon results in a gummy or doughy interior.
-
Cooling also helps moisture redistribute evenly.
Step 20: Troubleshooting Common Issues
-
Dense bread: Could be due to insufficient kneading, underproofing, or too much flour.
-
Flat loaf: Overproofing or weak gluten development.
-
Crust too hard: Oven too hot or no steam during baking.
-
Uneven holes in crumb: Uneven kneading or shaping.
Italian Herb and Cheese Bread Recipe
Bread is a universal staple, and Italian bread is renowned for its simple yet bold flavors, rustic crusts, and tender crumb. The addition of fragrant Italian herbs and savory cheese elevates this humble food into a versatile accompaniment for meals or a satisfying snack on its own. This Italian Herb and Cheese Bread brings together aromatic rosemary, oregano, basil, and thyme with a rich blend of cheeses such as Parmesan and mozzarella, creating a loaf bursting with flavor and texture.
Ingredients
- 3 1/2 cups all-purpose flour
- 1 packet (2 1/4 tsp) active dry yeast
- 1 cup warm water (about 110°F / 43°C)
- 2 tbsp olive oil
- 1 tsp sugar
- 1 1/2 tsp salt
- 1 tbsp Italian seasoning (a mix of dried basil, oregano, thyme, rosemary, and marjoram)
- 1 cup shredded mozzarella or Italian blend cheese
- 1/4 cup grated Parmesan cheese
- 2 tbsp fresh parsley, finely chopped (optional)
- 1 tsp garlic powder or 2 cloves fresh garlic minced (optional)
Instructions
- Activate yeast:
In a small bowl, combine warm water, sugar, and yeast. Let sit for 5-10 minutes until foamy. - Make dough:
In a large bowl, mix flour, salt, Italian seasoning, and garlic powder (if using). Add the yeast mixture and olive oil. Stir until a dough forms. - Knead dough:
Turn dough out onto a floured surface and knead for about 8-10 minutes until smooth and elastic. If dough is sticky, add a little more flour, 1 tablespoon at a time. - First rise:
Place dough in a lightly oiled bowl, cover with a damp towel or plastic wrap, and let rise in a warm place for 1 to 1.5 hours, until doubled in size. - Add cheese and shape:
Punch down dough and gently knead in shredded mozzarella and Parmesan cheese. Shape dough into a loaf and place on a greased or parchment-lined baking sheet or loaf pan. - Second rise:
Cover loaf and let rise for another 30 minutes. - Bake:
Preheat oven to 375°F (190°C). Bake bread for 25-30 minutes, until golden brown and sounds hollow when tapped on the bottom. - Cool and serve:
Let bread cool on a rack before slicing. Garnish with fresh parsley if desired.
Notes
- Cheese: Use your favorite Italian cheese blend or add some sharp provolone for extra flavor.
- Herbs: Fresh herbs can be swapped for dried—just use about 1 tablespoon fresh chopped.
- Garlic: Fresh minced garlic adds a stronger flavor; adjust to taste.
- Serving ideas: Perfect with soups, salads, or as a sandwich base.

