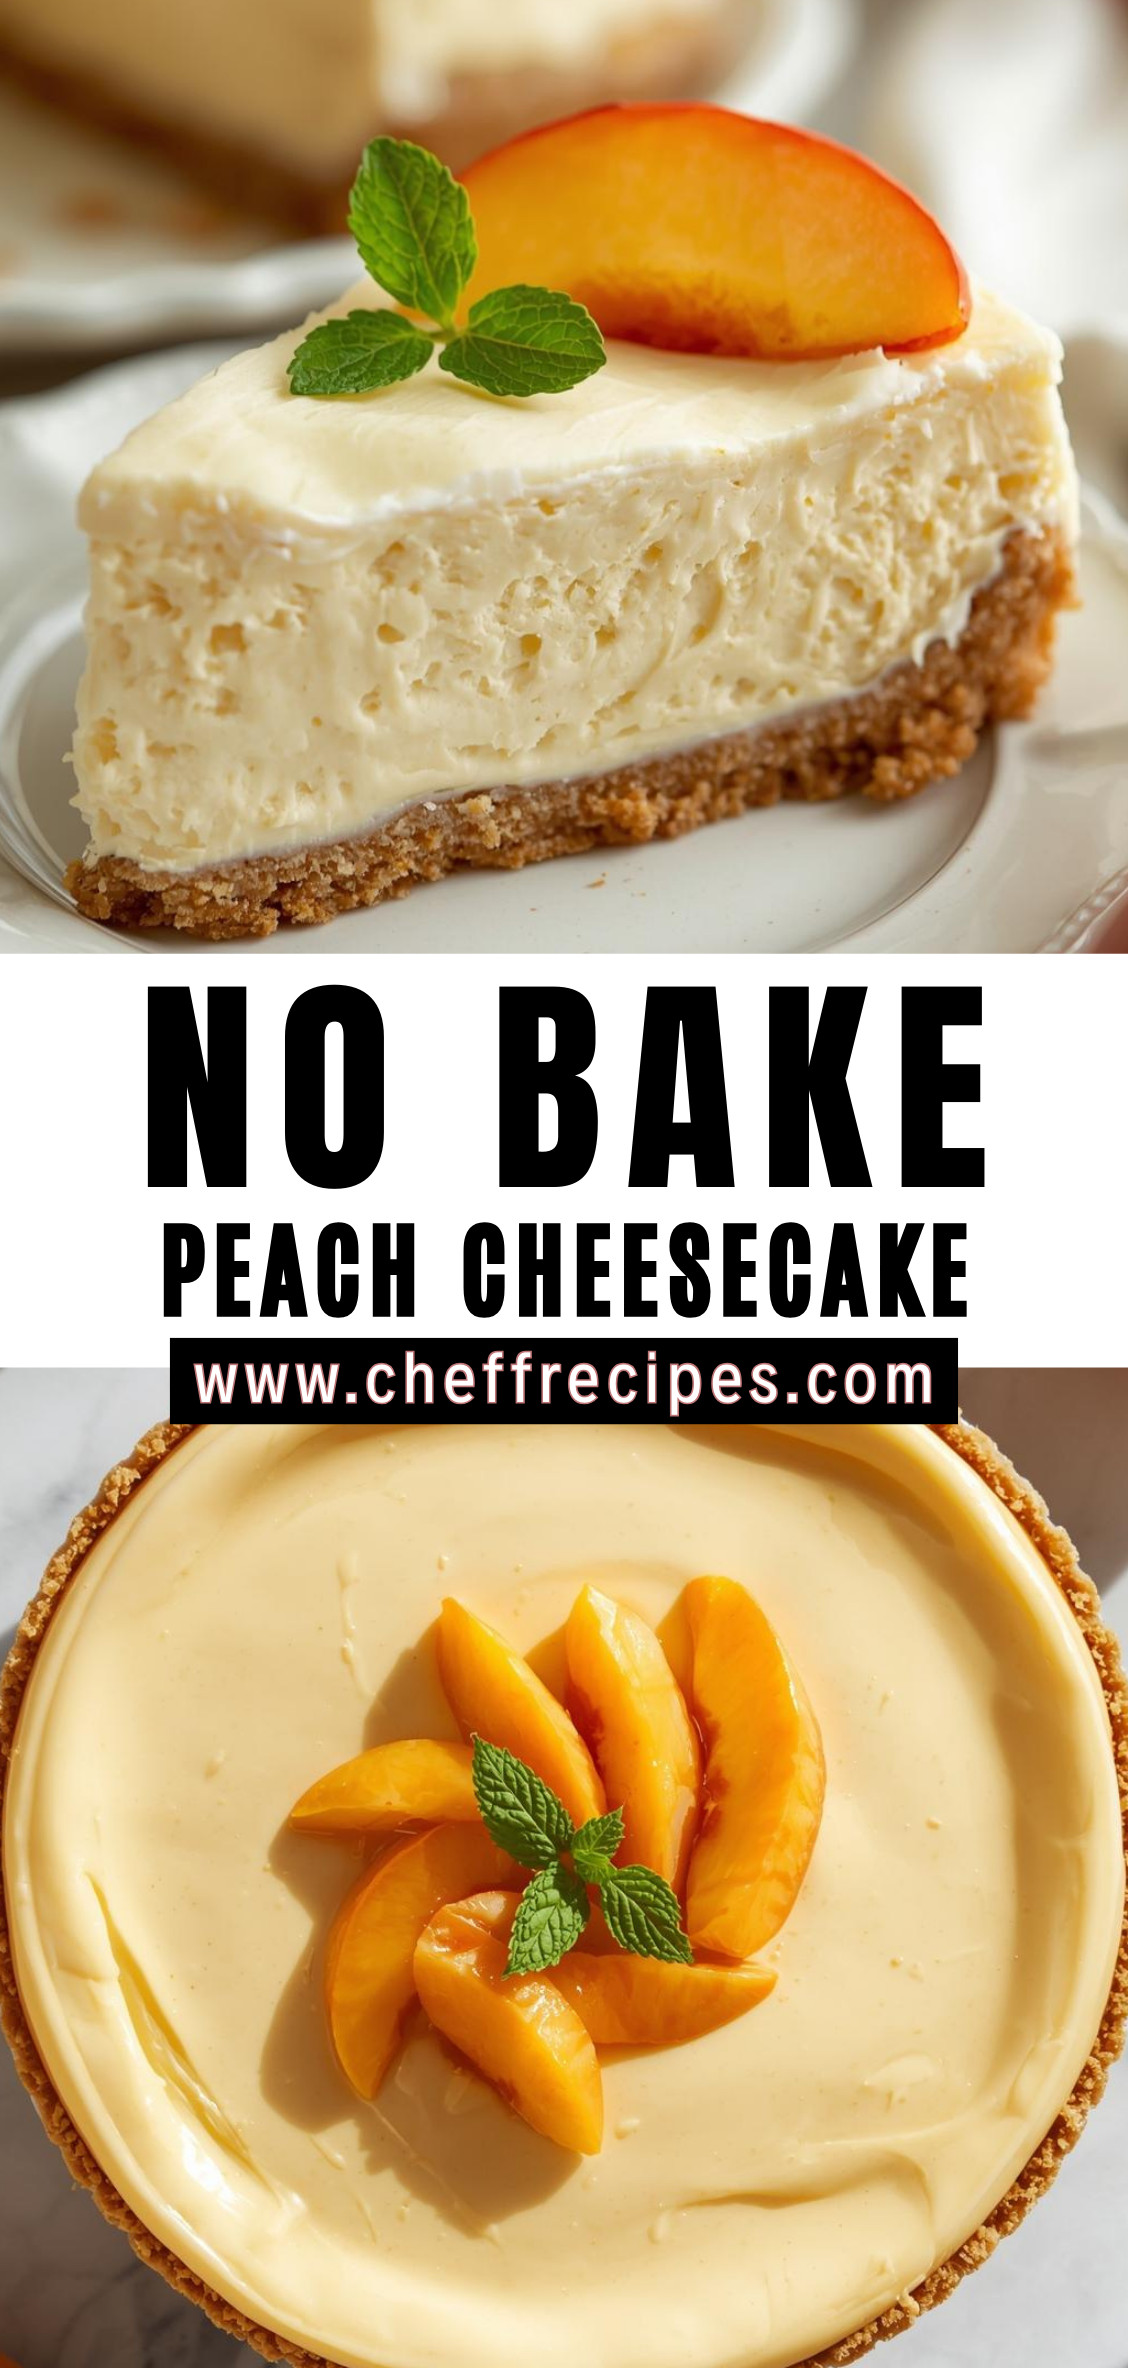
There is something timeless about a dessert that requires no oven, no elaborate techniques, and no last-minute fuss to succeed. A no bake peach cheesecake belongs to that cherished category of recipes that feel deceptively simple, yet deliver a result that tastes as if hours of careful preparation were involved. It brings together the lush sweetness of ripe peaches, the cool silkiness of cream cheese, and the buttery comfort of a crisp crumb crust. More than anything, it represents a balance between elegance and ease—an ideal combination for home cooks who want a dessert that feels special without demanding the intensity of traditional baking.
Peaches themselves hold a remarkable culinary presence. Their aroma alone signals warmth, summer, and abundance. Whether purchased at a bustling farmers market or selected carefully from a grocery display, peaches invite a sense of nostalgia. For many people, they evoke childhood memories: juices running down fingers, the snap of a ripe peach’s skin, and the flavor that seems to define warm afternoons. Working them into a no bake cheesecake both preserves and elevates these qualities. The fruit remains vibrant, fragrant, and fresh, unburdened by cooking, which can sometimes mute its natural brightness.
A no bake cheesecake also offers a unique structural charm. Unlike baked cheesecakes that rely on eggs and heat to firm their filling, the no bake style depends on a different sort of alchemy. Cream cheese, whipped cream or another stabilizing element, and time in the refrigerator create a luxurious texture that is soft yet sliceable. When infused with peaches—whether fresh slices, purée, or a layered combination—each bite carries a gentle sweetness and a whisper of summer. The absence of heat protects the delicate fruit flavor and makes this dessert ideal for warm seasons when turning on the oven feels more like a chore than a pleasure.
Beyond the sensory appeal, this dessert fits beautifully into a modern lifestyle. It can be prepared ahead, freeing the cook from last-minute obligations. It suits gatherings of all types: family dinners, weekend barbecues, celebrations, or quiet evenings when something sweet would complete the day. The ingredients are accessible, the process forgiving, and the result consistently impressive. Even cooks who consider themselves beginners can approach this recipe with confidence.
In the sections that follow, this comprehensive guide will walk you through the essential components of a no bake peach cheesecake, from selecting perfect peaches to crafting a stable filling, choosing the right crust, assembling the layers, and presenting the dessert with finesse. It will also provide variations, troubleshooting advice, serving suggestions, and options for customizing the recipe to suit different dietary needs or flavor preferences.
Detailed Step-by-Step Instructions
1. Preparing the Crust
A no bake cheesecake depends heavily on a stable, well-packed crust. Because the dessert will not be baked, the crust holds the responsibility of providing structure, texture, and contrast. The most common base is made from crushed cookies combined with melted butter, but to achieve the best texture, technique matters as much as the ingredients.
Step 1: Crush the cookies thoroughly
Begin by selecting your preferred base—graham crackers, digestive biscuits, vanilla wafers, or shortbread cookies all work well. Place them in a large resealable bag and crush them with a rolling pin until they form a fine, sandy texture. Alternatively, pulse them in a food processor using short bursts. The aim is to eliminate large chunks, as these can destabilize the crust once the cheesecake is sliced.
Step 2: Measure and refine the crumb texture
Once crushed, examine the texture. If you see visible larger crumbs, return them to the processor or break them down further. A consistent crumb ensures that the butter binds evenly throughout the mixture.
Step 3: Melt the butter and combine
Pour melted butter over the crumbs in a mixing bowl. Use a rubber spatula to fold and mix until the crumbs appear uniformly moist. The mixture should resemble damp sand: cohesive enough to hold shape when pinched, but not so wet that it feels greasy.
Step 4: Pack the crust firmly into the pan
Transfer the crumb mixture into a springform pan. Using the bottom of a flat measuring cup or a glass, press the mixture into a tight, even layer across the base. Pay attention to the edges, ensuring they are compacted as thoroughly as the center to prevent crumbling. For a sturdier crust, build the crumbs slightly up the sides of the pan, creating a shallow wall that helps the filling settle neatly.
Step 5: Chill to set
Refrigerate the crust for at least 30 minutes. This chilling period allows the butter to firm, giving the crust its structural integrity. For an even stronger base, freeze it for 10–15 minutes before adding the filling.
2. Preparing the Fresh Peach Component
Peaches elevate this cheesecake not just through flavor, but through their varied textures: some will be puréed for smoothness, others sliced for brightness. Handling them carefully results in cleaner flavors and better presentation.
Step 1: Selecting and checking ripeness
Choose peaches that are fragrant, slightly soft to the touch, and free of major bruises. Overripe peaches can introduce excess moisture, while underripe ones may lack sweetness.
Step 2: Peeling and pitting the peaches
If you prefer a smooth filling, peeling the peaches is worth the extra step. To peel easily, score a shallow X on the bottom of each peach and blanch them in boiling water for 20–30 seconds. Transfer to an ice bath. The skins should slip off easily with minimal effort. After peeling, slice around the pit and separate the halves.
Step 3: Creating the purée
Place half of the peach flesh in a blender or food processor. Add a small amount of lemon juice to preserve color and prevent the purée from turning brown. Blend until completely smooth. If the mixture is very watery, strain it through a fine-mesh sieve. The goal is a silky purée thick enough not to dilute the cheesecake filling.
Step 4: Preparing the sliced peaches
The remaining peaches should be cut into thin, even slices. These will add texture within the layers or serve as decoration on top. If using them inside the cheesecake, pat them dry with paper towels to remove excess juice.
3. Creating the Cheesecake Filling
No bake cheesecake filling should be smooth, airy, and stable. Achieving this relies on careful handling of cream cheese, sweetener, stabilizers, and the peach purée.
Step 1: Softening the cream cheese
Bring cream cheese to room temperature. Cold cream cheese can create lumps, and once lumps appear in a no bake filling, they are nearly impossible to remove. Leave the cream cheese out for at least 30–45 minutes, depending on your kitchen temperature.
Step 2: Creaming the base mixture
In a large bowl, beat the cream cheese with a handheld mixer or stand mixer until it is fluffy and smooth. Gradually add sugar, beating between additions until fully incorporated. The mixture should be creamy without visible graininess.
Step 3: Incorporating the peach purée
Slowly add the peach purée in portions, mixing on low speed. Adding it all at once can loosen the mixture too quickly and make it harder to maintain structure. Stop periodically to scrape down the sides of the bowl so the filling remains consistent throughout.
Step 4: Adding stabilizers
Depending on your preferred texture and recipe style, stabilizers may include whipped cream, gelatin, or cream cheese alone.
-
If using whipped cream: Whip until soft peaks form. Fold it into the peach-cream cheese mixture gently to avoid deflating the airiness.
-
If using gelatin: Bloom gelatin in cold water, heat gently until dissolved, then stir into the filling. Work quickly, as gelatin can set fast.
Each method creates a slightly different texture, from light and mousse-like to firm and sliceable.
Step 5: Combining fully and assessing consistency
The final mixture should be thick enough to hold soft peaks but still smooth enough to pour or spread. If the filling drips off a spatula rapidly, it may be too loose and require a longer chilling time or adjustment of stabilizer.
4. Assembling the Cheesecake
The assembly stage brings all elements together into the layered, cohesive dessert that will later slice beautifully.
Step 1: Pouring the main filling
Retrieve the chilled crust. Pour the cheesecake filling over the base in slow, controlled movements. Using a spatula, smooth the surface gently to remove air pockets. Tap the pan lightly on the counter to help the filling settle.
Step 2: Adding sliced peaches (optional)
For a layered effect, place thin slices of peach across the surface of the filling. Press them lightly to ensure they make contact with the filling. Avoid stacking slices too densely, as this may cause uneven setting.
Step 3: Final smoothing
Once all peaches are in place, add a small layer of remaining filling on top to conceal fruit pieces and create a uniform surface. Smooth with an offset spatula for a clean finish.
5. Chilling and Setting
A proper set is crucial to the success of a no bake cheesecake.
Step 1: Initial refrigeration
Cover the pan with plastic wrap or foil to protect the cheesecake from picking up refrigerator odors. Chill for a minimum of 5–6 hours, but 8 hours or overnight yields the best firmness and cleanest slices.
Step 2: Testing for firmness
Before unmolding, gently press the center of the cheesecake with the back of a spoon. It should feel firm, not jiggly. If it still yields significantly, chill for another 1–2 hours.
Step 3: Releasing from the pan
Run a thin knife along the inner edge of the springform pan. Release the latch slowly, allowing the sides to separate without pulling the cheesecake.
6. Adding Peach Topping (Optional but Highly Recommended)
A glossy peach topping intensifies flavor and provides a visually striking finish.
Step 1: Prepare the topping mixture
Simmer sliced peaches with a small amount of sugar and lemon juice until the fruit softens slightly and releases juices. For a thicker topping, mix a small amount of cornstarch with water and stir into the warm mixture until it thickens.
Step 2: Cool completely
Never add warm topping to a chilled cheesecake. Allow the topping to cool to room temperature before spooning it over the cheesecake.
Step 3: Spread evenly
Pour the topping over the surface and spread gently. The topping should form a thin, even layer, adding color, shine, and flavor.
7. Final Presentation
Once fully assembled, the cheesecake should rest in the refrigerator for an additional 30 minutes to help the topping adhere and settle.
When ready to serve, slice using a sharp knife dipped in hot water and wiped dry between cuts. This technique ensures clean, neat slices that showcase the layers beautifully.
No Bake Peach Cheesecake
There is something timeless about a dessert that requires no oven, no elaborate techniques, and no last-minute fuss to succeed. A no bake peach cheesecake belongs to that cherished category of recipes that feel deceptively simple, yet deliver a result that tastes as if hours of careful preparation were involved. It brings together the lush sweetness of ripe peaches, the cool silkiness of cream cheese, and the buttery comfort of a crisp crumb crust. More than anything, it represents a balance between elegance and ease—an ideal combination for home cooks who want a dessert that feels special without demanding the intensity of traditional baking.
Ingredients
- For the Crust:
- 1 ½ cups graham cracker crumbs
- 6 tablespoons unsalted butter, melted
- 2 tablespoons sugar (optional)
- For the Filling:
- 16 oz (450 g) cream cheese, softened
- 1 cup powdered sugar
- 1 teaspoon vanilla extract
- 1 ¼ cups heavy cream, cold
- 1 cup diced peaches (fresh or canned, drained)
- For the Peach Topping:
- 2 cups sliced peaches
- 2 tablespoons sugar or honey (optional)
- 1 teaspoon lemon juice
- 1 tablespoon cornstarch (optional, for thicker topping)
Instructions
1. Prepare the Crust
- Crush graham crackers into fine crumbs (or use a food processor).
- Mix crumbs, melted butter, and sugar in a bowl until fully combined.
- Press the mixture firmly into the bottom of a 9-inch springform pan.
- Place the crust in the refrigerator to firm up while making the filling.
2. Make the Cheesecake Filling
- In a mixing bowl, beat the softened cream cheese until smooth.
- Add powdered sugar and vanilla extract, and continue beating until creamy.
- In a separate bowl, whip the heavy cream until stiff peaks form.
- Gently fold the whipped cream into the cream cheese mixture.
- Stir in the diced peaches until evenly distributed.
- Pour the filling over the chilled crust and smooth the top.
3. Prepare the Peach Topping
- In a small saucepan, combine sliced peaches, sugar or honey, and lemon juice.
- Heat on low for 3–5 minutes until peaches soften.
- (Optional) Stir in cornstarch mixed with 1 tablespoon water to thicken the mixture.
- Let the topping cool completely before adding it to the cheesecake.
- Spoon the peach topping evenly over the cheesecake.
4. Chill and Serve
- Cover the cheesecake and refrigerate for at least 4–6 hours or overnight.
- Slice, serve, and enjoy!
Notes
- For a firmer cheesecake, chill overnight.
- Fresh peaches give the best flavor, but canned or frozen work too.
- Make sure all ingredients for the filling are room temperature—except the heavy cream, which must be cold.
- You can substitute the graham crust with vanilla wafers or digestive biscuits.
- Add a pinch of cinnamon to the crust for extra flavor.

