Peanut Butter and Jelly Cookies Recipe
Peanut butter and jelly (PB&J) sandwiches are a classic comfort food, beloved across generations and cultures. The combination of creamy or chunky peanut butter with sweet, tangy jelly or jam creates a perfect balance of salty and sweet flavors. It’s no wonder that this duo has inspired a wide variety of recipes, including Peanut Butter and Jelly Cookies, a delightful twist on the traditional sandwich.

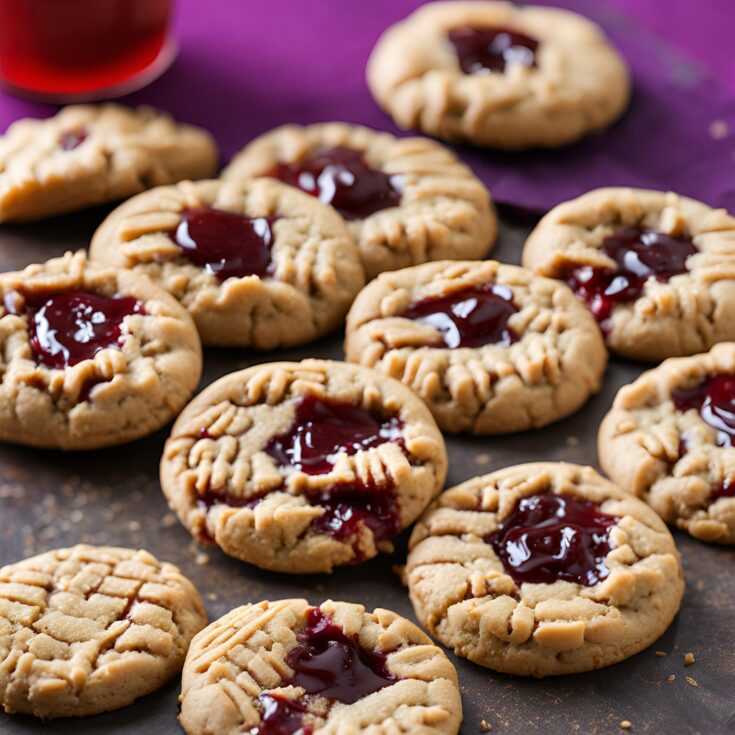
These cookies embody everything we love about the sandwich but in cookie form. Imagine a soft, chewy peanut butter cookie with a dollop of your favorite jam or jelly nestled right in the center. The beauty of these cookies lies in their simplicity, but also in their versatility. You can use any type of peanut butter (smooth, chunky, or even flavored) and a variety of jams or jellies (strawberry, grape, raspberry, or even a more exotic flavor like peach or apricot).
Whether you’re looking for a nostalgic treat or a creative spin on classic ingredients, Peanut Butter and Jelly Cookies are sure to satisfy any sweet tooth.
Expert Tips & Variations
1. Peanut Butter Choices:
- Creamy vs. Chunky: Both creamy and chunky peanut butter work well in this recipe. The creamy version results in a smoother cookie dough, while the chunky version provides a bit more texture and crunch. Feel free to experiment with your preference.
- Natural Peanut Butter: If you’re using natural peanut butter (which can separate), be sure to stir it well before measuring, and note that the dough may be a little softer. You might need to add a tablespoon of flour to compensate for the oil content.
2. Jelly & Jam Variations:
- Fruit Options: The beauty of this cookie is that you can experiment with different fruit jams or jellies. Traditional choices include strawberry, grape, and raspberry, but you could also use more exotic flavors like peach, apricot, or even blackberry. The sky’s the limit!
- Thickening the Jam: If your jam or jelly is too runny, consider adding a little cornstarch to thicken it before using it as the filling. Heat the jelly with cornstarch over low heat, stirring constantly, until it thickens to the desired consistency. Let it cool before adding it to the cookies.
3. Baking Time Adjustments:
- Oven Variations: Oven temperatures can vary, so start checking your cookies around the 10-minute mark. If your oven runs hot, you may need to reduce the temperature by 10-15°F to prevent over-baking.
- For Softer Cookies: If you prefer a chewier cookie, remove the cookies from the oven as soon as they’re golden brown around the edges but still soft in the center. Let them cool on the sheet for a few minutes to firm up.
4. No Fork Marks?
- If you’re not fond of the traditional fork pattern on your cookies, you can skip that step. Instead, gently flatten the dough balls with the palm of your hand or the back of a spoon.
5. Freezing the Dough:
- Freezing Cookie Dough: If you want to make the dough ahead of time or prepare cookies in bulk, you can freeze the dough. Roll the dough into balls, then freeze them on a baking sheet for about 1 hour before transferring them to a freezer bag. When you’re ready to bake, place them on a baking sheet and bake as usual, adding a minute or two to the baking time.
Frequently Asked Questions
1. Can I use a different type of nut butter?
Yes! If you’re allergic to peanuts or prefer a different flavor, you can use other nut butters such as almond butter, cashew butter, or even sunflower seed butter. Just be sure to choose a nut butter that is smooth and creamy for the best texture.
2. Can I make these cookies without sugar?
Yes! You can substitute the granulated sugar with a sugar alternative like stevia, monk fruit sweetener, or a sugar substitute of your choice. Keep in mind that this may alter the texture and flavor slightly.
3. Can I use homemade jam or jelly?
Definitely! Homemade jams or jellies will work just as well as store-bought varieties. In fact, they might add a more personal touch and unique flavor to your cookies.
Serving Suggestions
- Serve with Milk: These cookies pair wonderfully with a cold glass of milk, much like the classic PB&J sandwich.
- Ice Cream Sandwiches: Turn these cookies into an ice cream sandwich by adding a scoop of vanilla or chocolate ice cream in between two cookies. Perfect for a warm day or a fun dessert.
- As a Snack or Gift: These cookies are perfect for lunchboxes, afternoon snacks, or as a homemade gift. Pack them in a jar or box with a ribbon for a thoughtful, personalized treat.
Peanut Butter and Jelly Cookies are a delightful fusion of two beloved childhood staples. With their soft, chewy texture and sweet fruit filling, these cookies are perfect for satisfying a craving for both peanut butter and jam at once. Whether you stick to the classic flavors or experiment with new variations, these cookies are sure to bring smiles to faces young and old alike.
Additional Variations and Customizations
- Flavor Combinations:
- Chocolate Peanut Butter and Jelly Cookies: Add ¼ cup of cocoa powder to the cookie dough for a chocolatey twist that pairs perfectly with peanut butter and jelly. You can also drizzle melted chocolate over the cooled cookies for extra decadence.
- Nutella PB&J Cookies: Instead of regular peanut butter, try using Nutella (hazelnut spread) for a rich and creamy alternative. Nutella pairs wonderfully with fruit jams like raspberry or strawberry for a unique and indulgent treat.
- Coconut Peanut Butter and Jelly Cookies: Incorporate shredded unsweetened coconut into the dough for a tropical flavor. Coconut and peanut butter make a great pairing, especially with mango or pineapple jam in the center.
- Peanut Butter and Jelly Thumbprint Cookies: Instead of creating the indentations with a fork, use your thumb to press into each cookie. This creates a deeper well for the jam, which results in more of that delicious fruit filling in each bite.
- Spiced Peanut Butter Cookies: Add a pinch of cinnamon or nutmeg to the cookie dough for a subtle warmth that enhances the peanut butter flavor. This works especially well with strawberry or apple jelly.
- Dietary Adaptations:
- Vegan PB&J Cookies: To make these cookies vegan, simply substitute the egg with a flax egg (1 tablespoon ground flaxseed mixed with 3 tablespoons water, left to sit for 5 minutes). Use dairy-free butter and ensure the jelly or jam is free of gelatin.
- Gluten-Free PB&J Cookies: Use a gluten-free flour blend to replace the all-purpose flour. Make sure the peanut butter and jam you use are also gluten-free.
- Low-Carb Version: For a low-carb alternative, you can use almond flour instead of regular flour and a sugar substitute like erythritol or stevia for the sweetener. Opt for a sugar-free fruit jam.
- Different Nut Butters:
- Almond Butter: If you’re a fan of almonds, almond butter can be used instead of peanut butter. Almond butter offers a milder taste and pairs well with jams like apricot or orange marmalade.
- Cashew Butter: Cashew butter creates a smooth, creamy dough that works well with sweeter jams like strawberry or cherry. Cashews have a mild flavor that won’t overpower the jam.
- Sunflower Seed Butter: This is a great nut-free alternative for those with peanut or nut allergies. The flavor is mild and pairs well with most fruit jams or jellies.
- Jam and Jelly Options:
- Berry Varieties: Use any berry jam or jelly such as blueberry, blackberry, or mixed berry. The natural sweetness of these jams complements the salty richness of peanut butter.
- Citrus and Tropical Flavors: Try using marmalade (with its slightly bitter orange peel) or tropical jams like mango, pineapple, or passion fruit for a unique flavor profile. These jams will create a delightful contrast with the peanut butter.
- Homemade Jam: If you prefer homemade, you can use your own fruit preserves. Whether it’s a fresh strawberry jam, homemade raspberry preserves, or even a spicy jalapeño jam, the possibilities are endless.
Baking and Storing Peanut Butter and Jelly Cookies
Baking Tips for Perfect Cookies:
- Proper Oven Temperature:
- Make sure your oven is preheated to the correct temperature, and if necessary, invest in an oven thermometer. Some ovens run hot or cool, and this can affect the texture of your cookies. If the oven is too hot, the cookies may burn before they set properly. On the other hand, a too-cool oven might cause them to spread too much or bake unevenly.
- Evenly Sized Cookies:
- Ensure that your cookie dough balls are all the same size to guarantee even baking. You can use a cookie scoop or measure each portion with a tablespoon. Consistency in size helps the cookies bake at the same rate.
- Check for Doneness:
- Keep an eye on the cookies as they bake. The edges should be lightly golden, but the centers will still appear soft. Allow them to cool on the baking sheet for a few minutes before transferring to a wire rack. This cooling time ensures they hold their shape while they firm up.
- Overfilling the Jam:
- Be careful not to overfill the center with jam. While it may be tempting to add more, too much jam can overflow and burn onto the baking sheet, making the cookies harder to remove and affecting their texture.
Storage and Freezing:
- Room Temperature Storage:
- Peanut Butter and Jelly Cookies can be stored in an airtight container at room temperature for up to 4-5 days. Make sure the cookies are fully cooled before storing them, as residual heat could make the cookies soggy.
- Freezing Baked Cookies:
- These cookies freeze well, making them a perfect make-ahead treat. After the cookies have cooled completely, place them in a single layer on a baking sheet and freeze for 1-2 hours. Then, transfer them to an airtight freezer-safe bag or container. They can be frozen for up to 2-3 months.
- To thaw, simply place the frozen cookies on the counter for 30 minutes to 1 hour, or microwave them for a few seconds to warm them up.
- Freezing Cookie Dough:
- If you want to prepare ahead, freeze the cookie dough balls before baking. Arrange the dough balls on a baking sheet and freeze until solid. Then, transfer them to a zip-top bag or airtight container. When ready to bake, place the frozen dough balls directly on a baking sheet and add 1-2 extra minutes to the baking time.
Serving Suggestions
- For a Sweet Breakfast or Snack:
- These Peanut Butter and Jelly Cookies make a perfect morning snack when paired with a cup of coffee or milk. They’re a great way to satisfy your sweet tooth while still enjoying the nostalgia of a PB&J sandwich.
- Cookie Platter:
- Serve these cookies on a platter alongside other cookie favorites like chocolate chip cookies, oatmeal cookies, or sugar cookies for a fun dessert table at parties or gatherings.
- With Ice Cream:
- Create a fun twist on the classic ice cream sandwich by using two Peanut Butter and Jelly Cookies and filling them with a scoop of your favorite ice cream. Vanilla, chocolate, or even fruity flavors work beautifully with the peanut butter and jelly combo.
- Gift Idea:
- These cookies make an excellent homemade gift, especially during the holidays or for birthdays. Pack them in a decorative jar or tin with a ribbon and a note for a thoughtful and delicious present.
Historical Context of Peanut Butter and Jelly
The iconic combination of peanut butter and jelly has a long-standing history in the culinary world. Peanut butter was first introduced to the public in the early 1900s. Dr. John Harvey Kellogg, who is also known for inventing cornflakes, is often credited with developing the first commercial peanut butter, which was intended as a nutritious food for patients at his sanitarium.
Jelly or jam, on the other hand, has been around for centuries, with early recipes dating back to the 16th century. However, it was in the early 20th century when the two ingredients were paired together in a sandwich. Peanut butter and jelly sandwiches gained popularity during the Great Depression due to their affordability and ease of preparation. The combination was embraced by families across America and became a staple in lunchboxes, especially during the post-World War II era.
In the 1960s, companies like Smucker’s and Jif began producing peanut butter and jelly together in one jar, making the pairing even more accessible and convenient.
Conclusion
Peanut Butter and Jelly Cookies are a modern take on a timeless classic. These cookies offer a delightful blend of textures and flavors, combining the rich, nutty taste of peanut butter with the sweet, tangy fruitiness of jelly. Whether you’re enjoying them as an after-school snack, packing them into lunchboxes, or serving them at a party, they’re sure to be a crowd-pleaser.
Experiment with different nut butters, fruit jams, and even creative twists like chocolate or coconut to make these cookies your own. With the option to freeze the dough or baked cookies, these treats are convenient and versatile. So, roll up your sleeves, preheat the oven, and get ready to bake a batch of delicious Peanut Butter and Jelly Cookies that will make everyone smile!
Peanut Butter and Jelly Cookies Recipe
Peanut butter and jelly (PB&J) sandwiches are a classic comfort food, beloved across generations and cultures. The combination of creamy or chunky peanut butter with sweet, tangy jelly or jam creates a perfect balance of salty and sweet flavors. It’s no wonder that this duo has inspired a wide variety of recipes, including Peanut Butter and Jelly Cookies, a delightful twist on the traditional sandwich.
Ingredients
- For the Peanut Butter Cookies:
- 1 cup creamy or chunky peanut butter (choose your preference)
- ½ cup unsalted butter, softened
- 1 cup granulated sugar
- 1 large egg
- 1 tsp vanilla extract
- 1 ½ cups all-purpose flour
- 1 tsp baking soda
- ¼ tsp salt
- 1 tablespoon milk (if needed for consistency)
- For the Jelly or Jam Filling:
- ½ cup fruit jam or jelly (choose your favorite: strawberry, grape, raspberry, apricot, etc.)
- Optional: 1 tablespoon cornstarch (if you prefer a thicker consistency)
Instructions
Step 1: Prepare the Dough
- Cream the Peanut Butter and Butter:
- In a large mixing bowl, use an electric mixer to beat together the peanut butter and softened unsalted butter until light and creamy. This should take about 2-3 minutes. The key to soft and chewy cookies is incorporating enough air into the dough during this step.
- Add the Sugar and Egg:
- Add the granulated sugar to the peanut butter mixture, and continue beating until smooth. Then, crack the egg into the bowl, add the vanilla extract, and mix well until the batter is fully combined.
- Add Dry Ingredients:
- In a separate bowl, whisk together the all-purpose flour, baking soda, and salt. Slowly add the dry ingredients into the wet ingredients, mixing at a low speed or by hand until the dough comes together. You may need to scrape down the sides of the bowl to ensure everything is evenly combined. If the dough feels too dry or crumbly, add 1 tablespoon of milk to help bring it together.
- Chill the Dough (Optional):
- For best results, refrigerate the dough for at least 30 minutes to help it firm up. This will make it easier to roll the dough into balls and will also help the cookies maintain their shape during baking.
Step 2: Shape the Cookies
- Preheat the Oven:
- Preheat your oven to 350°F (175°C). Line a baking sheet with parchment paper or silicone baking mats to prevent the cookies from sticking.
- Roll the Dough into Balls:
- Take tablespoon-sized portions of the chilled dough and roll them into smooth balls using your hands. Place the dough balls about 2 inches apart on the prepared baking sheet. You can use a small cookie scoop to make this process faster and more uniform.
- Flatten the Dough Balls:
- Use a fork to press down gently on each dough ball, creating a crisscross pattern on top of the cookies. This step not only flattens the dough but also helps create that signature peanut butter cookie texture.
Step 3: Add the Jelly or Jam Filling
- Create a Well for the Jelly:
- Using your thumb or the back of a spoon, gently press down into the center of each flattened cookie to create a small indentation. Be careful not to press all the way through the cookie. The indentation should be just deep enough to hold a small spoonful of jam or jelly.
- Fill the Center with Jelly or Jam:
- Spoon about 1 teaspoon of your chosen fruit jelly or jam into each indentation. Be sure not to overfill, as the jelly may spill over the edges during baking.
Step 4: Bake the Cookies
- Bake the Cookies:
- Bake the cookies in the preheated oven for 10-12 minutes or until the edges are golden brown and the cookies are set. The center of the cookies may still appear a little soft, but they will firm up as they cool. Keep an eye on the cookies toward the end of the baking time to prevent the jelly from bubbling over too much.
- Cool the Cookies:
- Once baked, remove the cookies from the oven and allow them to cool on the baking sheet for about 5 minutes. Then, transfer them to a wire rack to cool completely.

