Pull-Apart Charcuterie Bread Recipe
Introduction
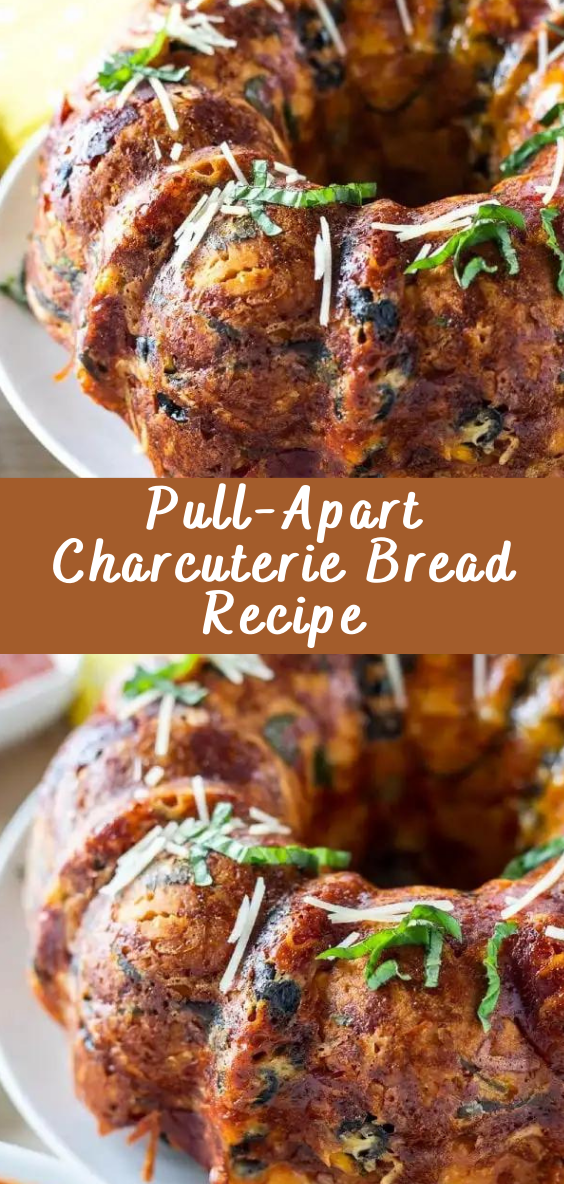
Pull-Apart Charcuterie Bread is a crowd-pleasing appetizer that combines the delightful flavors of a charcuterie board with the convenience of a pull-apart bread. This dish is perfect for gatherings, parties, or simply indulging in a savory treat. You’ll find a delightful mix of cured meats, cheeses, and other savory ingredients tucked between layers of soft bread. Let’s dive into creating this mouthwatering appetizer.
Ingredients You’ll Need
- 1 round bread loaf (such as a sourdough or Italian loaf)
- 4-6 ounces of assorted cured meats (e.g., salami, prosciutto, and pepperoni), thinly sliced
- 4-6 ounces of assorted cheeses (e.g., cheddar, mozzarella, and brie), thinly sliced or grated
- 1/4 cup of butter, melted
- 2 cloves of garlic, minced
- 2 tablespoons of fresh parsley, chopped
- 1 tablespoon of fresh rosemary, chopped
- 1 tablespoon of fresh thyme leaves
- Salt and black pepper to taste
Instructions
Preparing the Bread:
- Preheat your oven to 350°F (175°C).
- Place the round bread loaf on a cutting board and use a sharp serrated knife to make diagonal cuts about 1 inch apart across the entire loaf, being careful not to cut all the way through. These cuts will create a checkerboard pattern on the bread.
Adding the Fillings:
- Carefully tuck slices of cured meats and cheese into the cuts you made in the bread, alternating between them to ensure even distribution.
- As you fill the bread, some of the meat and cheese may stick out, and that’s perfectly fine; it will become beautifully crispy during baking.
Preparing the Garlic Herb Butter:
- In a small saucepan or microwave, melt the butter.
- Add minced garlic, chopped parsley, rosemary, thyme, salt, and black pepper to the melted butter. Mix well.
Drizzling and Wrapping:
- Place the stuffed bread loaf on a large piece of aluminum foil.
- Drizzle the prepared garlic herb butter evenly over the top of the bread, ensuring it seeps into the cuts and covers the entire surface.
- Wrap the bread securely in the aluminum foil.
Baking:
- Place the wrapped bread loaf on a baking sheet and bake in the preheated oven for about 15-20 minutes, or until the cheese is melted, and the bread is crispy on the outside.
- Optionally, you can unwrap the top of the bread for the last 5 minutes of baking to allow it to get golden and slightly crispy.
Serving:
- Carefully transfer the Pull-Apart Charcuterie Bread to a serving platter or board.
- Serve it warm, allowing your guests to pull apart the pieces filled with delicious cured meats and cheeses.
Conclusion
Pull-Apart Charcuterie Bread is the ultimate combination of bread, cured meats, cheeses, and herbs, making it an irresistible appetizer or snack. Whether you’re hosting a party or enjoying a cozy evening in, this dish is sure to please your taste buds and impress your guests.
So, follow this recipe to create a delightful Pull-Apart Charcuterie Bread and savor the flavors of a classic charcuterie board in every bite. Enjoy!
Source: reluctantentertainer.com
Tomato Basil Baked Chicken and Rice
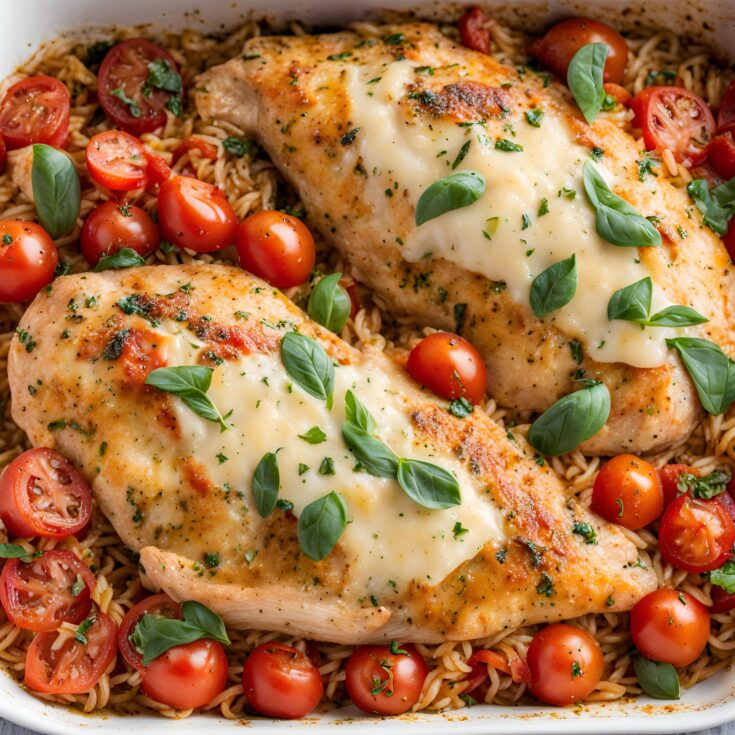
Tomato Basil Baked Chicken and Rice is a comforting, hearty dish that's perfect for any night of the week. The combination of juicy chicken, fragrant basil, and rich tomato sauce all baked together with fluffy rice makes for a meal that's as delicious as it is satisfying. This dish is a family favorite because it's easy to prepare, packed with flavor, and versatile enough to please even the pickiest eaters.
Ingredients
- Chicken:
- 6 bone in skin on Chicken Thighs (see notes)
- 2 tsp Paprika
- 1 tsp EACH: Dried Parsley, Garlic Powder
- 3/4 tsp Salt
- 1/2 tsp EACH: Onion Powder, Dried Basil
- 1/4 tsp Black Pepper
- Tomato Basil Rice:
- 1 1/2 cups (~300g) Uncooked Long Grain Rice
- 1 1/2 cups / 375ml Hot Chicken Stock
- 1 1/2 cups / 375ml Hot Water
- 1 cup / 125g Sun Dried Tomatoes, finely diced (patted dry to remove oil)
- 1/4 cup / 65g Tomato Puree (Tomato Paste in US)
- 1 small bunch of Fresh Basil, finely diced
- 1 medium White Onion, finely diced
- 1 1/2 tsp Dried Basil
- 1/2 tsp Salt (can adjust to preference)
- Oil Spray, as needed
- To Serve:
- Rocket/Arugula or Watercress
- Shaved Parmesan
- Balsamic Glaze
Instructions
In a small pot combine 2 tsp paprika, 1 tsp garlic powder & dried parsley, 3/4 tsp salt, 1/2 tsp onion powder & dried basil and 1/4 tsp black pepper. Coat the chicken skin-side-up with around 2/3 of the spice mix, lightly rub, then flip over the chicken and rub in the rest of the seasoning. Place to one side.
Add the diced onion to a baking dish and spray with oil. Pop in the oven at 180C/350F for 10mins, or until it just begins to soften/pick up colour.
When the onion is cooked, pour chicken stock & water into the baking dish. Add tomato puree, sun dried tomatoes, dried basil and salt. Use a whisk to blend the tomato puree, then add rice and give it all a final stir.
Place chicken in the dish skin-side-up and coat in a little oil spray. Don't worry if the liquid covers some of the skin, it'll soon reduce in the oven. Pop the whole thing in the oven at 180C/350F for 50mins, or until the chicken skin is crispy and beginning to char, with the liquid reduced right down and the rice around the edges cooked. Let it rest for 5mins.
Remove the chicken then sprinkle fresh basil over the rice. Use a fork to combine the basil and fluff up the rice. Serve chicken thighs with rice and a side salad of leafy green, shaved parmesan and balsamic glaze!
Notes
a) Rice - I find long grain rice comes out the fluffiest, but most white kinds of rice work well. I've tested with Basmati which works really well, but I imagine Jasmine would work well too.
b) Dish Size - I find 8x12" (20x30cm) works perfectly because most of the rice is covered and the liquid rises to the perfect level on the chicken. This means the rice doesn't dry out and the chicken stays moist. If your dish is much bigger consider cooking the 1st 20-30mins with foil on, just to ensure the rice doesn't dry out (more rice will be exposed).
c) Oil/Chicken Skin - I love keeping the skin on the chicken (there's nothing better than crispy chicken skin IMO). It does release a good bit of fat, which adds a good bit of flavour to the rice. However, because of this it's essential to not coat the chicken in oil (only a light oil spray before going in) and the same with the onion. If you pour in regular oil you run the risk of the rice coming out greasy. Also just make sure you drain away the oil of the sun dried tomato for the same reason.
d) Al Dente Rice - The rice may be slightly al dente once out of the oven, but after resting and fluffing it up, it should be perfectly cooked. Sometimes you might find the rice directly under the chicken is still a touch raw. If this is the case, just lift the chicken thighs and use a fork to mix up the rice underneath. Allow everything to rest for around 5-10mins before stirring in the fresh basil.
e) Salt - Different stocks will have varying levels of saltiness. I find general 1/2 tsp in with the rice is absolutely fine, but you could always start off with 1/4 tsp and then adjust once it's out of the oven.
f) Serving - This will feed 6 with a side salad. I highly recommend balsamic glaze and parmesan, both of which perfect the tomato and basil perfectly!
g) Leftovers - Allow to cool then tightly cover in the fridge (should be good for a couple of days, longer at your discretion). Reheat chicken in the oven at the same temp until piping hot through the centre. Microwave rice.
g) Calories - based on 1/6 of the whole recipe with no side salad.
Nutrition Information:
Amount Per Serving: Calories: 572