Hobo Foil Packets Recipe: A Convenient and Flavorful Outdoor Feast
If you’re seeking a hassle-free and delicious way to cook up a satisfying meal while enjoying the great outdoors, look no further than the Hobo Foil Packets recipe. These ingenious packets are a fantastic option for camping trips, picnics, or even a casual backyard cookout. In this article, we’ll guide you through the steps to create mouthwatering Hobo Foil Packets that are bursting with flavor and easy to prepare.
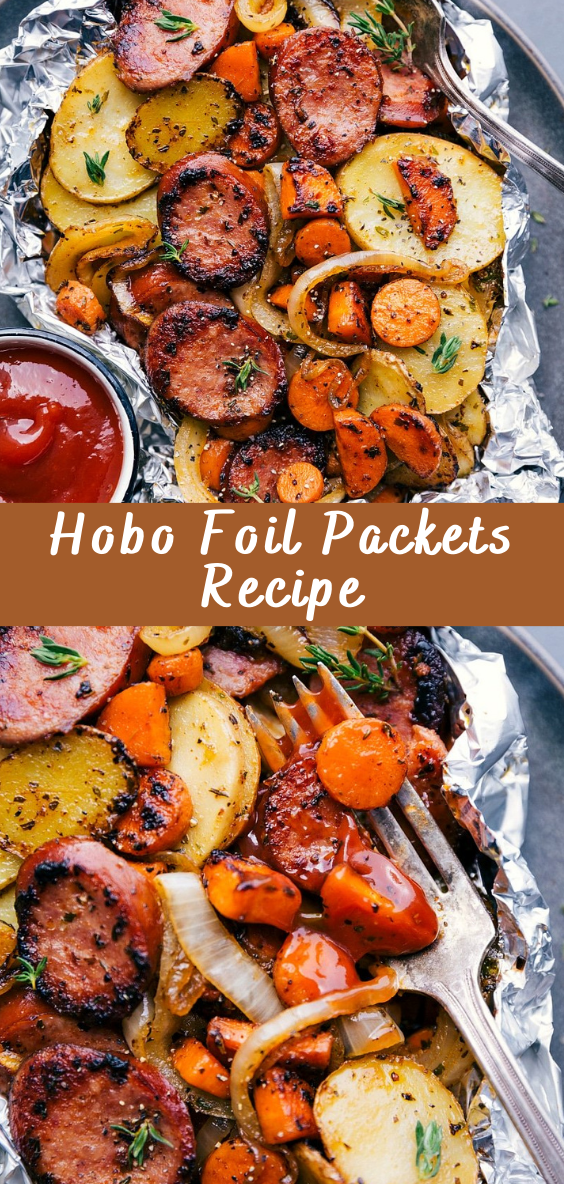
Table of Contents
- Introduction to Hobo Foil Packets
- Ingredients You’ll Need
- Choosing Your Protein
- Selecting the Veggies
- Adding Flavor with Seasonings
- Assembling the Foil Packets
- Cooking Methods: Grill or Campfire
- Unveiling Your Culinary Masterpiece
- Tips for Hobo Foil Packets
- Frequently Asked Questions (FAQs)
- Conclusion
Introduction to Hobo Foil Packets
Hobo Foil Packets, also known as tin foil dinners, offer a delightful and convenient way to prepare a variety of ingredients in a single packet. The beauty of this method lies in its simplicity—just layer your chosen proteins, vegetables, and seasonings in a piece of aluminum foil, seal it tightly, and let the flavors meld as they cook over an open flame or grill.
Ingredients You’ll Need
Prepare the following components to assemble your Hobo Foil Packets:
- Protein (chicken, beef, shrimp, sausage, or tofu)
- Assorted vegetables (potatoes, bell peppers, onions, zucchini)
- Olive oil or butter
- Garlic cloves
- Seasonings of your choice (thyme, rosemary, paprika, etc.)
- Salt and pepper
Choosing Your Protein
- Select your protein source, whether it’s chicken, beef, shrimp, sausage, or tofu.
- Cut the protein into bite-sized pieces for even cooking.
Selecting the Veggies
- Wash and chop your chosen vegetables into uniform pieces.
- Consider using vegetables that have similar cooking times.
Adding Flavor with Seasonings
- Mince garlic cloves and mix them with olive oil or melted butter.
- Add your preferred seasonings to the mixture to infuse the flavors.
Assembling the Foil Packets
- Lay out sheets of aluminum foil, large enough to hold the ingredients and be folded over.
- Place a portion of protein in the center of each foil sheet.
- Arrange a generous portion of chopped vegetables around the protein.
- Drizzle the garlic and oil/butter mixture over the ingredients.
- Season with your chosen seasonings, salt, and pepper.
Cooking Methods: Grill or Campfire
- For grilling, preheat the grill to medium-high heat.
- Place the foil packets directly on the grill grates.
- Cook for about 15-20 minutes, flipping once halfway through.
Unveiling Your Culinary Masterpiece
- Carefully remove the foil packets from the grill or campfire.
- Allow them to cool slightly before opening to avoid steam burns.
- Gently unfold the packets to reveal your perfectly cooked feast.
Tips for Hobo Foil Packets
- Customize Flavors: Experiment with different herbs, spices, and marinades.
- Double Layer: To prevent any leaks, consider using two layers of foil.
- Cooking Time: Adjust cooking time based on protein and veggie choices.
Frequently Asked Questions (FAQs)
1. Can I prepare Hobo Foil Packets in the oven?
Absolutely, bake them at 400°F (200°C) for approximately 25-30 minutes.
2. Can I use frozen protein and vegetables?
While fresh is recommended, you can use frozen ingredients, but thaw them first.
3. Are Hobo Foil Packets suitable for vegetarians?
Definitely! Opt for tofu or a variety of vegetables for a delightful vegetarian option.
4. Can I prepare the foil packets in advance?
Yes, you can assemble them ahead of time and store them in the refrigerator until ready to cook.
5. Can I reuse the foil packets?
It’s best to use fresh foil for each cooking session to ensure proper cooking and hygiene.
Conclusion
Hobo Foil Packets offer a blend of convenience, flavor, and creativity, making them a perfect choice for outdoor dining adventures. Whether you’re camping, grilling in your backyard, or having a picnic in the park, these packets allow you to savor a well-cooked meal without the fuss. So, gather your ingredients, embrace your inner campfire chef, and savor the deliciousness of Hobo Foil Packets in every savory bite.
Source: chelseasmessyapron.com
Cheesy Mozzarella Chicken Bake

If you're looking for a delicious, comforting meal that’s easy to prepare, look no further than Cheesy Mozzarella Chicken Bake. This dish combines tender chicken breasts, rich tomato sauce, and gooey melted mozzarella cheese, creating a mouth-watering dinner that’s perfect for any night of the week. Whether you're feeding a family or hosting a dinner party, this recipe is sure to impress.
Ingredients
- 4 large chicken breasts boneless skinless
- 2 tablespoons olive oil
- 1/2 teaspoon garlic powder
- Salt & pepper to taste
- 1.5 cups marinara sauce
- 1/2 cup freshly grated parmesan cheese
- 1 cup shredded mozzarella
Instructions
Preheat oven to 375F and move the rack to the middle position.
Season both sides of each piece of chicken with the garlic powder and salt & pepper.
Add the oil to a skillet over medium-high heat. Once the pan is hot, sear the chicken for 5 minutes/side. Add the chicken to a greased baking dish (I used a 9×13) once both sides are seared.
Pour the marinara sauce over the chicken and use a spoon to spread it evenly over and around the chicken.
Sprinkle the parmesan over the chicken breasts, and then do the same with the mozzarella.
Bake, uncovered, for 20 minutes. If your chicken breasts are on the smaller side, I suggest doing 15 minutes.
Broil the chicken for a few minutes or so until the cheese is lightly browned (watch it closely). Let the chicken rest for 5 minutes prior to serving (this will ensure it's juicy). Chicken is safe to eat at 165F.
Notes
- You can skip the step where you sear the chicken if you wish. Just place the raw chicken breasts in the baking dish, season them, and continue the recipe from step 4. I’d then cook the chicken for at least 30 minutes (or when a meat thermometer indicates it’s 165F in the thickest part).
- Timing on this recipe largely depends on the size of the chicken breasts, so I highly recommend using an instant read meat thermometer so you don’t under or overcook the chicken.
- If you have a large oven-safe skillet, feel free to use it and skip the baking dish.